UserGems & Groove Configuration with Gem-E Messaging
What is it?
While UserGems and Groove don't integrate directly, UserGems does directly integrate with Salesforce, which Groove sits on top of (e.g. all records updated within Salesforce are also updated in Groove). The UserGems <> Salesforce/Groove integration enables:
The sync of Contacts/Leads and Accounts between UserGems and Salesforce.
UserGems to automatically add Contacts directly to the right Flow to reduce the manual work for your reps and ensure timely followup.
Steps
1. Create Custom Fields in Salesforce to use in Groove
Create a custom field on the Lead and/or Contact objects in Salesforce for 'UG - Past Company'. If you're using Gem-E messaging, you'll also need to create custom fields for AI Subjects and AI Email Content generated by Gem-E to input as variables into flows.
To do this:
Within Salesforce, click the gear icon in the top right and choose "Setup"
From Setup, choose "Object Manager" and then search for the "Lead" or "Contact" object, depending on your setup
Click to "Fields & Relationships"
Click "New" and add new custom fields
Data Type: Text
Field label/name: UG - Past Company
Field length: 255
Make the field visible to all profiles
(Optional) Skip adding the Subject and Email Body fields to the page layout to avoid crowding the page
Save
Repeat the above for the fields listed in the table below
Note: It's important to create all Subject fields listed below, though you will notice that some are not referenced in the table in Step 3 below.
Label
Type
UG - Past Company
Text (255)
Gem-E Subject 1
Text (255)
Gem-E Subject 2
Text (255)
Gem-E Subject 3
Text (255)
Gem-E Subject 4
Text (255)
Gem-E Subject 5
Text (255)
Gem-E Subject 6
Text (255)
Gem-E Subject 7
Text (255)
Gem-E Email Body 1
Rich Text Area
Gem-E Email Body 2
Rich Text Area
Gem-E Email Body 3
Rich Text Area
Gem-E Email Body 4
Rich Text Area
Gem-E Email Body 5
Rich Text Area
Gem-E Email Body 6
Rich Text Area
Gem-E Email Body 7
Rich Text Area
Send the UserGems Team the API names of the fields you created
Search 'Gem-E' within the Fields & Relationships tab of the Lead or Contact object where you added the new fields. The API names of the fields appear here. Provide the API names to your UserGems CSE.
If you used the exact naming conventions in the table above, your list of fields should look like the below:
Gem_E_Subject_1__c
Gem_E_Subject_2__c
Gem_E_Subject_3__c
Gem_E_Subject_4__c
Gem_E_Subject_5__c
Gem_E_Subject_6__c
Gem_E_Subject_7__c
Gem_E_Email_Body_1__c
Gem_E_Email_Body_2__c
Gem_E_Email_Body_3__c
Gem_E_Email_Body_4_c
Gem_E_Email_Body_5__c
Gem_E_Email_Body_6__c
Gem_E_Email_Body_7__c
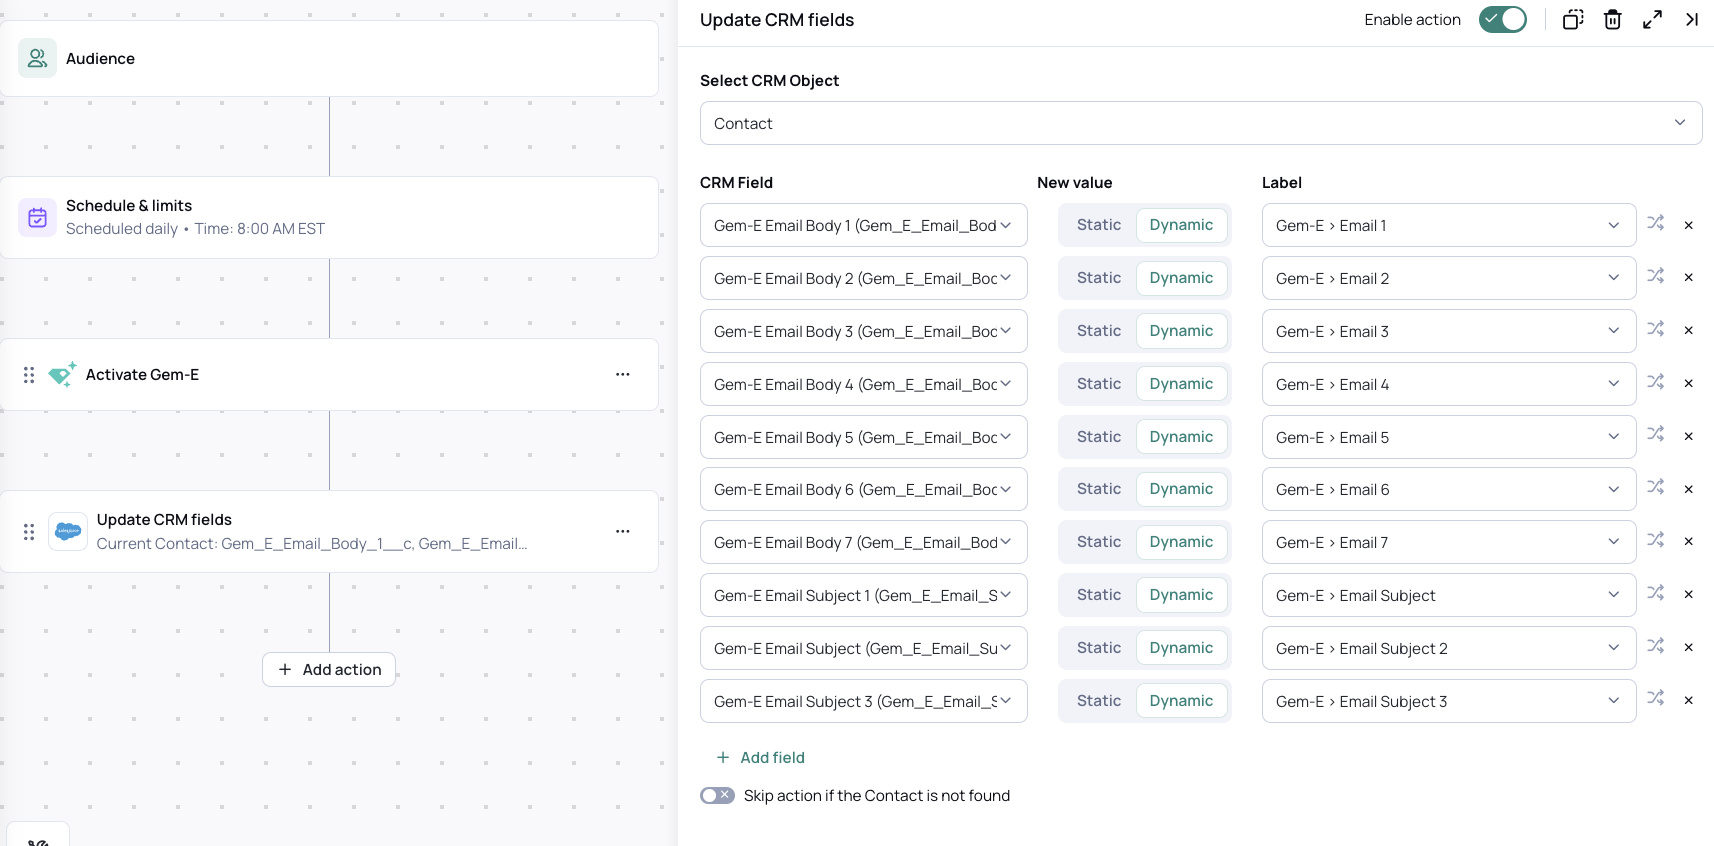
2. Add a Workflow Action to update CRM Fields
For campaigns/flows where you want to use Gem-E messaging, add a workflow action to Update CRM Fields.
In UserGems, navigate to Workflows and add a new workflow or edit an existing one.
In the Update CRM Fields action, select the object you’re updating (either contacts or leads, depending on how you’ve configured UserGems to create new records).
Add all 14 fields/properties under the CRM field section. (You can add more fields by clicking "+ Add Field.")
For each field row, select New Value = "Dynamic".
Map each CRM field to the dynamic Gem-E value by clicking the Label dropdown.
Your final setup should look something like this:
If everything looks correct, save the Workflow.
3. Create Groove Flow(s) Using Custom Variable Fields
Now, create a new Groove Flow using the custom variables created in Step 1 that will dynamically populate with Gem-E messaging when a prospect enters the flow.
It is a Groove best practice to have different Flows/input reports for Leads and Contacts
Example flow structures are included below:
IMPORTANT: Avoid using fully automated emails written with Gem-E through Groove - it doesn't support HTML for text formatting in automated email steps, so emails need to be thoroughly reviewed before sending to make sure they're properly spaced and formatted.
Co-pilot (High Touch) template for past champions:
Day
Action
Content
Day 1
Manual e-mail
Subject: {{custom variable}} that corresponds to Gem-E Subject 1
Body: {{custom variable}} that corresponds to Gem-E Body 1
Day 1
Call
Answer Brief:
Reference the email in Step 1 and the key signals it mentions. Name drop:
• Previous company
• Past champion
• Compelling signal like hiring/funding
Voicemail Example:
“Hey [First Name], it’s [Your Name] at [Company]. Just sent you a quick note — saw [Past Champion] just joined your team. Congrats on the hire! Thought it might be worth a quick chat if you’re exploring [Signal] right now.”
Day 1
LinkedIn Connection Request
-
Day 10
Call
Answer Brief:
Same structure as Day 1.
Voicemail Example:
“Hey [First Name], following up on my last note. If you or [Past Champion] think this might be worth revisiting, happy to chat or send more detail.”
Day 10
Manual e-mail (Reply)
Body: {{custom variable}} that corresponds to Gem-E Body 2
Day 13
Manual e-mail
(New Thread)
Subject: {{custom variable}} that corresponds to Gem-E Subject 3
Body: {{custom variable}} that corresponds to Gem-E Body 3
Day 13
Call
Answer Brief:
Same structure as Day 1.
Voicemail Example:
“Hi [First Name], just wanted to check in again in case you’re thinking about [Signal] in the near future. Let me know if helpful.”
Day 17
Manual e-mail (Reply)
Body: {{custom variable}} that corresponds to Gem-E Body 4
Day 21
Call
Answer Brief:
Same structure as Day 1.
Voicemail Example:
“Hey [First Name], [Your Name] again — figured I’d check back one last time. If you or someone on the team thinks this might be relevant now, I’m happy to share more.”
Day 21
Manual e-mail (Reply)
Body: {{custom variable}} that corresponds to Gem-E Body 5
Day 25
Manual e-mail
(New Thread)
Subject: {{custom variable}} that corresponds to Gem-E Subject 6
Body: {{custom variable}} that corresponds to Gem-E Body 6
Day 29
Call
Answer Brief:
Same structure as Day 1.
Voicemail Example:
“Hey [First Name], totally understand if this isn’t a fit right now. If it makes sense to revisit down the line, feel free to reach out anytime.”
Day 29
Manual e-mail
(New Thread)
Subject: {{custom variable}} that corresponds to Gem-E Subject 7
Body: {{custom variable}} that corresponds to Gem-E Body 7
Co-pilot (High Touch) template for everyone besides past champions:
Day
Action
Content
Day 1
Manual e-mail
Subject: {{custom variable}} that corresponds to Gem-E Subject 1 Body: {{custom variable}} that corresponds to Gem-E Body 1
Day 1
LinkedIn Connection Request
-
Day 2
Call
Answer Brief:
Reference the email in Step 1 and the key signals it mentions. Name drop:
• Previous company
• Past champion
• Compelling signal like hiring/funding
Voicemail Example:
“Hey [First Name], it’s [Your Name] at [Company]. Just sent you a quick note — saw [Past Champion] just joined your team. Congrats on the hire! Thought it might be worth a quick chat if you’re exploring [Signal] right now.”
Day 5
Manual e-mail
(Reply)
Body: {{custom variable}} that corresponds to Gem-E Body 2
Day 6
LinkedIn message
-
Day 7
Call
Answer Brief:
Same structure as Day 1.
Voicemail Example:
“Hey [First Name], following up on my last note. If you or [Past Champion] think this might be worth revisiting, happy to chat or send more detail.”
Day 10
Manual e-mail
(New Thread)
Subject: {{custom variable}} that corresponds to Gem-E Subject 3
Body: {{custom variable}} that corresponds to Gem-E Body 3
Day 13
Call
Answer Brief:
Same structure as Day 1.
Voicemail Example:
“Hi [First Name], just wanted to check in again in case you’re thinking about [Signal] in the near future. Let me know if helpful.”
Day 16
Manual e-mail
(Reply)
Body: {{custom variable}} that corresponds to Gem-E Body 4
Day 16
LinkedIn message
-
Day 19
Manual e-mail
Subject: {{custom variable}} that corresponds to Gem-E Subject 5
Body: {{custom variable}} that corresponds to Gem-E Body 5
Day 19
Call
Answer Brief:
Same structure as Day 1.
Voicemail Example:
“Hey [First Name], [Your Name] again — figured I’d check back one last time. If you or someone on the team thinks this might be relevant now, I’m happy to share more.”
Day 22
Manual e-mail
(New Thread)
Subject: {{custom variable}} that corresponds to Gem-E Subject 6
Body: {{custom variable}} that corresponds to Gem-E Body 6
Day 25
Manual e-mail
(New Thread)
Subject: {{custom variable}} that corresponds to Gem-E Subject 7
Body: {{custom variable}} that corresponds to Gem-E Body 7
Day 25
Call
Answer Brief:
Same structure as Day 1.
Voicemail Example:
“Hey [First Name], totally understand if this isn’t a fit right now. If it makes sense to revisit down the line, feel free to reach out anytime.”
Autopilot (low touch) template:
Day
Action
Content
Day 1
Manual Email (New Thread)
Subject: {{custom variable}} that corresponds to Gem-E Subject 1
Body: {{custom variable}} that corresponds to Gem-E Body 1
Day 6
Manual Email (Reply)
Body: {{custom variable}} that corresponds to Gem-E Body 2
Day 11
Manual Email (New Thread)
Subject: {{custom variable}} that corresponds to Gem-E Subject 3
Body: {{custom variable}} that corresponds to Gem-E Body 3
Day 15
Manual Email (Reply)
Body: {{custom variable}} that corresponds to Gem-E Body 4
Day 19
Manual Email (Reply)
Body: {{custom variable}} that corresponds to Gem-E Body 5
Day 24
Manual Email (New Thread)
Subject: {{custom variable}} that corresponds to Gem-E Subject 6
Body: {{custom variable}} that corresponds to Gem-E Body 6
Day 29
Manual Email (Reply)
Body: {{custom variable}} that corresponds to Gem-E Body 7
4. Enroll UserGems Leads/Contacts in Flow(s) via Report Import
There are several ways to add a lead or contact to a Flow in Groove (see this article). We'll focus on the 'Report Import' option in the below instructions.
Once you have your flow created, simply navigate to it and find the “Automated Actions” tab
Select Import via: Salesforce Report
Locate the folder/report that you would like to use for sending contacts to this Flow
Now, every 3 hours, any new entries to the report will automatically be added to this flow!
After adding the custom UserGems variables and making any additional (optional) customizations to your flow(s), you're ready to activate them!
Additional Considerations
Configure your reports/flows so that any given prospect only enrolls in one flow at a time
Can utilize "Import Rules" along with field updates/actions
Be mindful of who will be the "sender" for a given flow. Adding user lookup or owner fields to the source report will allow you to dynamically set the "sender" based on who the prospect is.