If you’re not using Outreach or Salesloft—where UserGems has direct integrations—but still want to use Gem-E messaging in your Sales Engagement Platform (SEP), don’t worry! It only requires one extra step to set up.
Instead of pushing Gem-E messaging directly into your SEP, we’ll push it to the lead/contact level in your CRM. From there, you can map these fields to your SEP and use them as variables/merge fields in your Gem-E sequence.
1. Create Fields/Properties in Your CRM
Create the following fields/properties on your contacts/leads. It's important to create all Subject fields listed below, though you will notice that some are not referenced in the table in Step 5 below.
Note: These fields do not have to be displayed on page layouts - they are only meant to store information for use in cadences. It can be helpful to display them for troubleshooting and preview purposes, but they are large fields that can clutter the layout for users.
Label
Type
Gem-E Subject 1
Text (255)
Gem-E Subject 2
Text (255)
Gem-E Subject 3
Text (255)
Gem-E Subject 4
Text (255)
Gem-E Subject 5
Text (255)
Gem-E Subject 6
Text (255)
Gem-E Subject 7
Text (255)
Gem-E Email Body 1
Rich Text Area
Gem-E Email Body 2
Rich Text Area
Gem-E Email Body 3
Rich Text Area
Gem-E Email Body 4
Rich Text Area
Gem-E Email Body 5
Rich Text Area
Gem-E Email Body 6
Rich Text Area
Gem-E Email Body 7
Rich Text Area
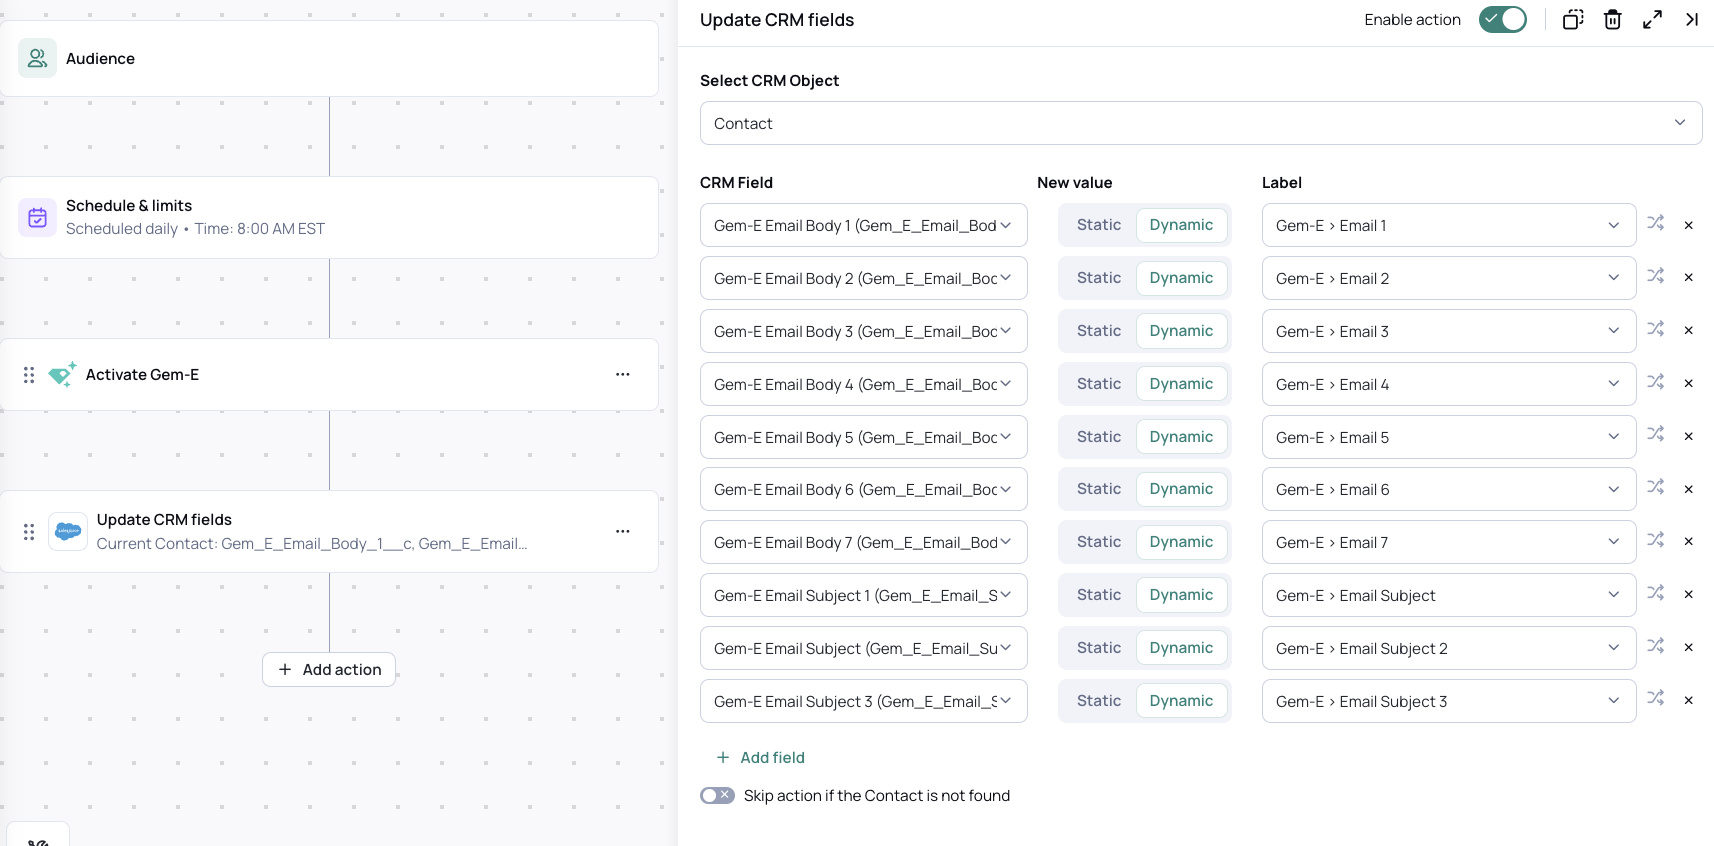
2. Add a Workflow Action to Update CRM Fields
For campaigns where you want to use Gem-E messaging, add a workflow action to Update CRM Fields.
In the Update CRM Fields action, select the object you’re updating (either contacts or leads, depending on how you’ve configured UserGems to create new records).
Add all Gem-E fields/properties under the CRM field section. (You can add more fields by clicking "+ Add Field.")
For each field row, select New Value = "Dynamic".
Map each CRM field to the dynamic Gem-E value by clicking the Label dropdown.
Your final setup should look something like this:
If everything looks correct, save the action.
3. Map CRM Fields to SEP
Next, map the Gem-E fields from your CRM as custom variable fields in your SEP.
If you’re using HubSpot or Salesforce for sequences, you can skip this step.
4. Create Sequences/Cadences Using Custom Variable Fields
Now, create a new sequence/cadence using custom variables that will dynamically populate with Gem-E messaging when a prospect enters the sequence.
Example sequence structures are included below:
Co-pilot (High Touch) template for past champions:
Day
Action
Content
Day 1
Manual e-mail
Subject: {{custom variable}} that corresponds to Gem-E Subject 1
Body: {{custom variable}} that corresponds to Gem-E Body 1
Day 1
Call
Answer Brief:
Reference the email in Step 1 and the key signals it mentions. Name drop:
• Previous company
• Past champion
• Compelling signal like hiring/funding
Voicemail Example:
“Hey [First Name], it’s [Your Name] at [Company]. Just sent you a quick note — saw [Past Champion] just joined your team. Congrats on the hire! Thought it might be worth a quick chat if you’re exploring [Signal] right now.”
Day 1
LinkedIn Connection Request
-
Day 10
Call
Answer Brief:
Same structure as Day 1.
Voicemail Example:
“Hey [First Name], following up on my last note. If you or [Past Champion] think this might be worth revisiting, happy to chat or send more detail.”
Day 10
Automated e-mail (Reply)
Body: {{custom variable}} that corresponds to Gem-E Body 2
Day 13
Automated e-mail
(New Thread)
Subject: {{custom variable}} that corresponds to Gem-E Subject 3
Body: {{custom variable}} that corresponds to Gem-E Body 3
Day 13
Call
Answer Brief:
Same structure as Day 1.
Voicemail Example:
“Hi [First Name], just wanted to check in again in case you’re thinking about [Signal] in the near future. Let me know if helpful.”
Day 17
Automated e-mail (Reply)
Body: {{custom variable}} that corresponds to Gem-E Body 4
Day 21
Call
Answer Brief:
Same structure as Day 1.
Voicemail Example:
“Hey [First Name], [Your Name] again — figured I’d check back one last time. If you or someone on the team thinks this might be relevant now, I’m happy to share more.”
Day 21
Automated e-mail (Reply)
Body: {{custom variable}} that corresponds to Gem-E Body 5
Day 25
Automated e-mail
(New Thread)
Subject: {{custom variable}} that corresponds to Gem-E Subject 6
Body: {{custom variable}} that corresponds to Gem-E Body 6
Day 29
Call
Answer Brief:
Same structure as Day 1.
Voicemail Example:
“Hey [First Name], totally understand if this isn’t a fit right now. If it makes sense to revisit down the line, feel free to reach out anytime.”
Day 29
Automated e-mail
(New Thread)
Subject: {{custom variable}} that corresponds to Gem-E Subject 7
Body: {{custom variable}} that corresponds to Gem-E Body 7
Co-pilot (High Touch) template for everyone besides past champions:
Day
Action
Content
Day 1
Automated e-mail
Subject: {{custom variable}} that corresponds to Gem-E Subject 1 Body: {{custom variable}} that corresponds to Gem-E Body 1
Day 1
LinkedIn Connection Request
-
Day 2
Call
Answer Brief:
Reference the email in Step 1 and the key signals it mentions. Name drop:
• Previous company
• Past champion
• Compelling signal like hiring/funding
Voicemail Example:
“Hey [First Name], it’s [Your Name] at [Company]. Just sent you a quick note — saw [Past Champion] just joined your team. Congrats on the hire! Thought it might be worth a quick chat if you’re exploring [Signal] right now.”
Day 5
Automated e-mail
(Reply)
Body: {{custom variable}} that corresponds to Gem-E Body 2
Day 6
LinkedIn message
-
Day 7
Call
Answer Brief:
Same structure as Day 1.
Voicemail Example:
“Hey [First Name], following up on my last note. If you or [Past Champion] think this might be worth revisiting, happy to chat or send more detail.”
Day 10
Automated e-mail
(New Thread)
Subject: {{custom variable}} that corresponds to Gem-E Subject 3
Body: {{custom variable}} that corresponds to Gem-E Body 3
Day 13
Call
Answer Brief:
Same structure as Day 1.
Voicemail Example:
“Hi [First Name], just wanted to check in again in case you’re thinking about [Signal] in the near future. Let me know if helpful.”
Day 16
Automated e-mail
(Reply)
Body: {{custom variable}} that corresponds to Gem-E Body 4
Day 16
LinkedIn message
-
Day 19
Automated e-mail
Subject: {{custom variable}} that corresponds to Gem-E Subject 5
Body: {{custom variable}} that corresponds to Gem-E Body 5
Day 19
Call
Answer Brief:
Same structure as Day 1.
Voicemail Example:
“Hey [First Name], [Your Name] again — figured I’d check back one last time. If you or someone on the team thinks this might be relevant now, I’m happy to share more.”
Day 22
Automated e-mail
(New Thread)
Subject: {{custom variable}} that corresponds to Gem-E Subject 6
Body: {{custom variable}} that corresponds to Gem-E Body 6
Day 25
Automated e-mail
(New Thread)
Subject: {{custom variable}} that corresponds to Gem-E Subject 7
Body: {{custom variable}} that corresponds to Gem-E Body 7
Day 25
Call
Answer Brief:
Same structure as Day 1.
Voicemail Example:
“Hey [First Name], totally understand if this isn’t a fit right now. If it makes sense to revisit down the line, feel free to reach out anytime.”
Autopilot (low touch) template:
Day
Action
Content
Day 1
Automatic Email (New Thread)
Subject: {{custom variable}} that corresponds to Gem-E Subject 1
Body: {{custom variable}} that corresponds to Gem-E Body 1
Day 6
Automatic Email (Reply)
Body: {{custom variable}} that corresponds to Gem-E Body 2
Day 11
Automatic Email (New Thread)
Subject: {{custom variable}} that corresponds to Gem-E Subject 3
Body: {{custom variable}} that corresponds to Gem-E Body 3
Day 15
Automatic Email (Reply)
Body: {{custom variable}} that corresponds to Gem-E Body 4
Day 19
Automatic Email (Reply)
Body: {{custom variable}} that corresponds to Gem-E Body 5
Day 24
Automatic Email (New Thread)
Subject: {{custom variable}} that corresponds to Gem-E Subject 6
Body: {{custom variable}} that corresponds to Gem-E Body 6
Day 29
Automatic Email (Reply)
Body: {{custom variable}} that corresponds to Gem-E Body 7
5. Set Up a Trigger to Add Contacts to the Sequence
Each SEP handles workflows/triggers differently, but in general, you need to create a trigger that:
IF {{Gem-E Email Body1}} is not blank,
THENadd the prospect to the Gem-E sequence you just created.
If you’re using multiple Gem-E sequences (e.g., different sequences for different campaigns), you may need to add additional criteria to your UserGems workflow.
For example, you could set the trigger to:
{{Gem-E Email Body 1}} is not blank AND Campaign = UserGems Account w/ Funding Swarm.
Instead of using {{Gem-E Email Body 1}} exactly, like we show above, use the custom variable you created in Step 1 that corresponds to Gem-E Email Body 1.
If you need assistance with this step, reach out to your UserGems rep.