
While UserGems and Instantly don't integrate directly, UserGems Workflows can include a Webhook Action that will allow you to push Gem-E written emails over to Instantly for Leads/Contacts.
Steps
The steps below assume that you have created an Instantly account or that UserGems has created one on your behalf. If you're a UserGems customer and you aren't sure whether you have an Instantly account or if one can be created for you as part of your package, contact your CSE.
1. Set up Email Accounts (outside of Instantly)
- Create email inboxes using Google Workspace or your email provider
- We suggest you use a subdomain of your main domain or a different top level (eg .net)
2. Connect Email Accounts in Instantly
While logged in to Instantly, navigate to Email Accounts and add all of the inboxes you configured in Step 1
Need more help? Review Instantly's documentation on connecting email accounts to Instantly.
Tip: here at UserGems, we started with 3 inboxes for each of the sales team members who send cold outbound emails.
3. Warm Up Mailboxes within Instantly
For each mailbox configured in Instantly, you can configure Email warmup. We recommend warming up brand new inboxes that have never been used for 2 weeks. Warming up an inbox means that it will slowly start sending and emails - mimicking human conversations - so Google will see the mailbox as active, which improves the deliverability of cold outbound emails.

Need more help? Review Instantly's documentation on warmup settings or learn how warm-up works and why it's important.
4. Create Instantly Campaign & Sequence
Create an Instantly Campaign and then a sequence by following the steps below.
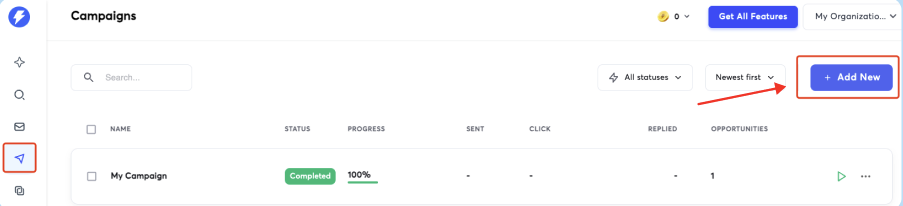
- Navigate to the Campaigns dashboard.
- Click on the +Add New button in the top right.
- Type in the name of your campaign (example: [Team member name] [Sequence name] like "Courtney's Past Champions")
Tip: If multiple sales team members will be sending emails out of Instantly, you'll need a separate Campaign per team member. At UserGems, we build and configure one campaign, then duplicate for each member of our outbound team. More on this in Step 4 below.
- Click on the blue CONTINUE button to move to the next step.
- Click over to the Options tab within the Campaign. The options below reflect the best practices that we have implemented at UserGems; you can tweak these if you feel confident in doing so.
- Accounts to use: select the email account(s) associated with the sales rep team member that this campaign is for
- Stop sending emails on reply: Enabled
- Open Tracking: Disabled
- Daily Limit: we use the default setting, 200
- Under Show Advanced Options, the only thing we strongly recommend checking is "Insert Unsubscribe Link in Header."
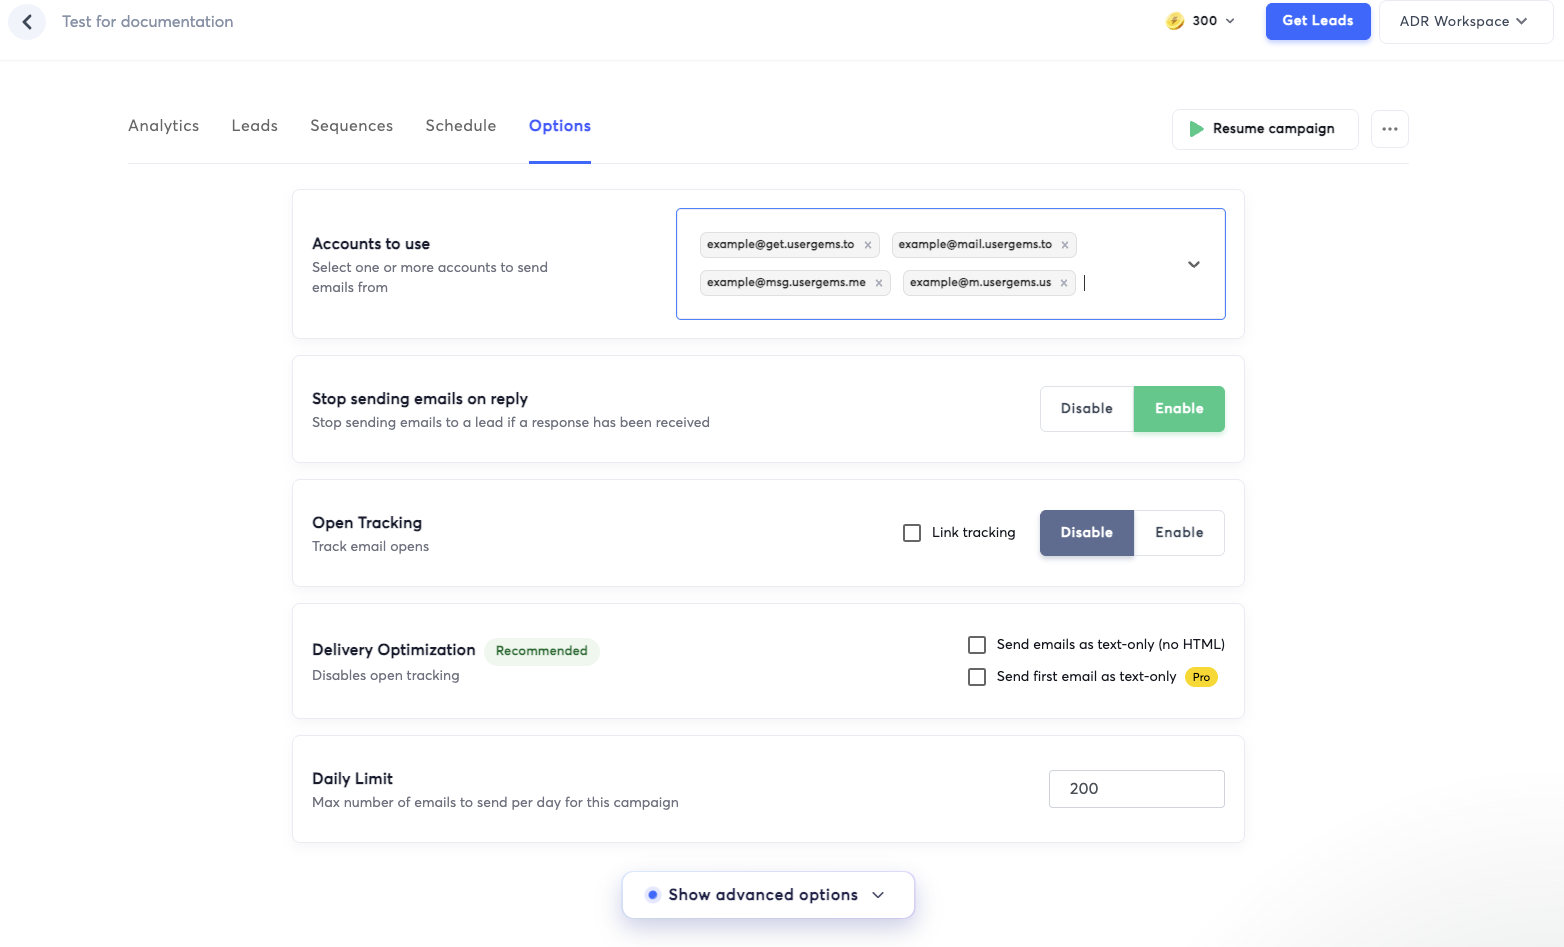

- Save the options you've configured so far
- Navigate to the Leads tab within the Campaign
- We recommend uploading this sample CSV, as it makes it much easier to configure the sequence in the next step
- Click Add Leads
- Map all fields as shown below, selecting Custom Variable next to every Subject and Body field, then click Upload All


- You will be sent to the Sequences tab automatically after uploading Leads
- Configure your sequence using the desired number of steps (sequence template below)
- In each step, add a subject variable and a body variable, the signature, and (strongly recommended) an unsubscribe link
- Make sure to Save at the end of each step's configuration
- Add the desired number of days between steps
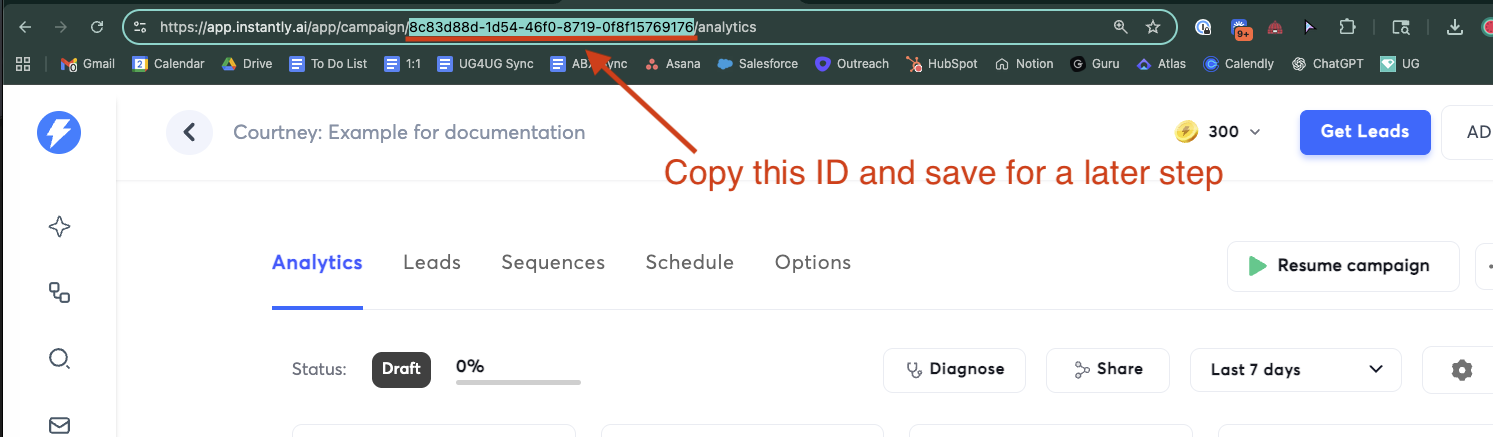
- Your Sequence and Campaign are now configured.
- Now that you've saved, click back into the campaign and copy the ID from the URL. Save this off to the side; we use a Google sheet like this
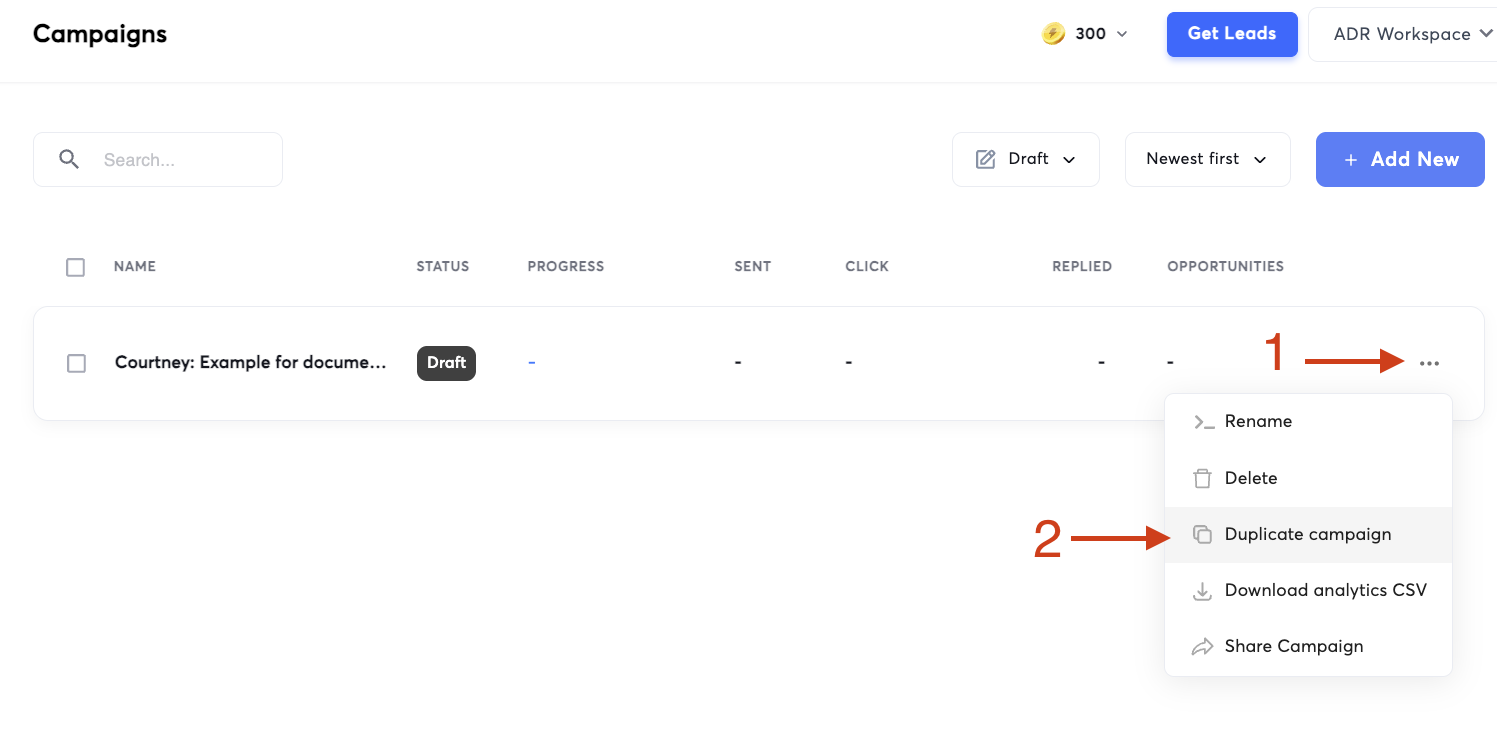
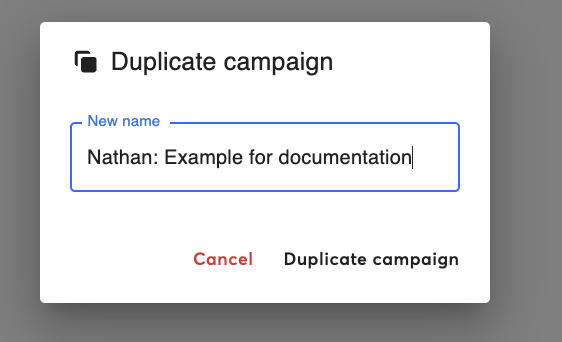
- If applicable, duplicate out the campaign for other team members by clicking the Three dots and then Duplicate campaign.
- Name the new campaign accordingly (we include the team member's name)
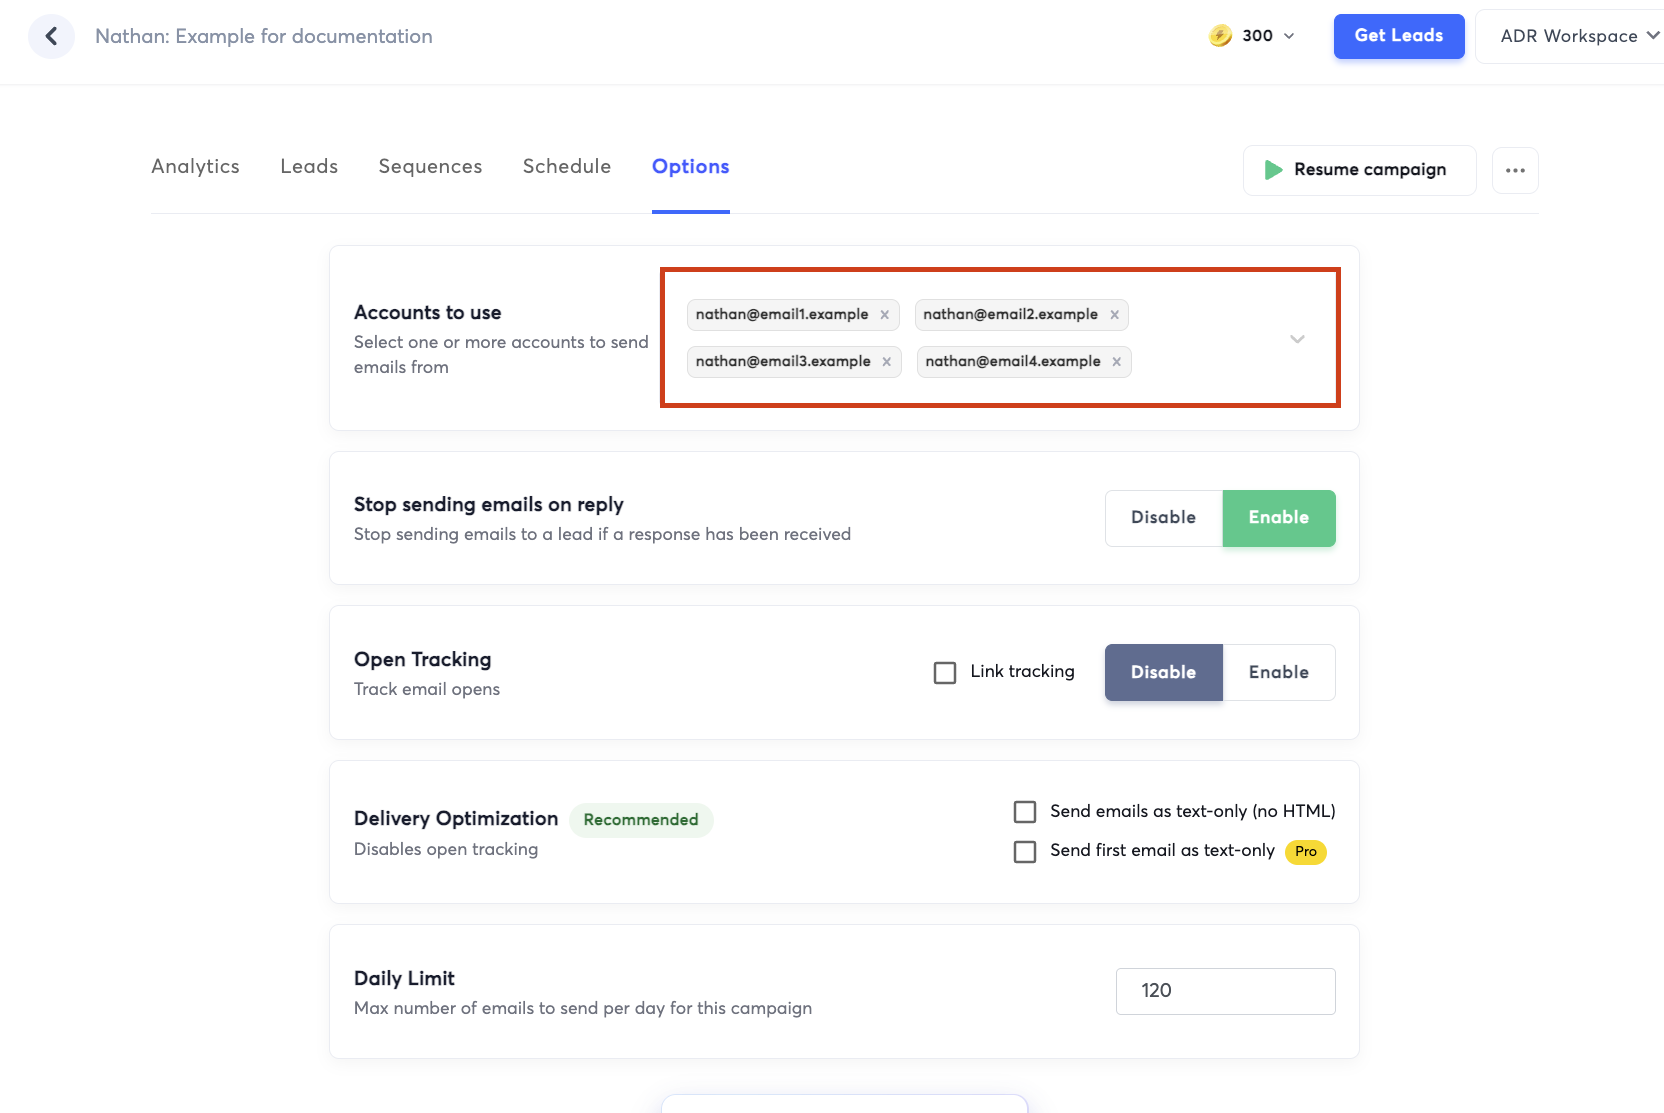
- Click over to the Options tab and select the mailboxes for that specific team member next to Accounts to use
- Review to make sure other customizations made to Options carried over, then Save
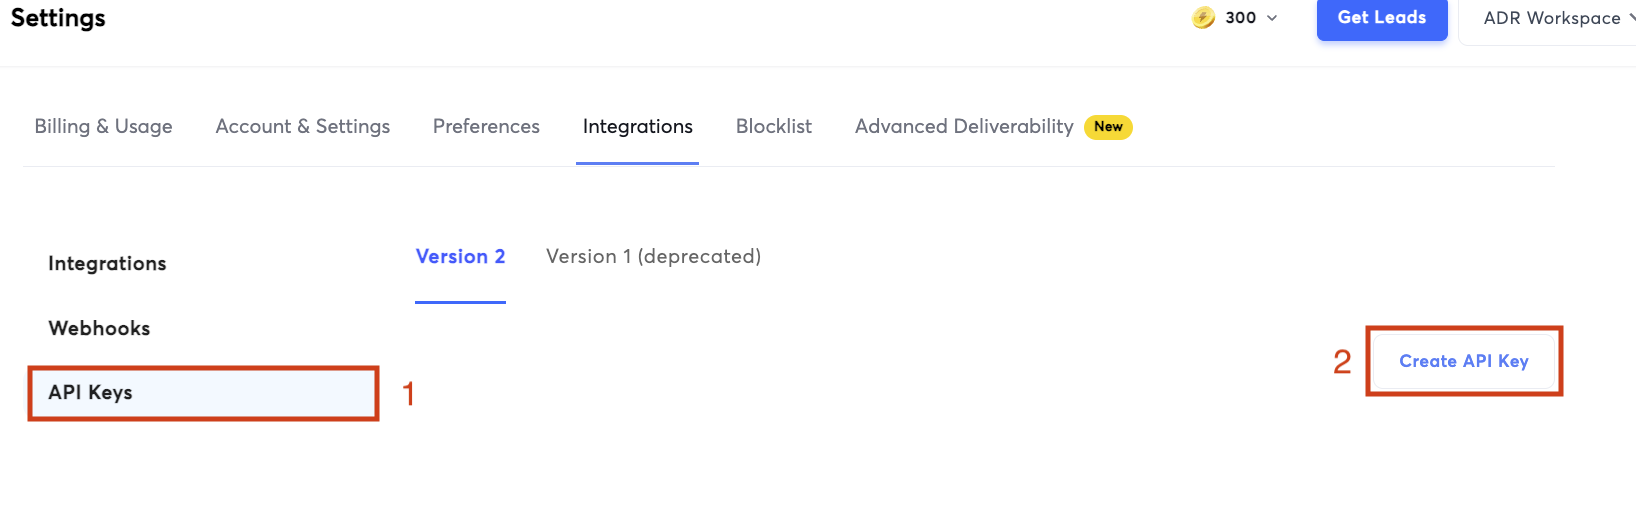
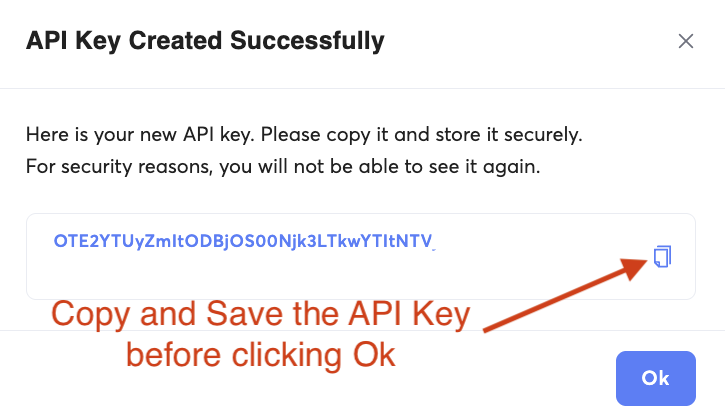
5. Get your API Key from Instantly
- In Instantly, navigate to the Integrations page and click API Keys
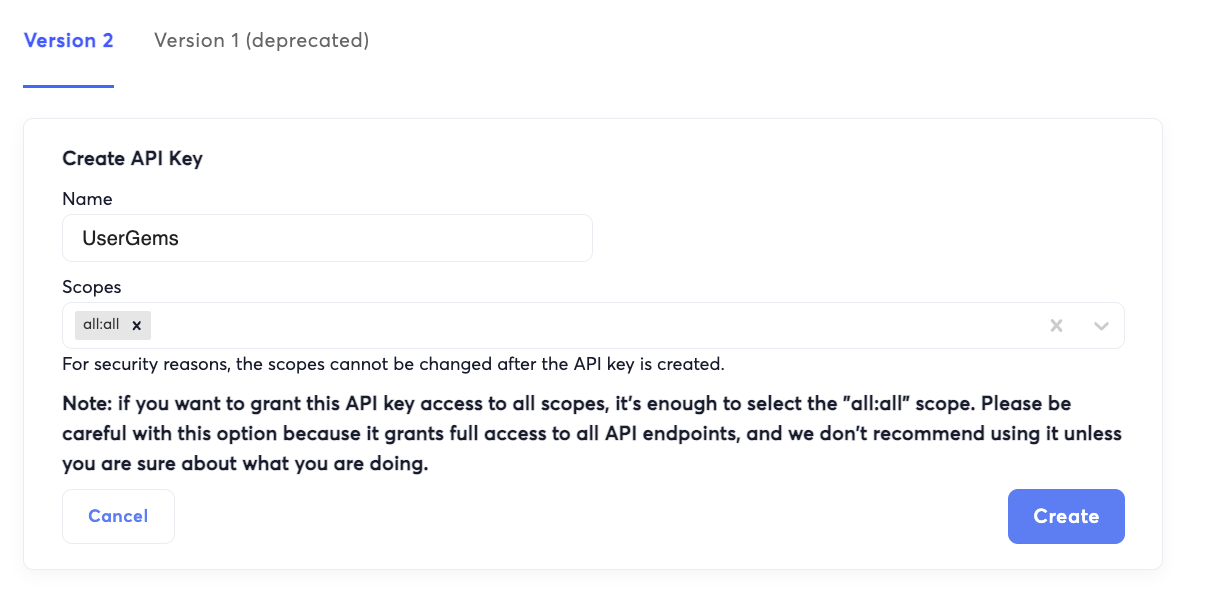
- Name your API Key and select Scopes all:all, then click Create
- Copy and Save the API key as you won't be able to see it again after clicking Ok
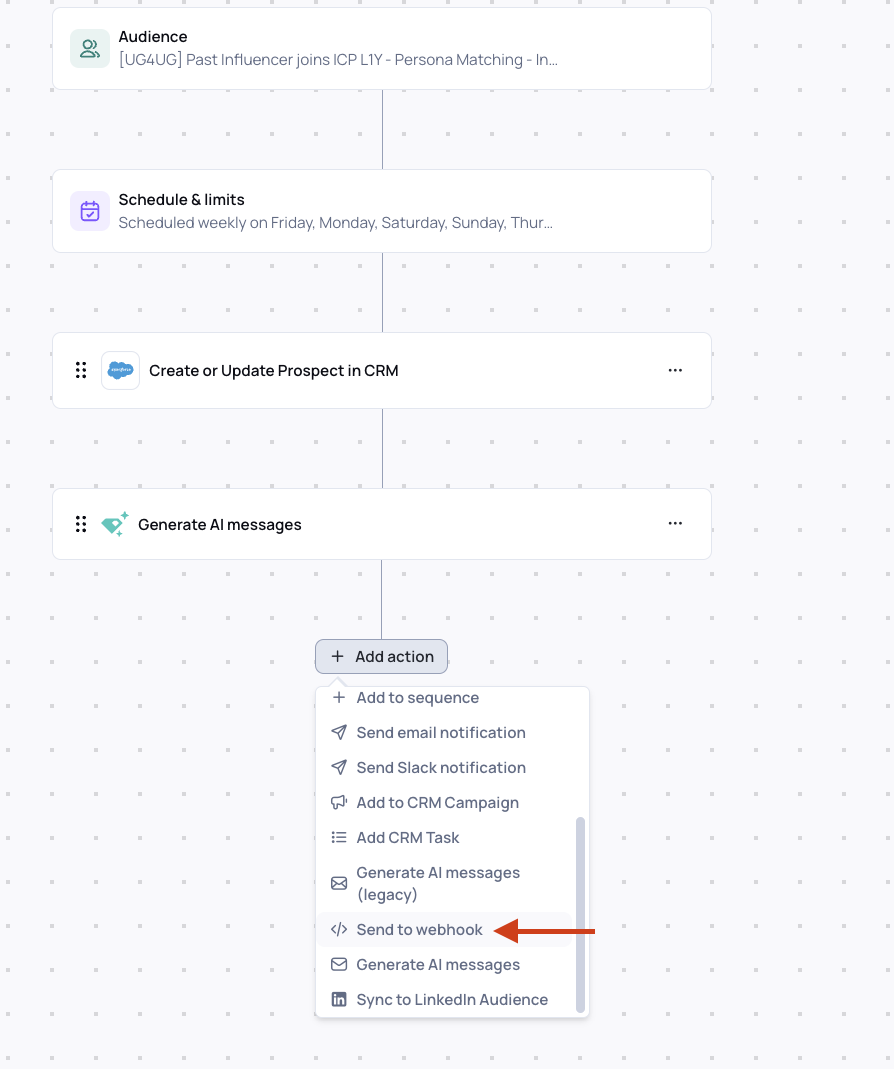
6. Add a Webhook Action to your UserGems Workflow
- Now navigate to UserGems and open the workflow you plan to use to send Prospects to Instantly
- If there isn't a Send to webhook action already, add one
- Click in to the Webhook action and toggle Action On in the top right to enable it
- Webhook URL: https://api.instantly.ai/api/v2/leads
- Webhook Method: POST
- Webhook Headers:
- Key: Authorization / Value: Bearer APIKEY (use your unique API key here)
- Key: Content-Type / Value: application/json
- Use the instructions provided here to copy and personalize the webhook payload, then paste it into the Webhook Payload text area
IMPORTANT! Leave the word Bearer in the Authorization Value box before you paste your API key. It will look something like Bearer 47Aagkha130gajgkah843ahrh01487

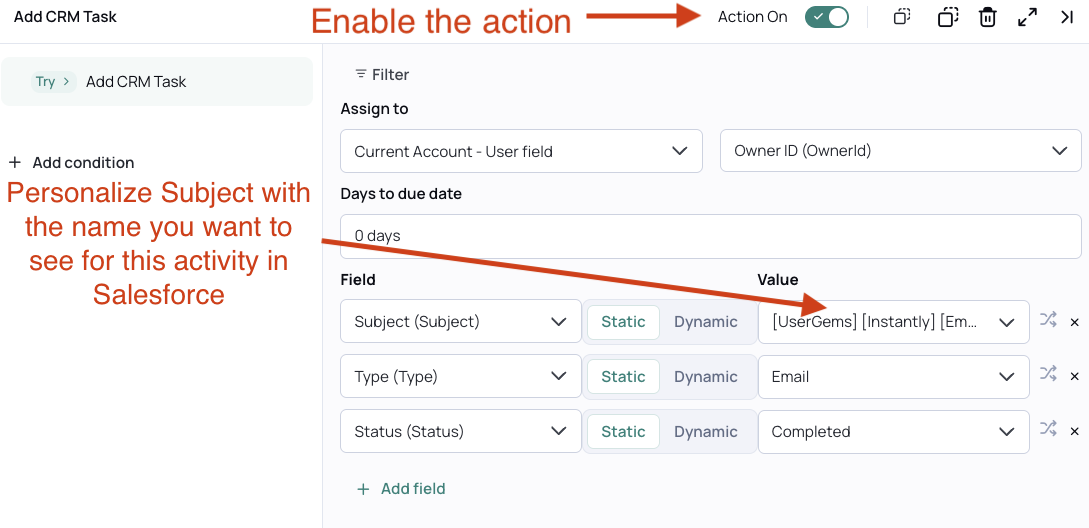
- Optionally, add an action to add a CRM Task to Salesforce, which will log an activity on the associated lead/contact when this workflow runs
- Assign to: Current Account - User field > select the user field of the person who this activity should link to (example: Owner ID)
- Days to due date: 0 days
- Fields:
- Subject (Subject) > Static > [UserGems] [Instantly] [Email] [Out]
- Type (Type) > Static > Email
- Status (Status) > Static > Completed
- Save changes in the workflow
7. Test and Activate UserGems Workflow & Instantly Campaign
It is strongly recommended to test your workflow before Activating.
- Push a few test records through the UserGems Workflow as shown in the GIF below
- Once the Workflow has finished running, navigate back to Instantly and open up the workflow, then click into the Leads tab
- Review the fields you see for a Lead there; you're looking for their name, email, and subject/body varialbes to be populated
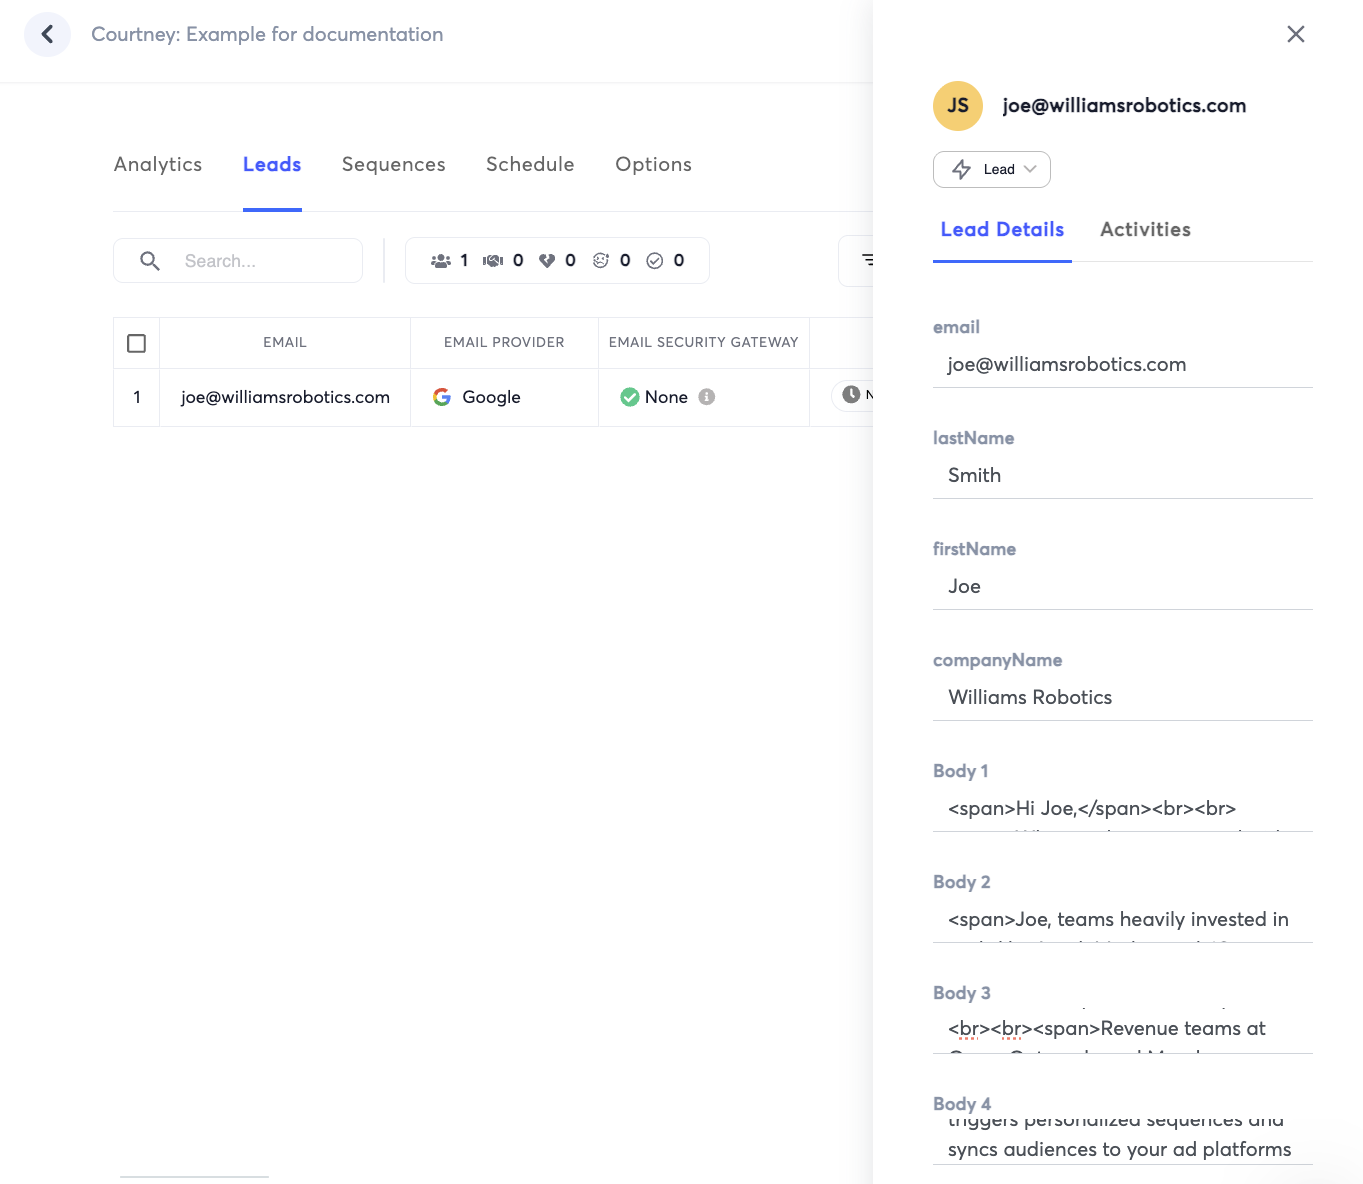
It's normal to see html tags like < span > and < br > in these emails; they'll appear properly formatted when Instantly sends the email.
- Once you've confirmed that the "Leads" in Instantly are populated, click Resume Campaign in the top right and your Campaign is now active!
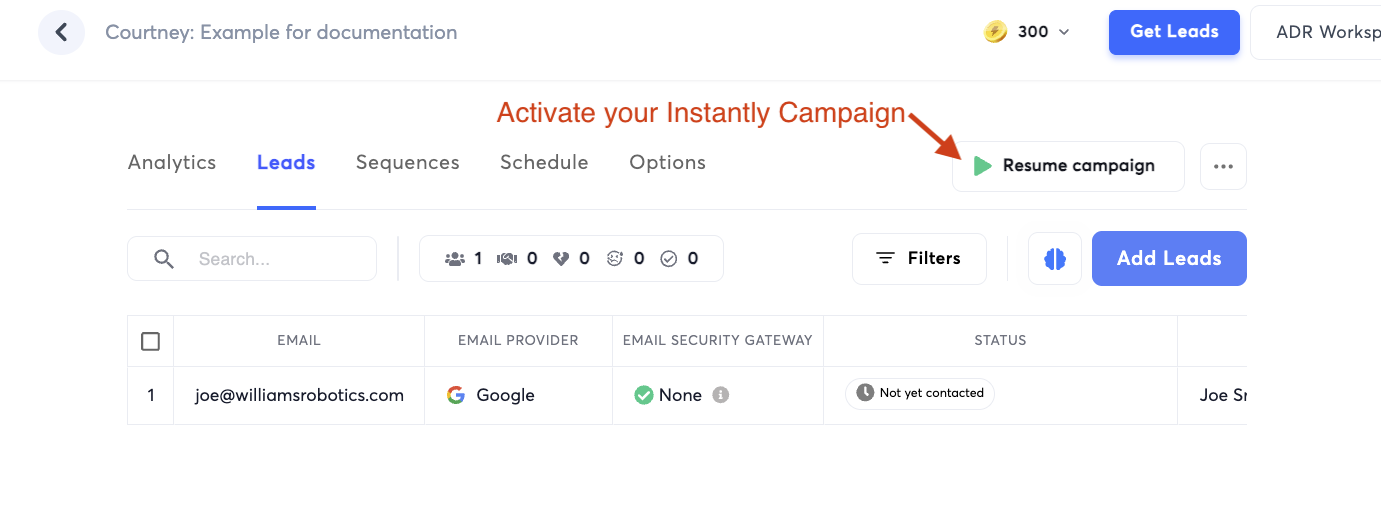
- Finally, activate your UserGems Workflow
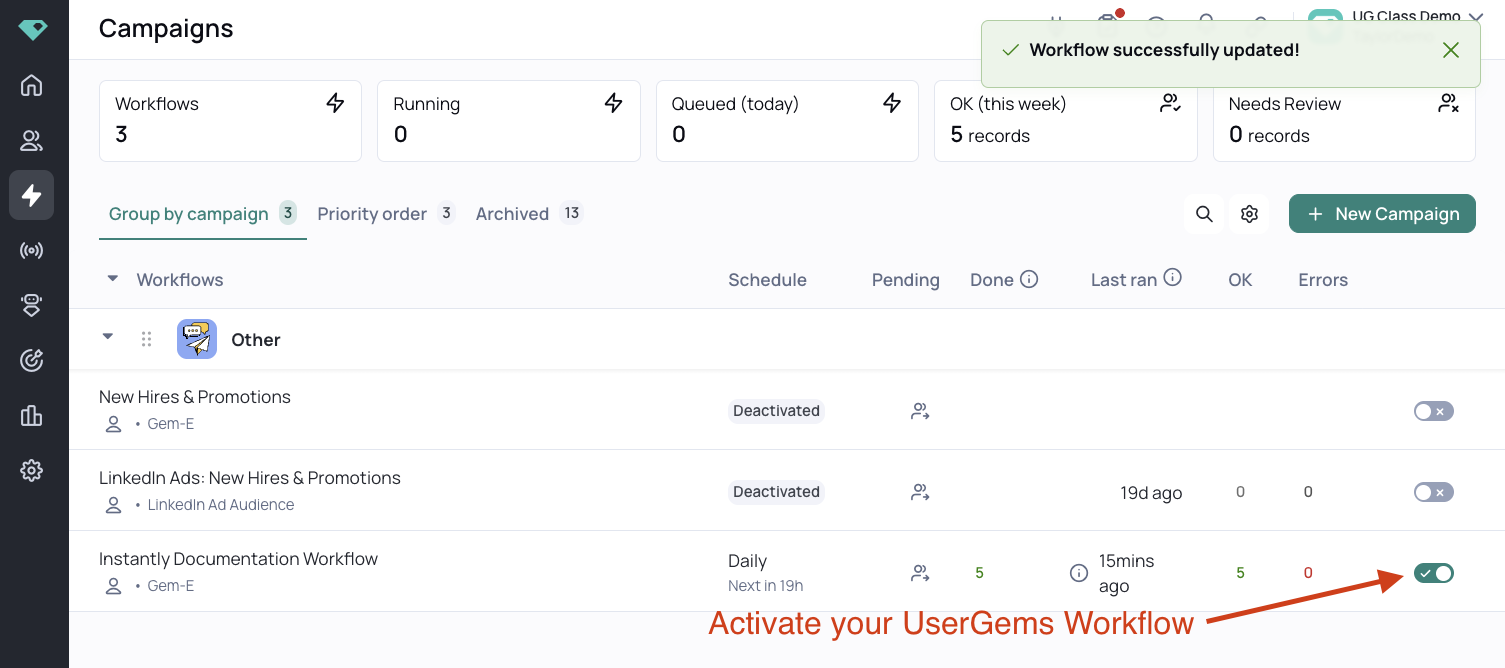
As the workflow runs, Leads will be added in Instantly and emails will automatically send.