

lemlist is a sales engagement and cold outreach platform used to automate and personalize prospecting campaigns across email, LinkedIn, calls, and more.
While UserGems and lemlist don't integrate directly, UserGems Campaigns can include a Webhook Action that pushes Gem-E written emails over to lemlist for Leads/Contacts. You can also integrate lemlist with your CRM for activity logging purposes.
How the pieces fit together: you build a sequence in lemlist with empty placeholder variables for the Gem-E copy. A UserGems Campaign then calls the lemlist API once per prospect, creating that person as a lead in the lemlist campaign with their Gem-E subjects and bodies attached as variable values. lemlist sends; your CRM logs the activity.
Before you start, you'll need:
- A paid lemlist account. Pick your plan based on your team's outbounding needs. Multi-channel or above is recommended, but any lemlist plan works with UserGems, including Email only.
- Admin access in lemlist (to generate an API key) and edit access to the UserGems Campaign you want to connect.
- Roughly a month of lead time if you're standing up new domains and mailboxes, see Steps 1–3 below.
Steps
1. Purchase domains + mailboxes
Create the email inboxes you'll send from using Google Workspace or your email provider.
- lemlist suggests you use a subdomain of your main domain (eg. go.yourcompany.com) or a different top level domain (eg. .net), so cold outbound never puts your primary domain's reputation at risk - see this article about choosing a subdomain vs separate domain.
- this article walks you through how to buy a domain and email for lemlist, and this one shows how to connect an external domain to lemlist
Here at UserGems, we started with 3 inboxes for each ADR sender.
2. Complete your technical setup within lemlist
Next, follow the steps in this article to complete your technical setup within lemlist including:
- Connecting your email provider
- Setting up email signatures
- Configuring DNS records — SPF, DKIM, DMARC, MX, and a custom tracking domain
3. Warm Up Mailboxes using lemwarm
lemwarm is an email warm-up tool built into lemlist that helps improve deliverability so your emails land in the inbox by gradually building your sender reputation.
Follow the steps in this lemlist article to set up lemwarm and start warming your inboxes.
How long to warm: lemlist's guidance is roughly one month, and they recommend you don't run outreach campaigns during that window. Start outbound only once all three are true:
- Your deliverability score is 90+
- lemwarm is showing no spam placement
- Your sending volume has been stable at your target level for at least two weeks
Ramping volume: lemlist suggests Week 1 at 10–15 emails/day, Week 2 at 20–30/day, then stepping up gradually. Once you're at steady state, they recommend a total of 60–70 emails per day per mailbox, counting lemlist sends and lemwarm together.
After mailboxes are warm, keep warming active to help maintain and improve your sender reputation and reduce the chance of deliverability issues.
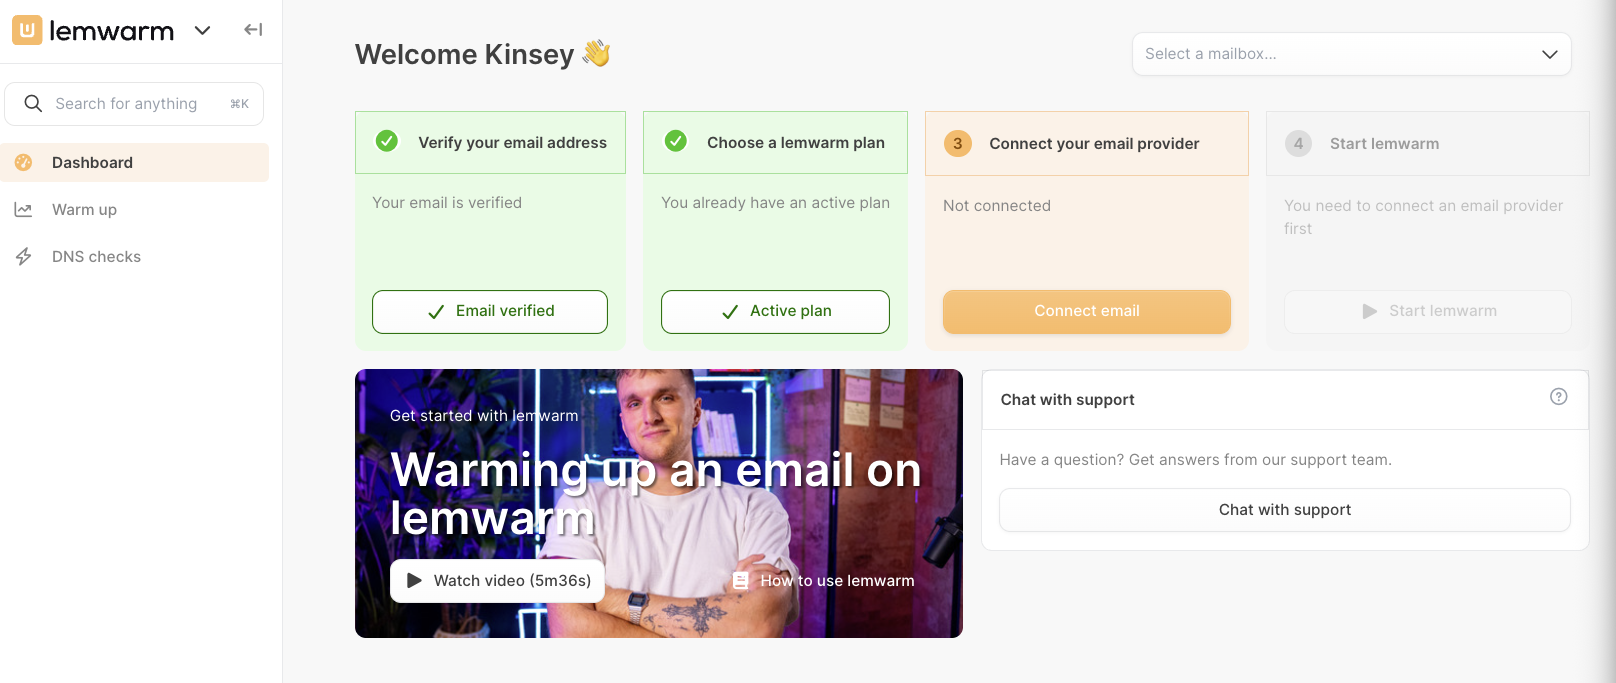
In the above article you'll see instructions around choosing a lemwarm plan. If you're already using a paid lemlist plan, lemwarm is included and you should see that you already have an active plan when visiting the lemwarm dashboard.
4. Create your lemlist Campaign
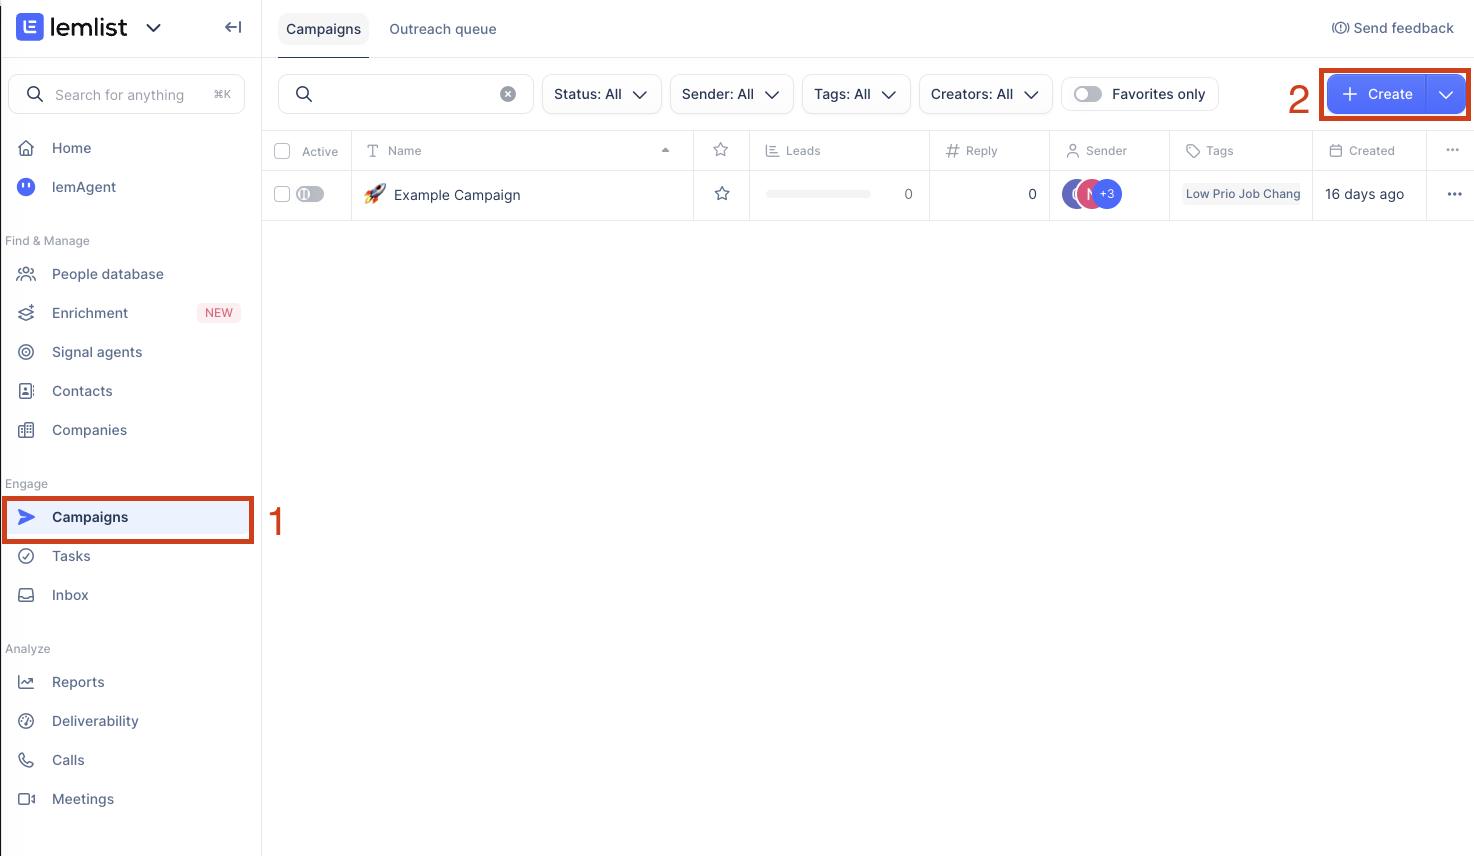
Start a new campaign from the Campaigns section.
- From the left‑hand menu, click Campaigns, then click Create in the top‑right corner.
After clicking Create campaign, you land on the Sequence tab.
- First, name your Campaign. Use something specific and descriptive for internal users. We usually match the name to our UserGems campaign as it makes the two easier to reconcile later.
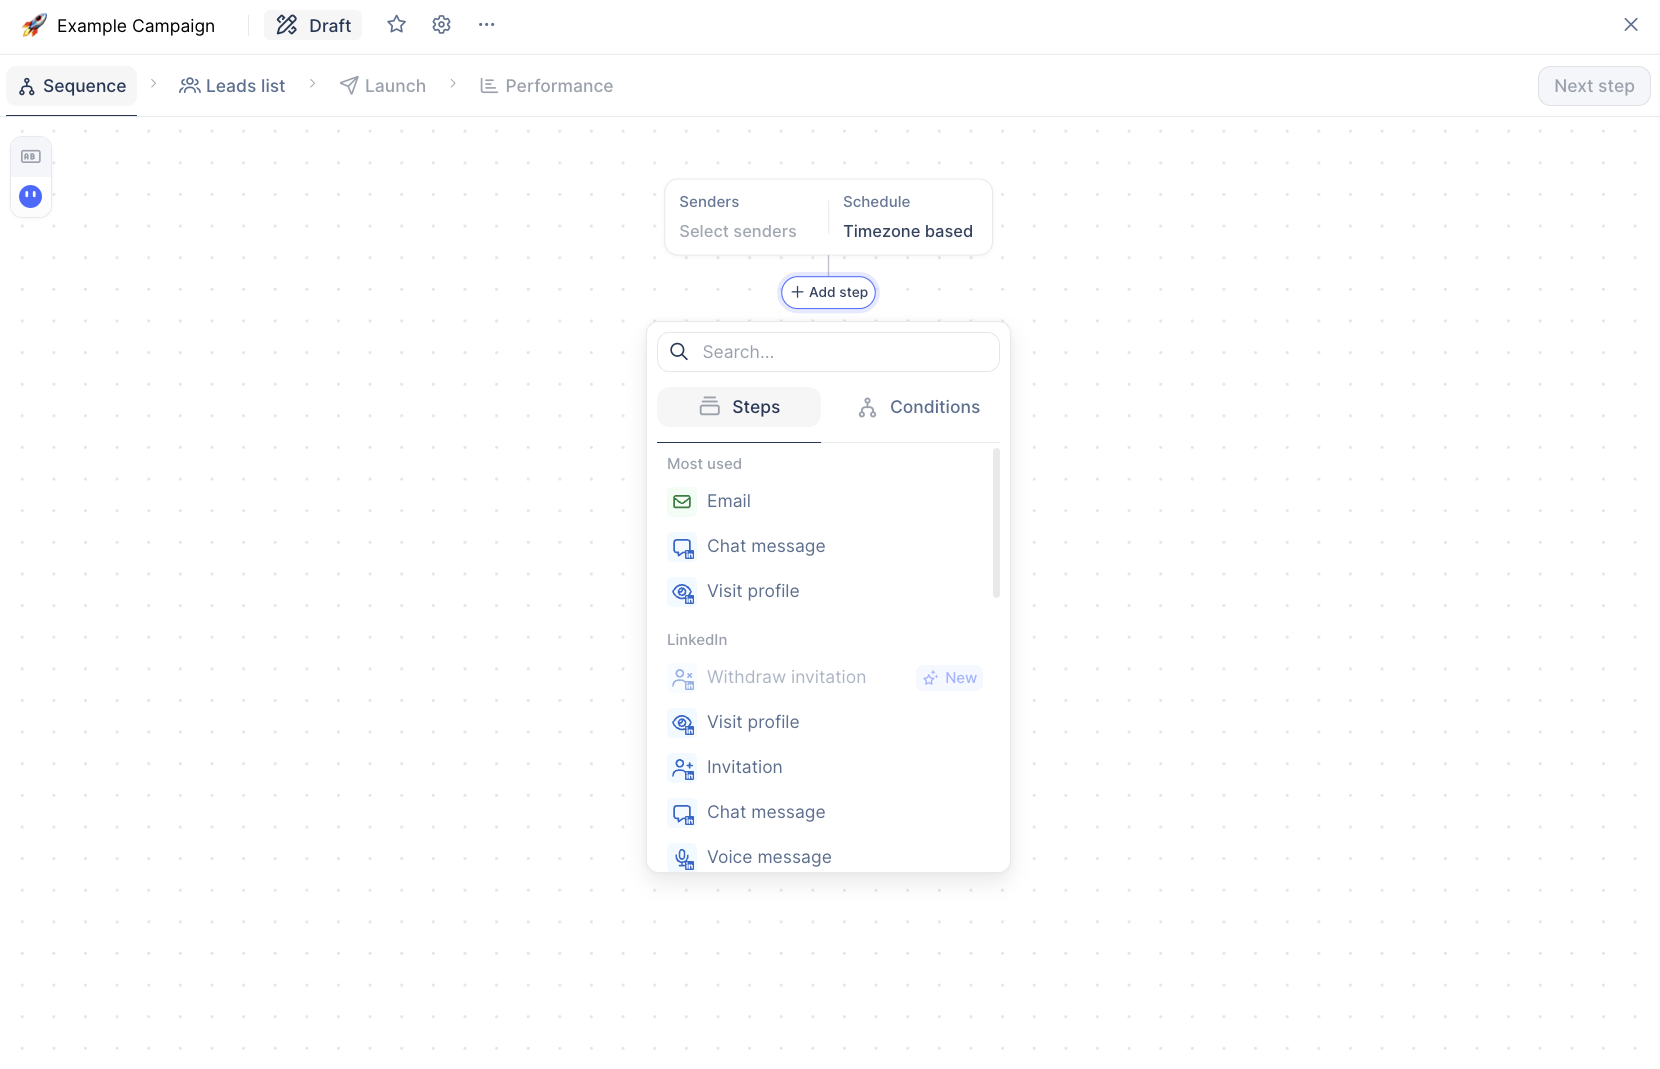
- On the Sequence tab, start building the steps for your campaign.
- Steps lets you add actions like emails, LinkedIn Steps, calls, tasks, and more.
- Conditions lets you add branching logic based on lead data or behavior.
Add an email step to your sequence to use with Gem-E messaging.
Pick your sender
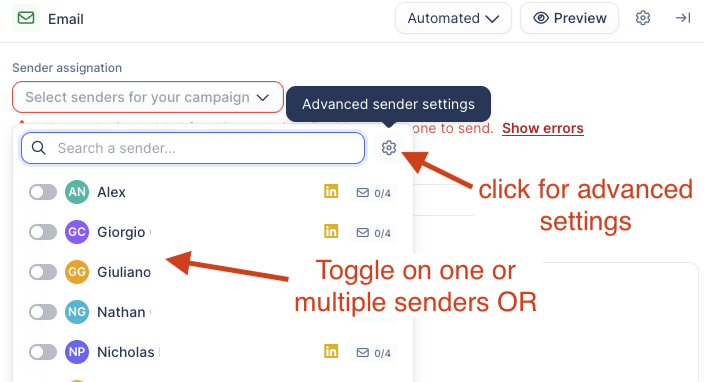
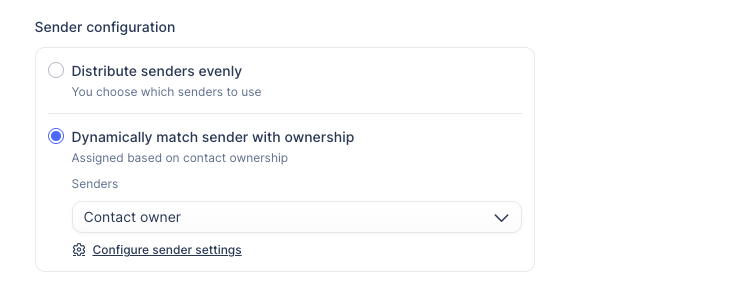
Within the email step, select a sender. You can either select one sender, select multiple and have senders distributed evenly, OR open Settings > Senders for advanced settings.
If you want the lead or contact's owner to be the sender, choose "Dynamically match sender with ownership" and then select the owner field you want to use. This requires that lemlist is connected to your CRM so there's an owner field available. Once connected, you can use an out-of-the-box owner like Contact Owner, or a custom variable if you use a custom lookup field instead. See this lemlist article for more details around dynamic senders.
Dynamic Senders matches at launch time, using the owner value on the lead. For leads created by the webhook, that value has to arrive in the payload. See the contactOwner note in Step 6 for more details.
Create your Gem-E variables
Next, create your custom variables for Gem-E subject lines and content.
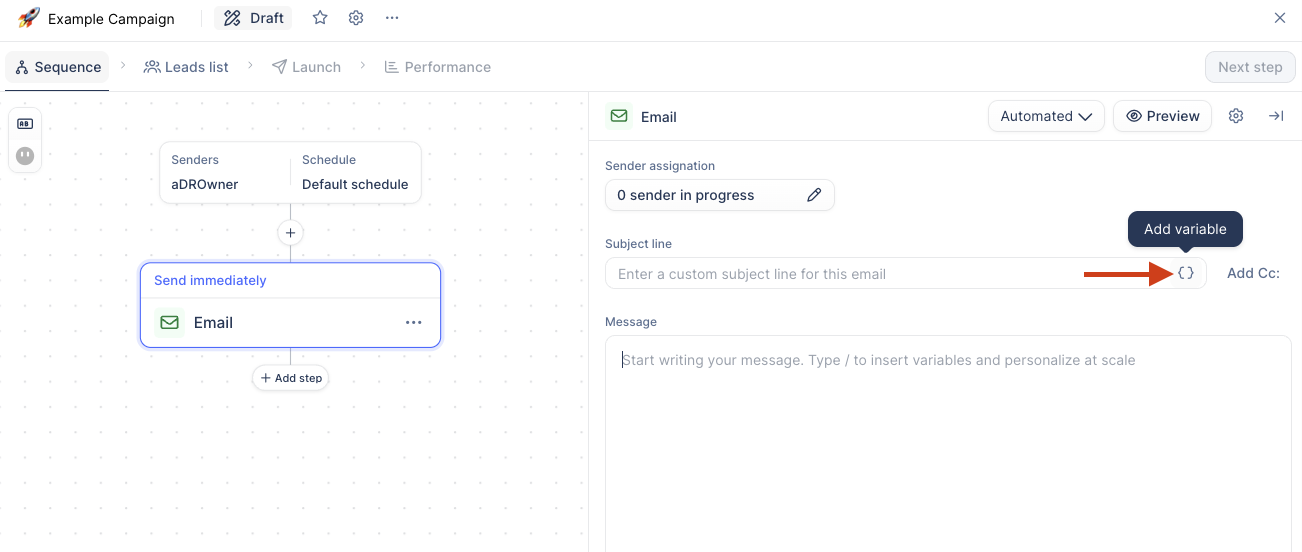
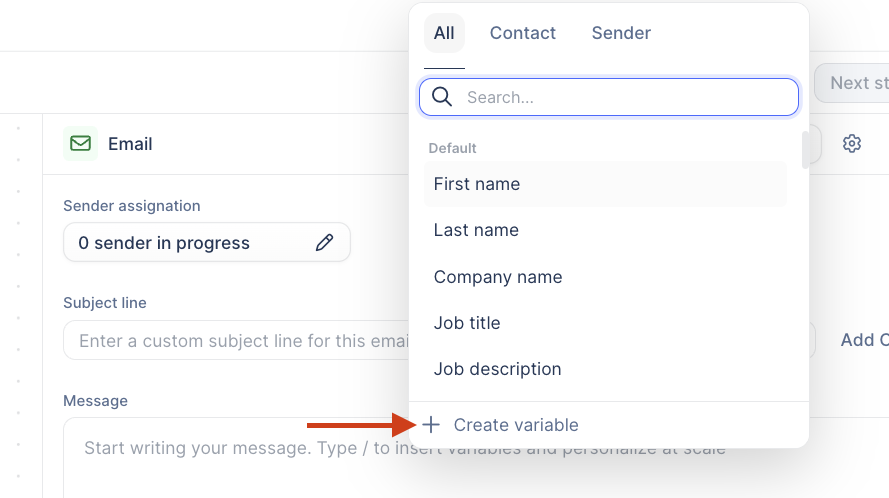
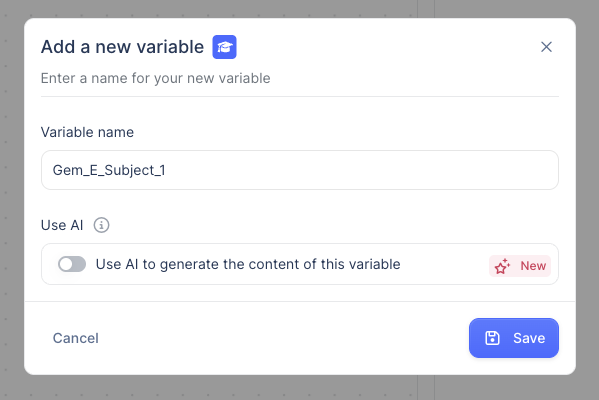
Within the email step, click the Insert Variable button next to the subject line field, then click Create variable. Use the naming convention shown in the table below to create all of your variables. Notice that dashes and spaces are replaced with underscores as you type - this is expected.
Two things to pay close attention to, because both fail silently:
- Names are case-sensitive. Gem_E_Body_1 and gem_e_body_1 are two different variables in lemlist.
- The names here must match the keys in your webhook payload exactly. lemlist creates a custom variable from any extra key/value pair it receives via the API, so a typo in either place produces a second, empty variable rather than an error.
With all of your variables created, search the word "gem" in the variables list to see them. For Email 1 insert Subject 1 and Body 1, as well as the sender signature variable as shown in the GIF below. For Email 2 insert Subject 2 and Body 2, and so on.
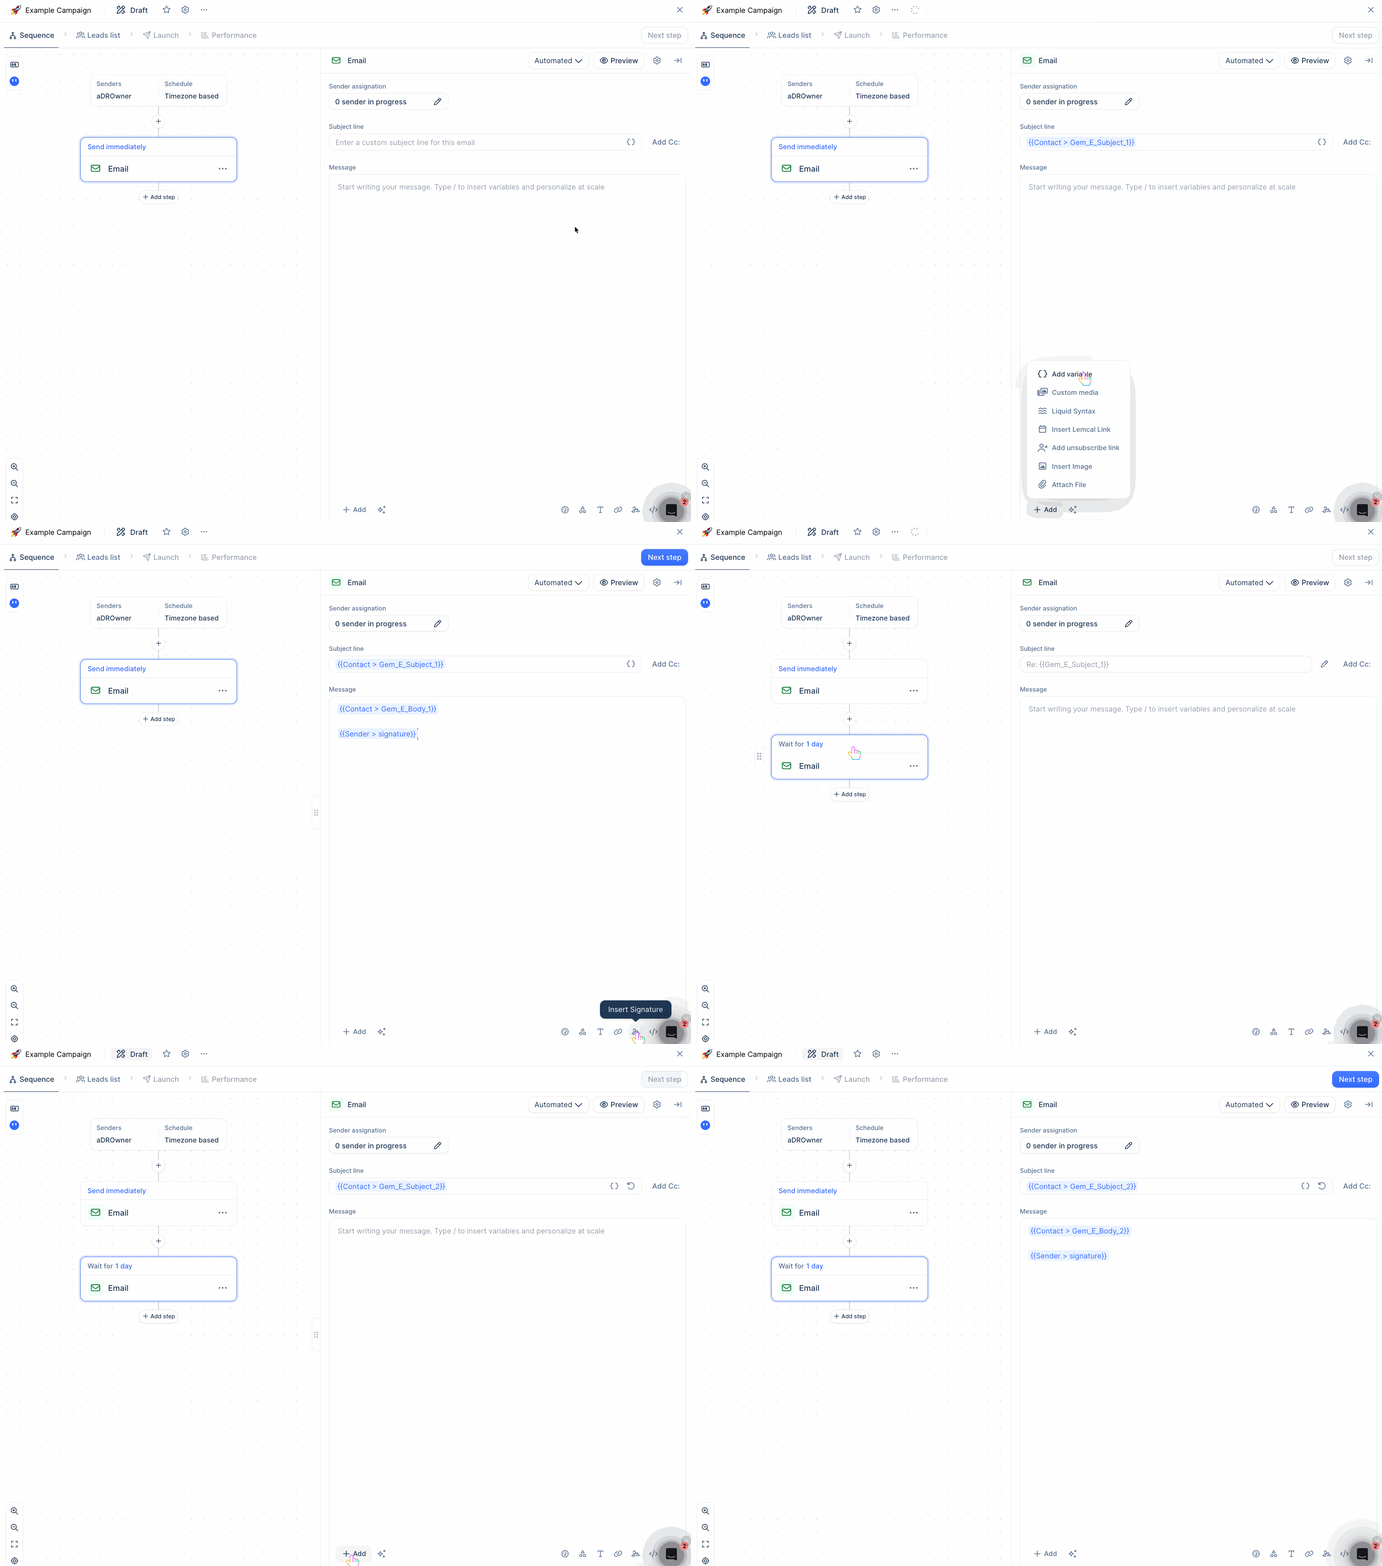
Continue building out your sequence until it includes all the steps you'd like. (This sequence can be duplicated and altered going forward instead of starting from scratch each time.) Here's an example of what your finished sequence could look like.
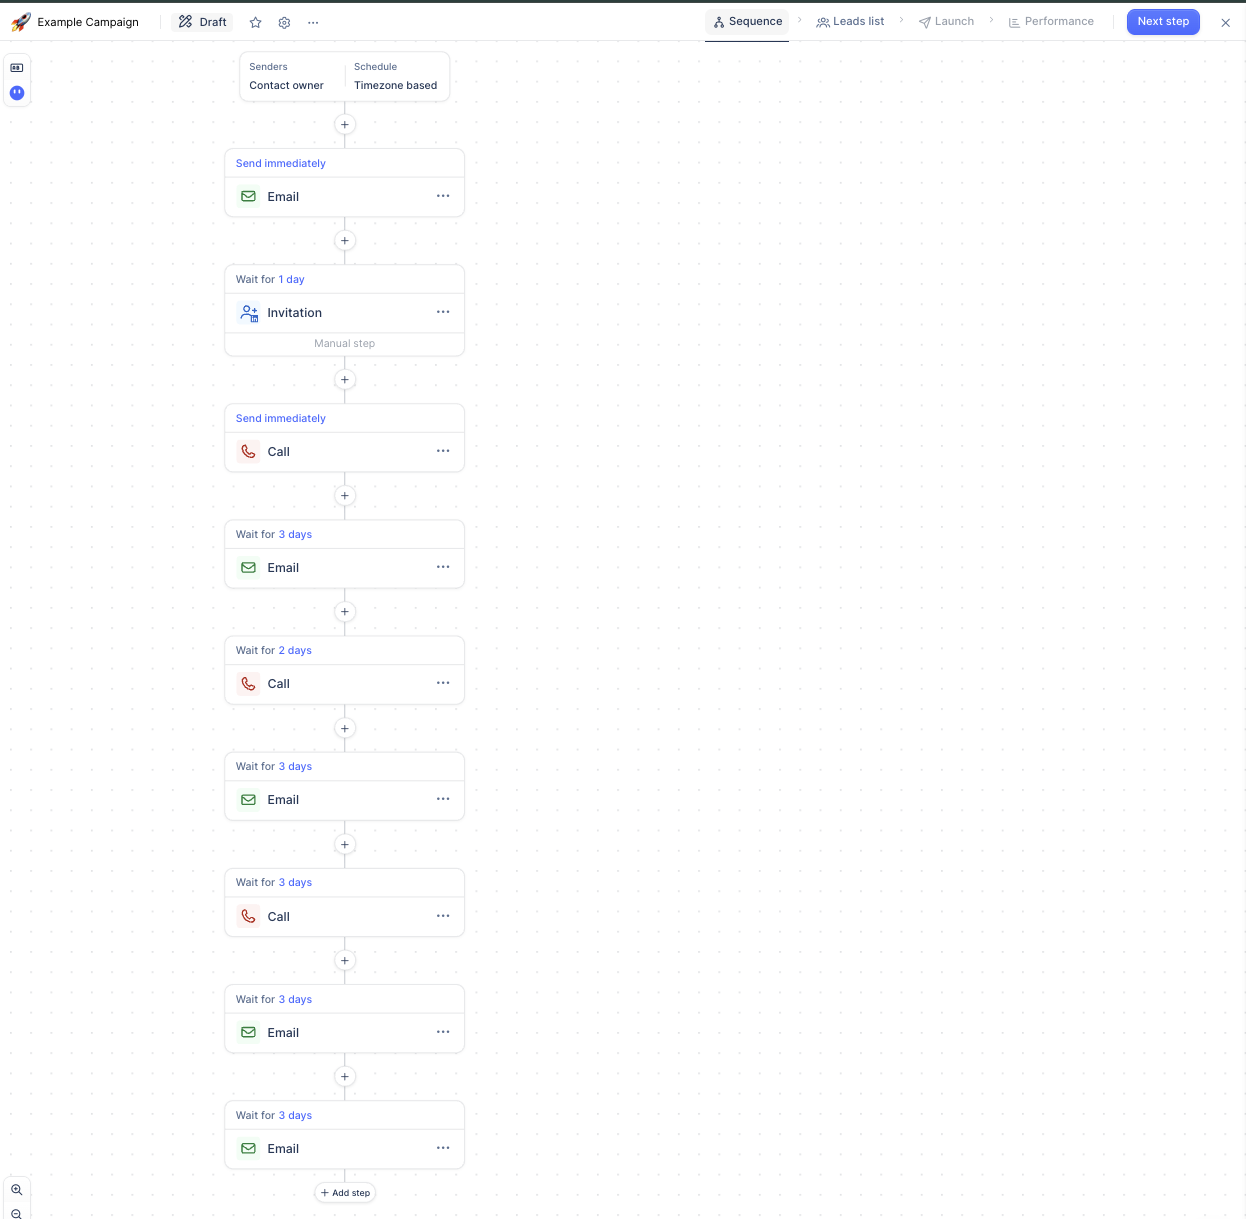
Example sequence structures are included below:
Co-pilot (High Touch) template for past champions:
Co-pilot (High Touch) template for everyone besides past champions:
Autopilot (low touch) template:
With your sequence steps in place, review the Campaign Settings by clicking on the Settings button at the top of the campaign. The remaining settings are lemlist functionality, so we recommend reviewing their guide on how to create a lemlist campaign to make sure it's optimized for your use case.
Connect your lemlist campaign to UserGems
Next it's time to connect your lemlist campaign with UserGems. Now that you've saved, click into the campaign and copy the ID starting with cam_ from the URL. Grab all of the numbers and letters, and save it off to the side — we use a Google sheet like this that you can copy to stay organized.

You can duplicate campaigns and tweak them as needed after testing.
5. Get your API Key from lemlist & base64 encode it
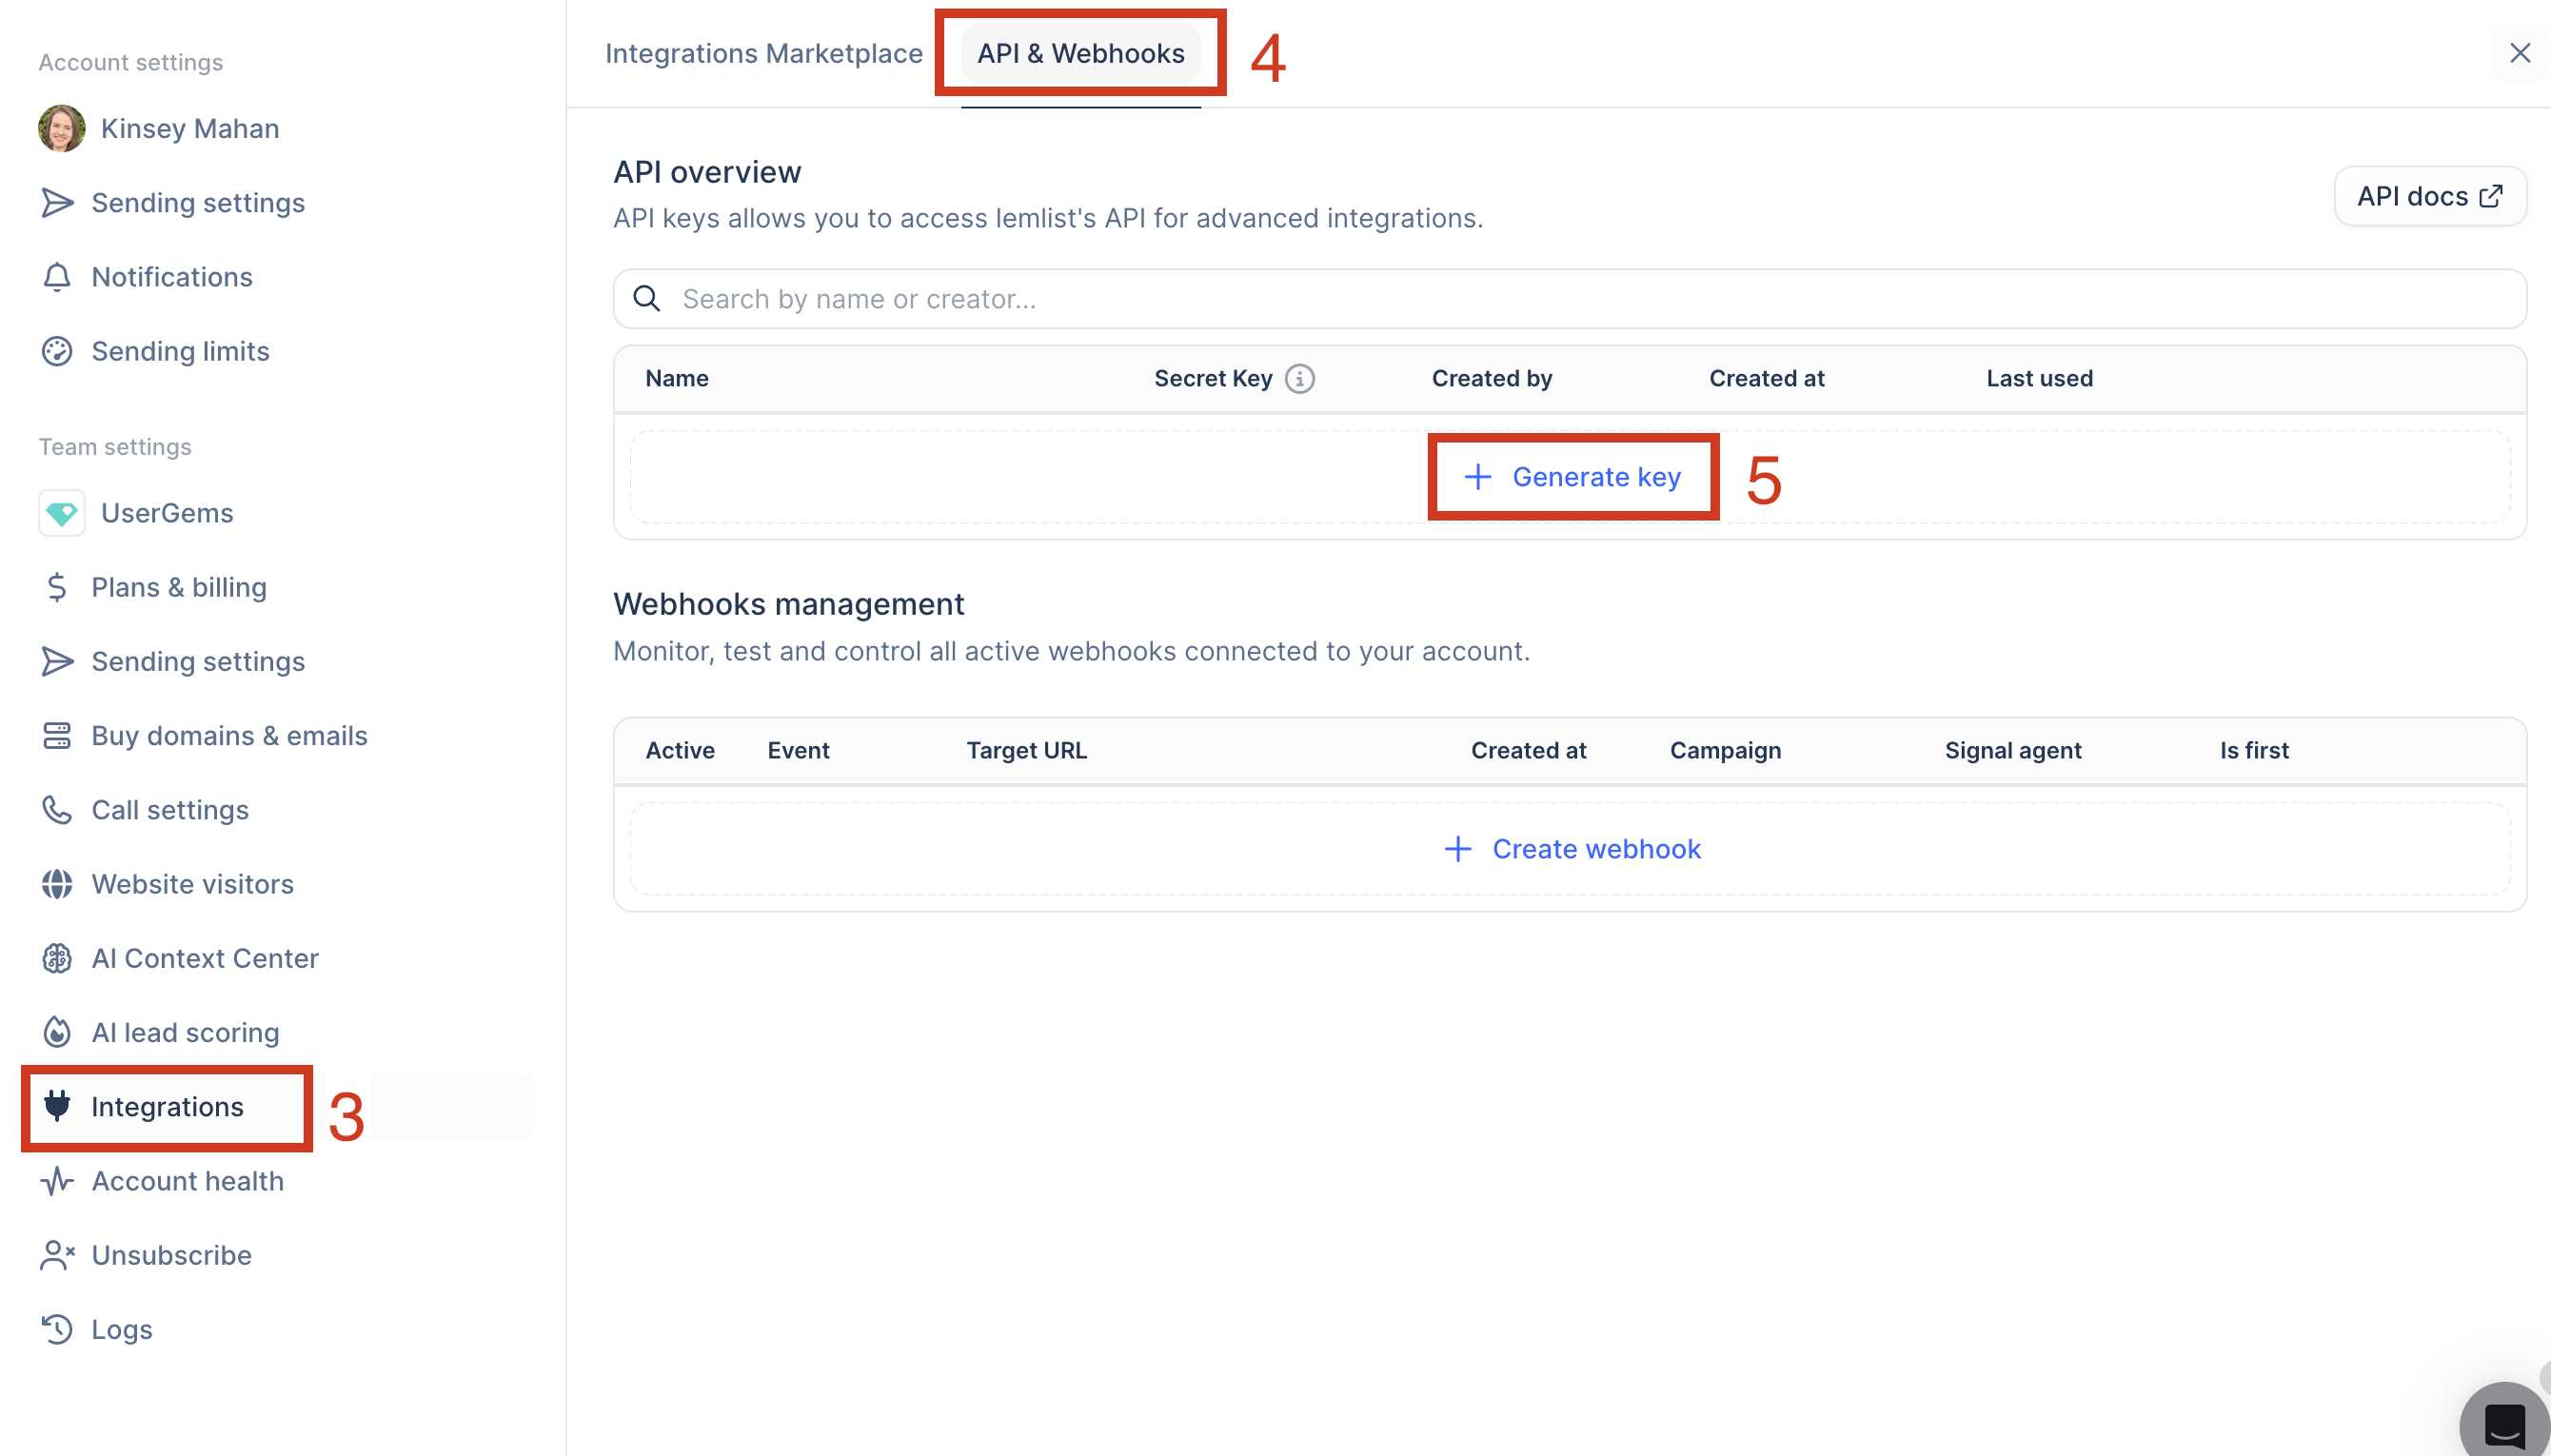
- In lemlist, click your name in the bottom left > Settings > Integrations > API & Webhooks > Generate Key
- Name your API key — something like UserGems webhook — then click Create Key
- Copy and securely save the API key. You won't be able to see it again after clicking Done. (You can rename keys and check their Last used date later under Integrations, but you can't re-read the value.)
- Base64-encode the API key before using it in the webhook header. lemlist's API uses HTTP Basic Auth with no username, so the string you need to encode is:
:YOUR_API_KEY— a colon, followed immediately by the API key, with no username and no space before the colon. - Encode it. Because this string is a live credential, we recommend encoding it locally rather than pasting it into a website:
- Mac / Linux Terminal:
printf ':YOUR_API_KEY' | base64 - Windows PowerShell:
[Convert]::ToBase64String([Text.Encoding]::UTF8.GetBytes(":YOUR_API_KEY")) - If you'd rather use an online encoder such as base64encode.org, paste in :YOUR_API_KEY (including the leading colon) and copy the resulting string.
- Mac / Linux Terminal:
- Copy the resulting base64 string to use in the webhook Authorization header in the next step.

6. Add a Webhook Action to your UserGems Campaign
- Navigate to UserGems and open the campaign you plan to use to send prospects to lemlist.
- If there isn't a Send to webhook action already, add one.

- Click in to the Webhook action and toggle Action On in the top right to enable it
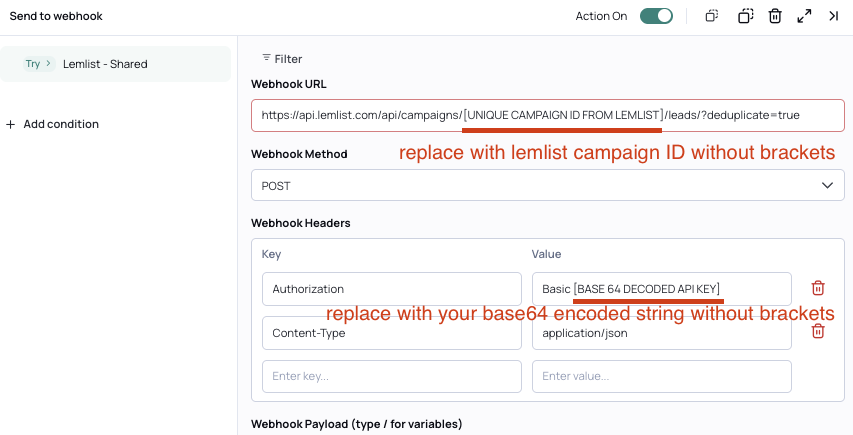
- URL:
https://api.lemlist.com/api/campaigns/[UNIQUE CAMPAIGN ID FROM LEMLIST]/leads/?deduplicate=true - Method: POST
- Headers:
Authorization: Basic [BASE64_ENCODED_STRING]— the base64 string generated in Step 5, not the raw API keyContent-Type: application/json
- URL:
What deduplicate=true does: lemlist checks the email address against your other campaigns and skips the insert if it already exists there. It defaults to false. Leave it on if you don't want the same person running in two lemlist campaigns at once.
- Use the instructions provided here to copy and personalize the webhook payload, then paste it into the Webhook Payload text area
A few things to check as you personalize it:
- email is the only field lemlist requires. Everything else is optional, but if you are using Gem-E written messaging be sure to send the appropriate number of subject/body variables too.
- Any key that isn't one of lemlist's standard fields becomes a custom variable. Your Gem-E keys must match the variable names from Step 4 character for character.
- If you're using Dynamic Senders, include contactOwner in the payload set to the sender's lemlist login email — that's the value lemlist matches on for API-created leads.
IMPORTANT! Leave the word Basic in the Authorization Value box before you paste your base64 string generated in Step 5 using your API key. It will look something like Basic 47Aagkha130gajgkah843ahrh01487
- Save changes in the campaign
7. Test and Activate UserGems Workflow & lemlist Campaign
Push 2–3 test records through your UserGems campaign, then check these four things in lemlist. They're in order — if one fails, the ones below it will too.
- The lead showed up.
Open your lemlist campaign and go to Launch. Your test people should be sitting there waiting.
If nothing arrived: the webhook isn't firing. Check the campaign ID in the URL and the Authorization header. A 401 means the header is wrong; a 404 means the campaign ID is wrong or got truncated. - The Gem-E fields are populated.
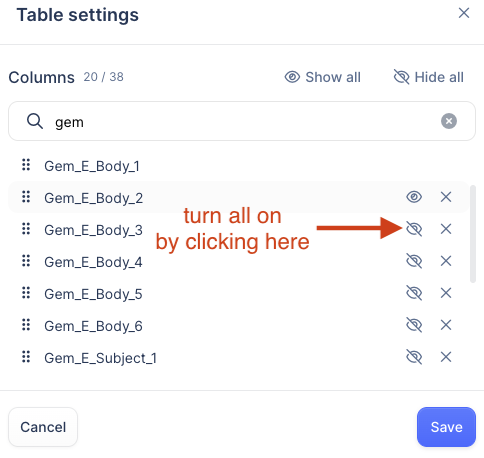
Click the eyeball icon to turn on the Gem-E columns. You should see real subject lines and real body copy.
If you see blanks: a variable didn't land between the quotation marks. You can also filter the Launch list by Missing variable to catch these in bulk.
If you see INSERT VARIABLE FOR...: you missed a slot. Fix it before launching — that text will send to a prospect exactly as written. - The sender is right.
If you're using Dynamic Senders, check that the sender on each lead matches that record's owner in your CRM.
If every lead shows the same sender: contactOwner isn't landing. Confirm the key is spelled exactly contactOwner — one word, capital O, no space — and that Contact Owner Email is populated on the record in UserGems. - The email reads right.
Preview one email in the sequence and read it start to finish. You're checking that the Gem-E copy makes sense in context and that your signature is there.
Once all four check out, launch your test leads, confirm the first email actually sends, then activate your UserGems campaign.

Once you've confirmed that the "Leads" in lemlist are populated, launch them so that the campaign starts for your leads.
Finally, activate your UserGems Campaign.
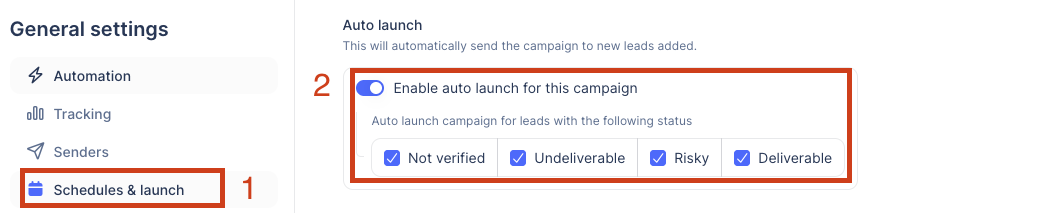
Going live day-to-day. Once you're past testing, manually launching every lead becomes a bottleneck for an always-on UserGems campaign. lemlist's auto-launch starts leads automatically as they arrive.
We use these auto launch settings here at UserGems once a campaign has been tested:
Troubleshooting