UserGems & Sales Engagement Configuration with Gem-E Messaging
While UserGems and Salesforce's Sales Engagement don't integrate directly, UserGems does directly integrate with Salesforce, which Sales Engagement sits on top of. The UserGems <> Salesforce/Sales Engagement integration enables:
The sync of Contacts/Leads and Accounts between UserGems and Salesforce.
UserGems to automatically add Contacts directly to the right Cadence to reduce the manual work for your reps and ensure timely followup.
Steps
1. Create Gem-E fields in Salesforce
Create custom fields on the Salesforce Contact and/or Lead object (depending on whether you will be enrolling Leads or Contacts into Sales Engagement Cadences) for UserGems to write the emails written by Gem-E
Skip adding these fields on the page layout so it doesn't crowd the page (unless you want reps to see them)
If you use both Leads and Contacts in Salesforce, you need to add Gem-E fields on both objects and map the fields between Leads & Contacts
Sample field label
Sample API name
Type
Gem-E Subject 1
Gem_E_Subject_1__c
Text (255)
Gem-E Subject 2
Gem_E_Subject_2__c
Text (255)
Gem-E Subject 3
Gem_E_Subject_3__c
Text (255)
Gem-E Subject 4
Gem_E_Subject_4__c
Text (255)
Gem-E Subject 5
Gem_E_Subject_5__c
Text (255)
Gem-E Subject 6
Gem_E_Subject_6__c
Text (255)
Gem-E Subject 7
Gem_E_Subject_7__c
Text (255)
Gem-E Content 1
Gem_E_Content_1__c
Rich text
Gem-E Content 2
Gem_E_Content_2__c
Rich text
Gem-E Content 3
Gem_E_Content_3__c
Rich text
Gem-E Content 4
Gem_E_Content_4__c
Rich text
Gem-E Content 5
Gem_E_Content_5__c
Rich text
Gem-E Content 6
Gem_E_Content_6__c
Rich text
Gem-E Content 7
Gem_E_Content_7__c
Rich text
2. Create Email Templates in Salesforce using the above variables
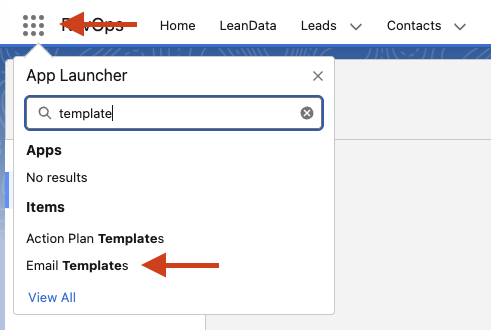
In Salesforce, click the App Launcher and search "template", then click to Email Templates.
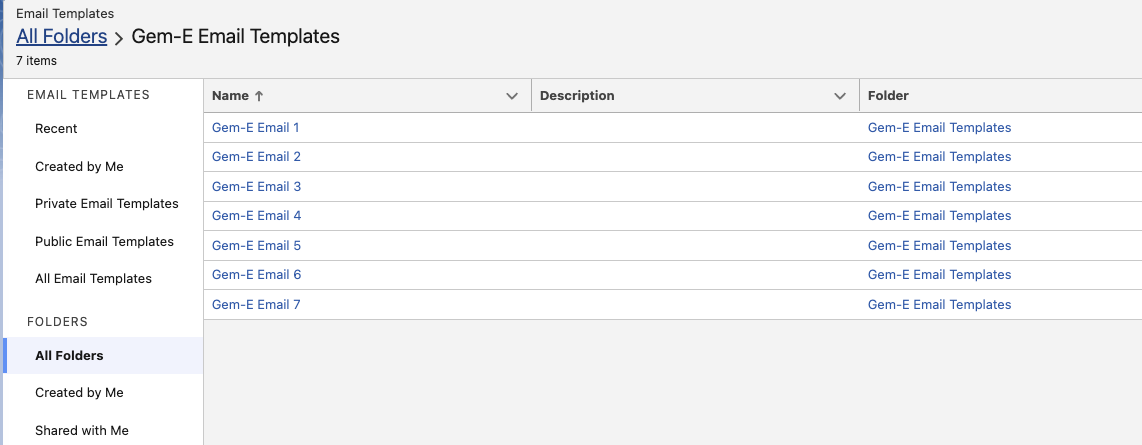
Create a new email template for each step of the Cadence you're creating - for example, if you will be creating a Cadence with 7 email steps, create 7 email templates.
For each template:
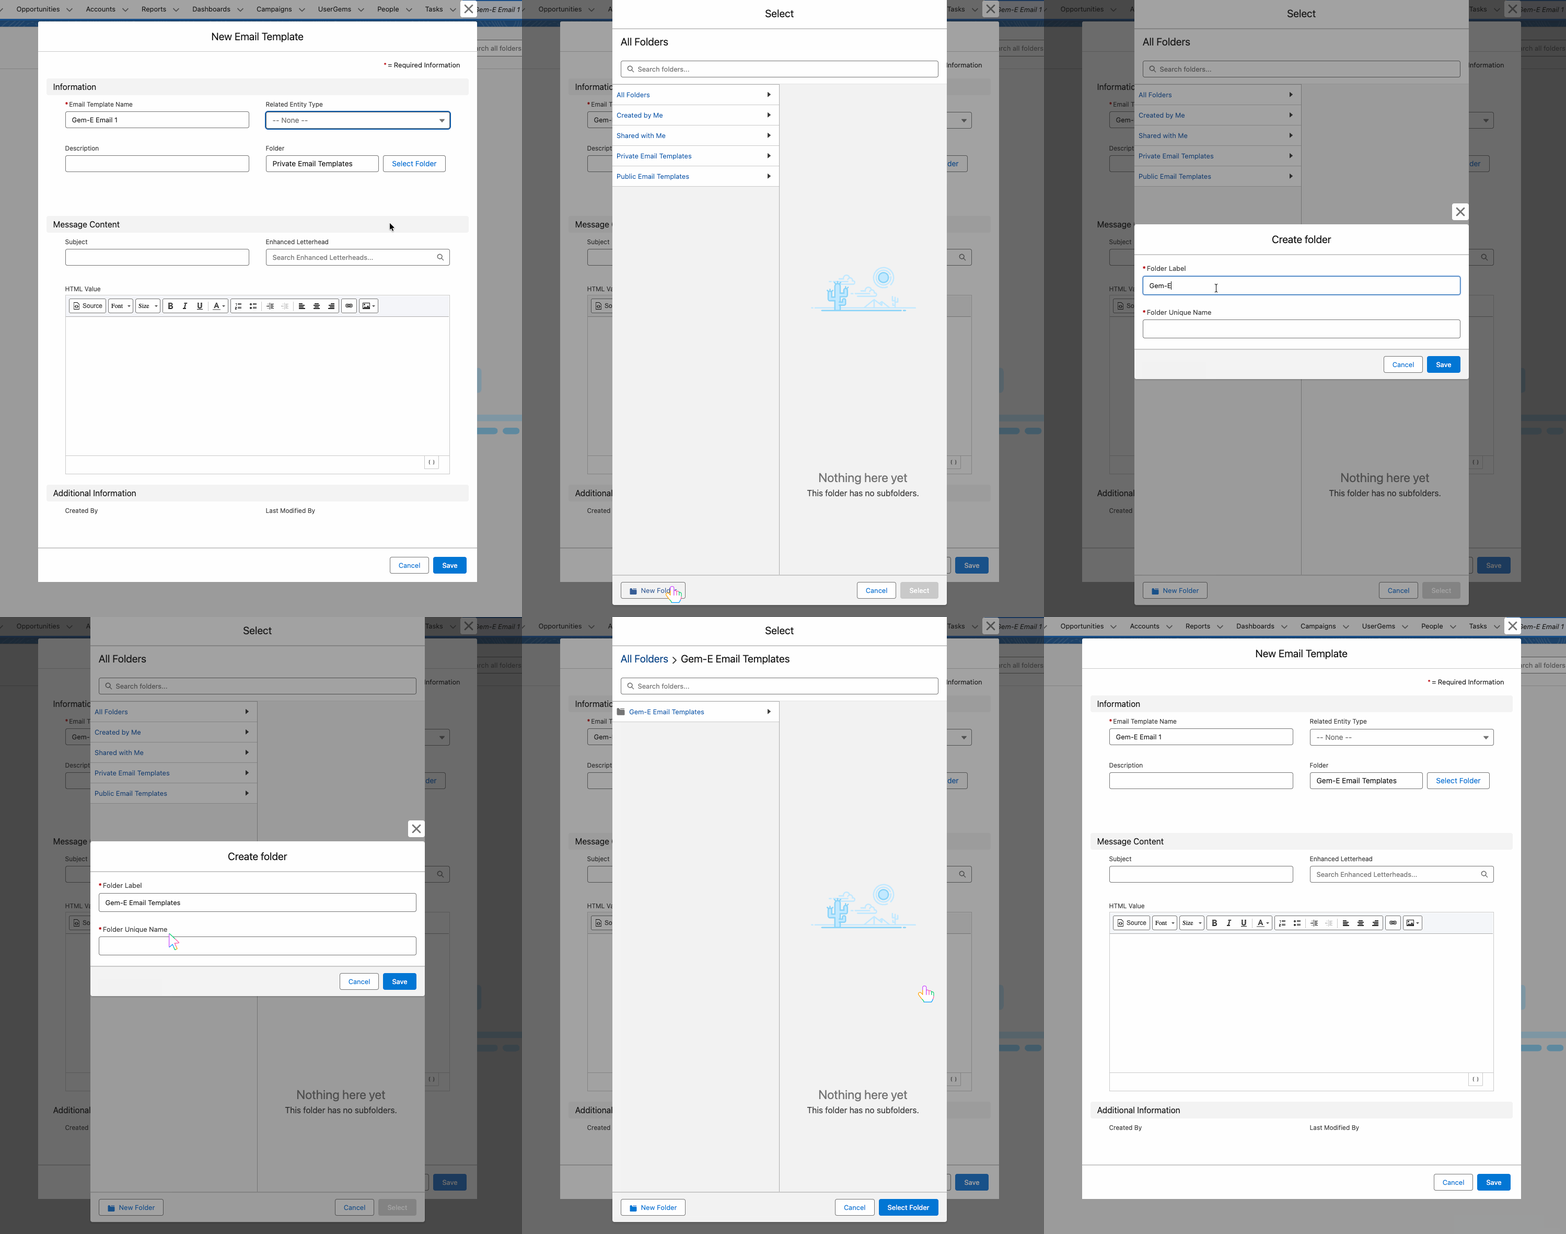
Enter a name (e.g. Gem-E Email 1, Gem-E Email 2)
Leave Related Entity type blank
Select a folder for the email templates, ideally create a new folder called Gem-E Email Templates to use for all of them
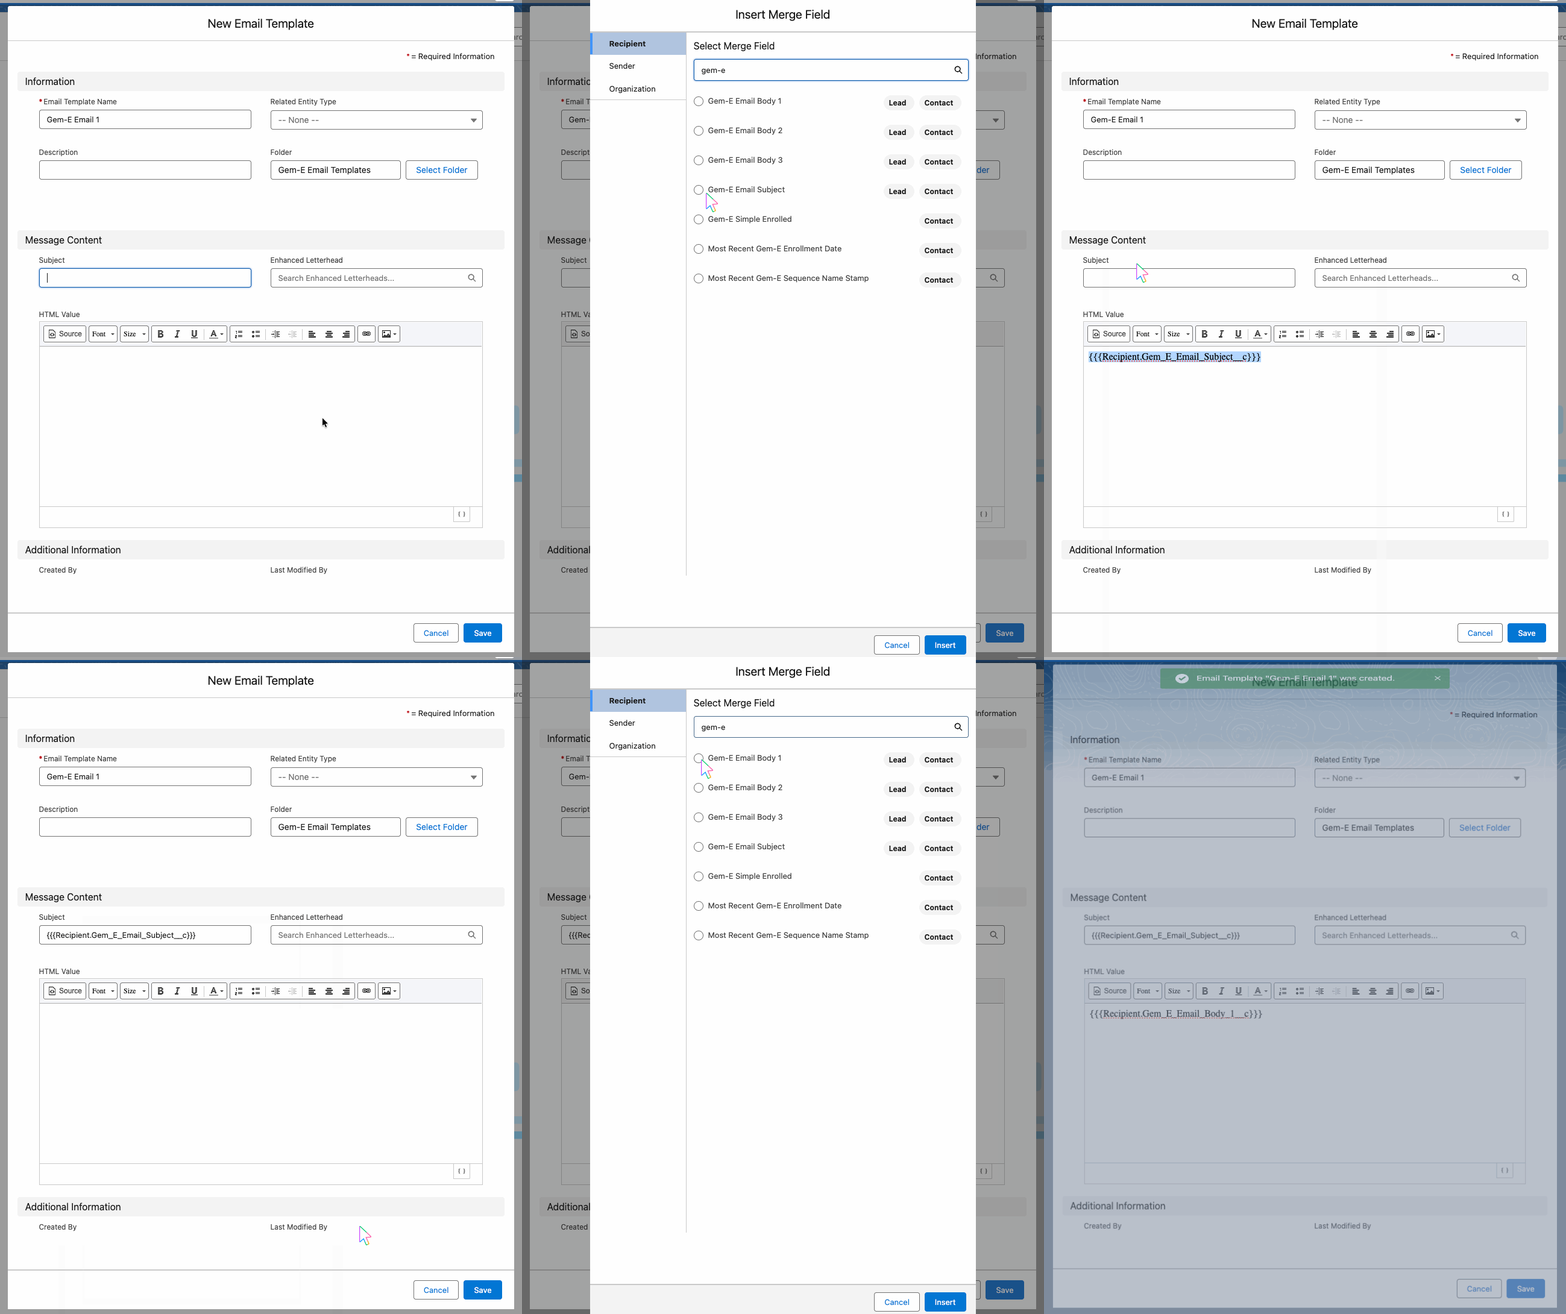
Click the "Insert Merge Field" button to select merge fields for the subject line and content/body
Use the Subject 1 variable and the Content 1 variable in email 1, the Subject 2 variable and Content 2 variable in email 2, etc.
Your Gem-E fields are likely named differently from the example shown below. Regardless of their names, make sure Subject 1 and Content 1 are used in Template 1 and so on.
At the end of this process you should have as many email templates as you will have email steps in your Gem-E Cadence.
3. Create Sales Engagement Cadence(s) using the above Email Templates
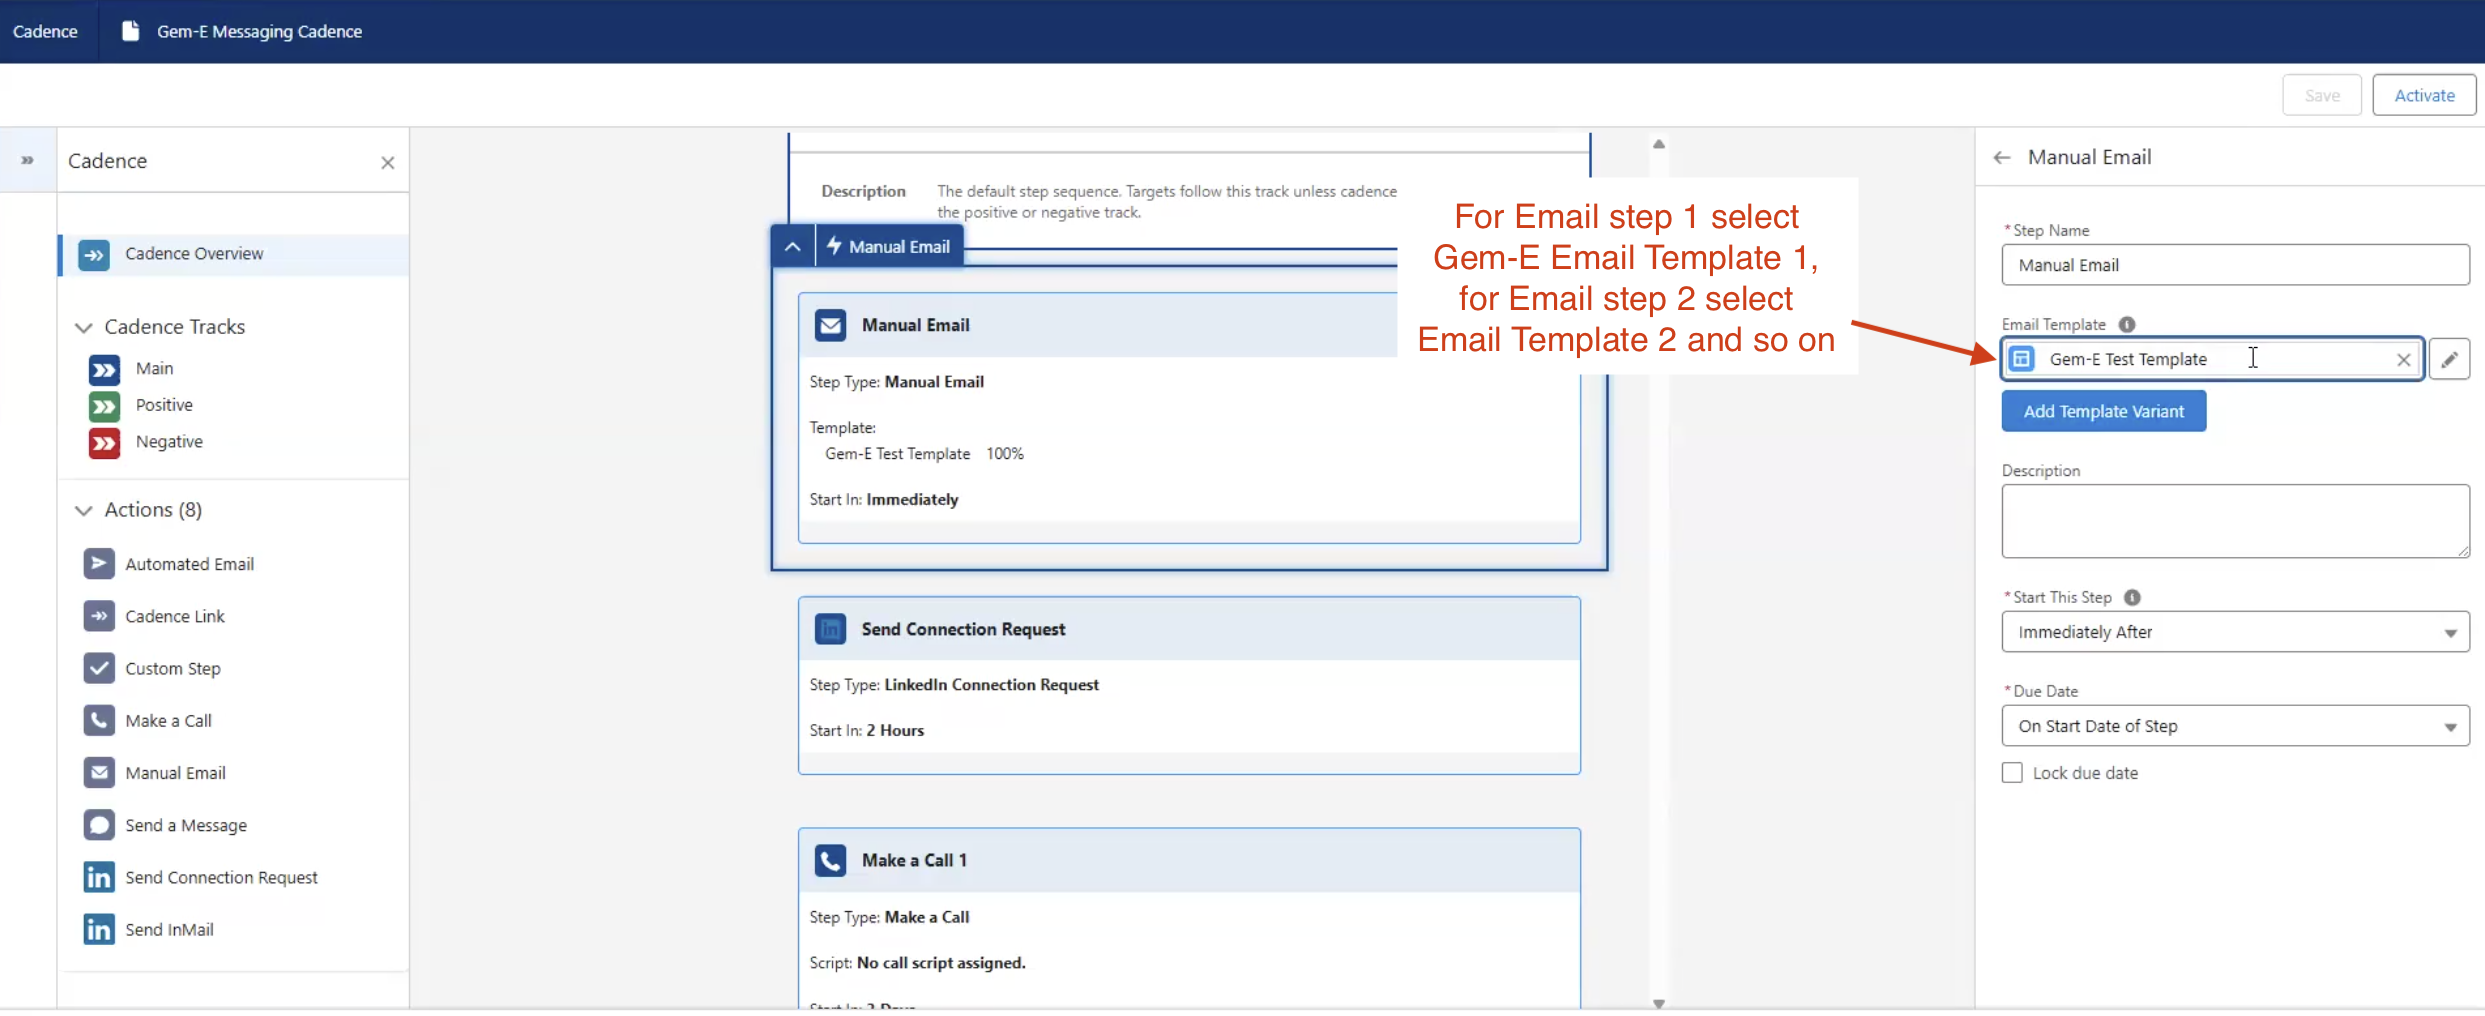
Create a Sales Engagement Cadence using the Email Templates you previously created.
Co-pilot (High Touch) template for past champions:
Answer Brief: Reference the email in Step 1 and the key signals it mentions. Name drop:
Previous company
Past champion
Compelling signal like hiring/funding
Voicemail Example: "Hey [First Name], it's [Your Name] at [Company]. Just sent you a quick note — saw [Past Champion] just joined your team. Congrats on the hire! Thought it might be worth a quick chat if you're exploring [Signal] right now."
Day 1
LinkedIn Connection Request
—
Day 10
Call
Answer Brief: Same structure as Day 1. Voicemail Example: "Hey [First Name], following up on my last note. If you or [Past Champion] think this might be worth revisiting, happy to chat or send more detail."
Answer Brief: Same structure as Day 1. Voicemail Example: "Hi [First Name], just wanted to check in again in case you're thinking about [Signal] in the near future. Let me know if helpful."
Day 17
Automated e-mail (Reply)
Body: {{custom variable}} → Gem-E Body 4
Day 21
Call
Answer Brief: Same structure as Day 1. Voicemail Example: "Hey [First Name], [Your Name] again — figured I'd check back one last time. If you or someone on the team thinks this might be relevant now, I'm happy to share more."
Answer Brief: Same structure as Day 1. Voicemail Example: "Hey [First Name], totally understand if this isn't a fit right now. If it makes sense to revisit down the line, feel free to reach out anytime."
Answer Brief: Reference the email in Step 1 and the key signals it mentions. Name drop:
Previous company
Past champion
Compelling signal like hiring/funding
Voicemail Example: "Hey [First Name], it's [Your Name] at [Company]. Just sent you a quick note — saw [Past Champion] just joined your team. Congrats on the hire! Thought it might be worth a quick chat if you're exploring [Signal] right now."
Day 5
Automated e-mail (Reply)
Body: {{custom variable}} → Gem-E Body 2
Day 6
LinkedIn message
—
Day 7
Call
Answer Brief: Same structure as Day 1. Voicemail Example: "Hey [First Name], following up on my last note. If you or [Past Champion] think this might be worth revisiting, happy to chat or send more detail."
Answer Brief: Same structure as Day 1. Voicemail Example: "Hi [First Name], just wanted to check in again in case you're thinking about [Signal] in the near future. Let me know if helpful."
Answer Brief: Same structure as Day 1. Voicemail Example: "Hey [First Name], [Your Name] again — figured I'd check back one last time. If you or someone on the team thinks this might be relevant now, I'm happy to share more."
Answer Brief: Same structure as Day 1. Voicemail Example: "Hey [First Name], totally understand if this isn't a fit right now. If it makes sense to revisit down the line, feel free to reach out anytime."
Select the email templates you previously created in the appropriate steps.
Once your Cadence is configured with the necessary steps, click the Activate button in the top right to make the Cadence eligible for Automated Actions in Step 5 below.
4. Assign Permissions to Admins/Users for Automated Actions
An extra Sales Engagement permission is required for the Salesforce Admin/User who will be building out the automated actions referenced in Step 5 to auto-enroll Leads and/or Contacts into Gem-E Cadences, as well as the end users who will be sending cadence emails (i.e. if you want Leads/Contacts to be added to a cadence automatically on a Sales Rep's behalf, that Sales Rep needs the below permissions assigned as well).
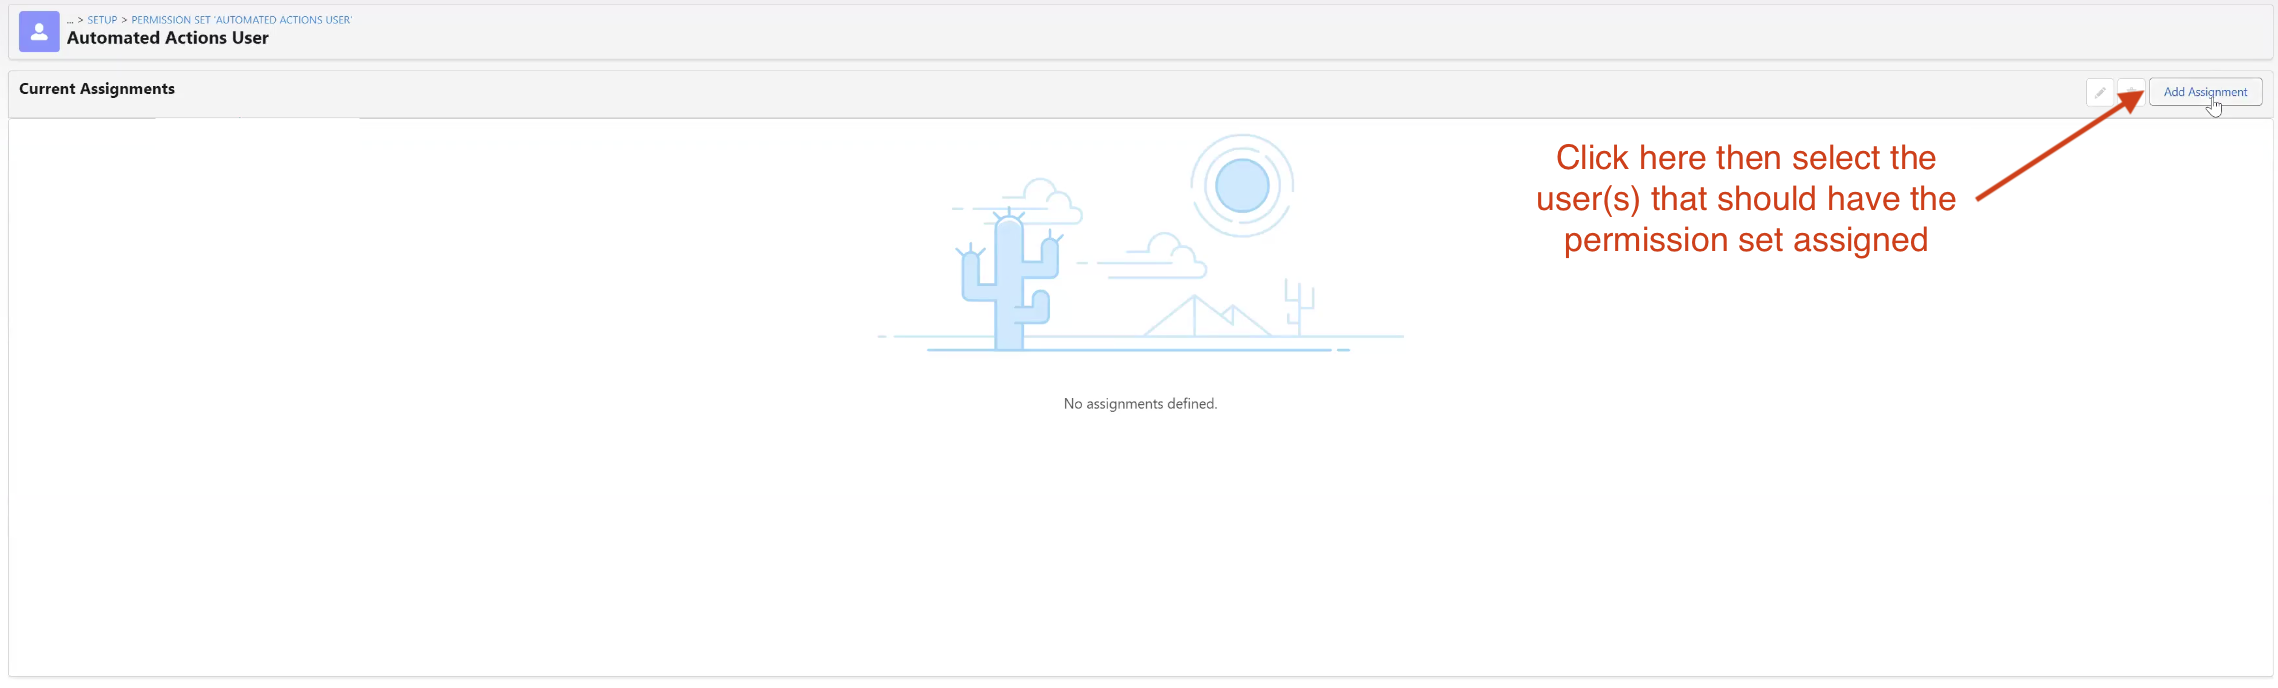
These Admins/Users will need permission to Sales Engagement AND the permission called Automated Action User. See this Salesforce Help Article for more details on this permission.
To assign this permission:
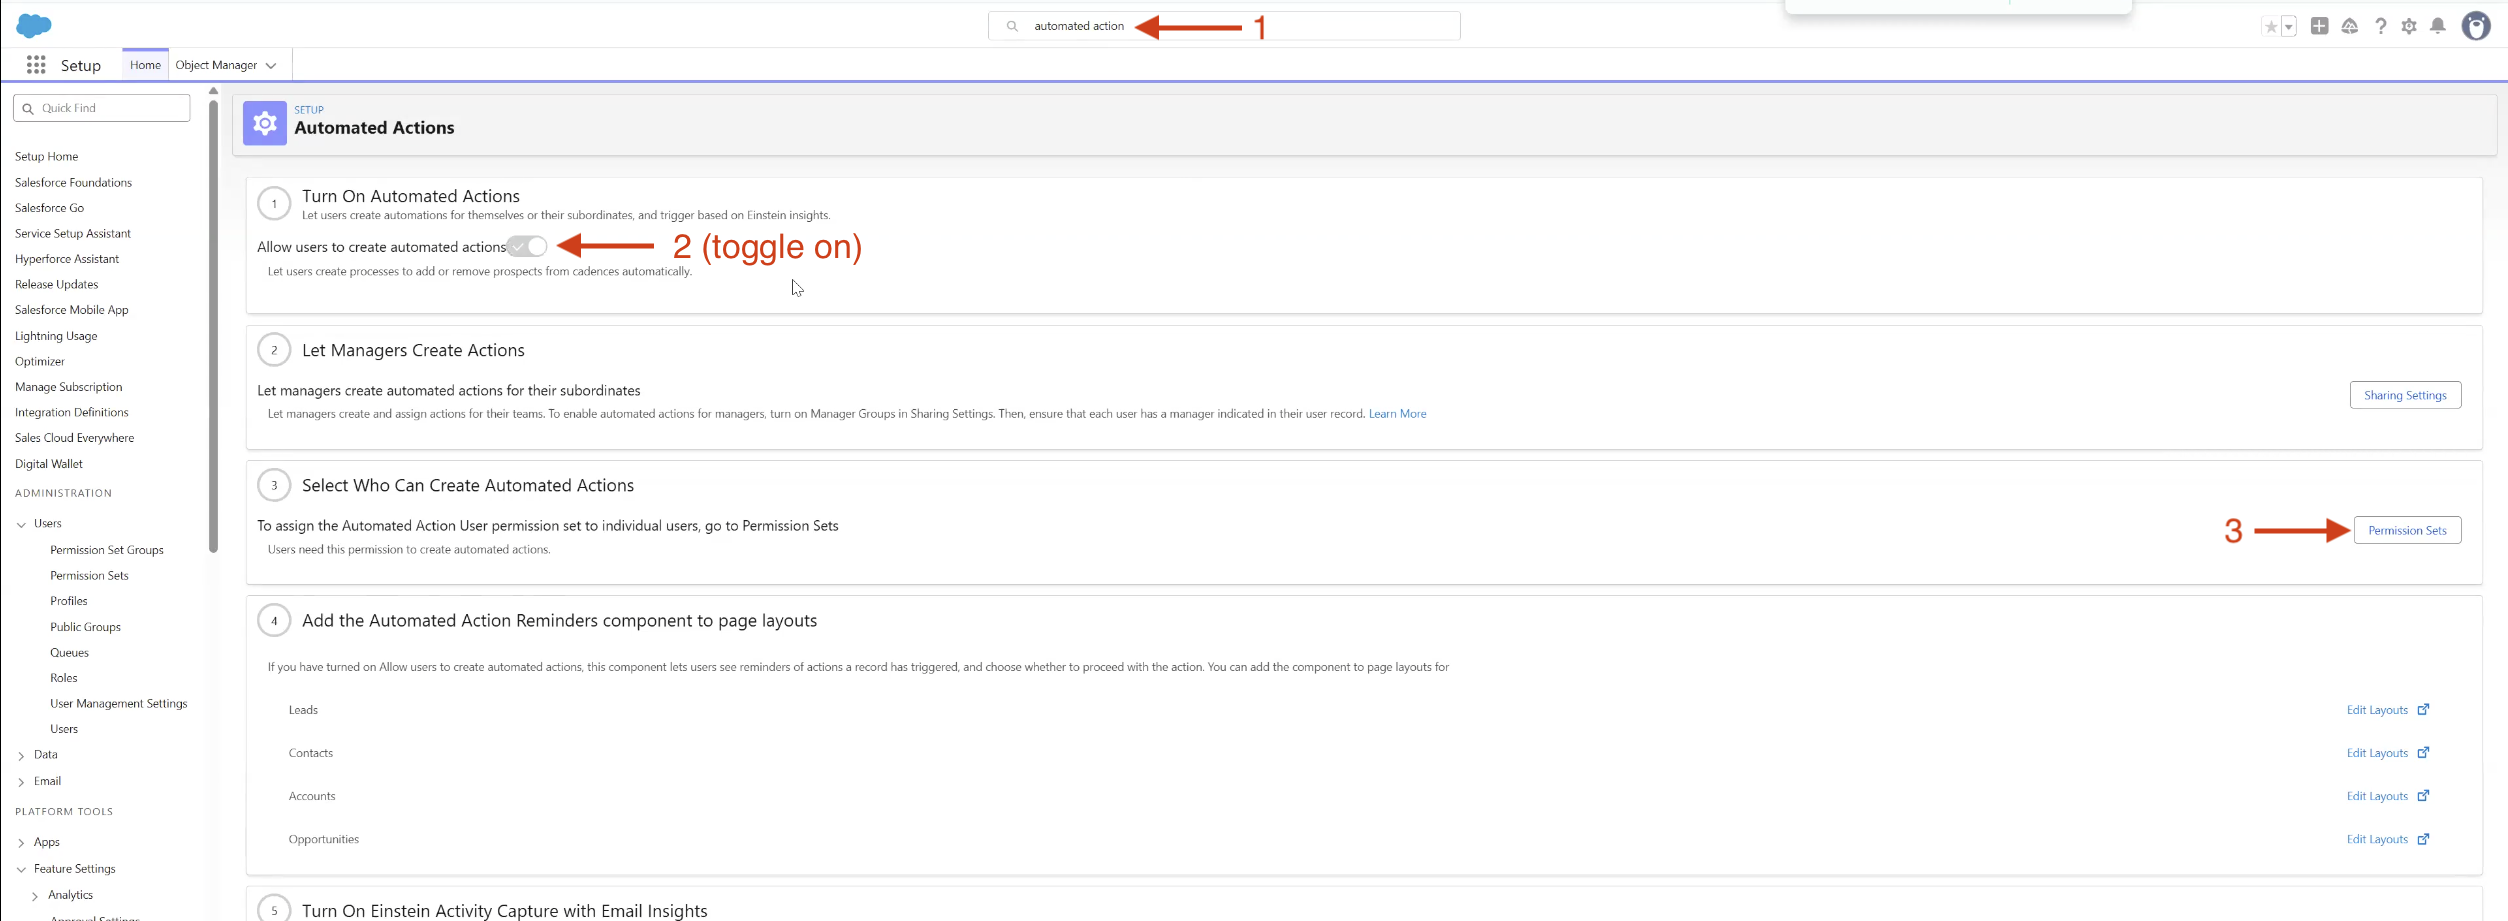
Navigate to Setup and search Automated Actions in the bar at the top of the page
Toggle ON automated actions to enable a permission set called Automated Actions
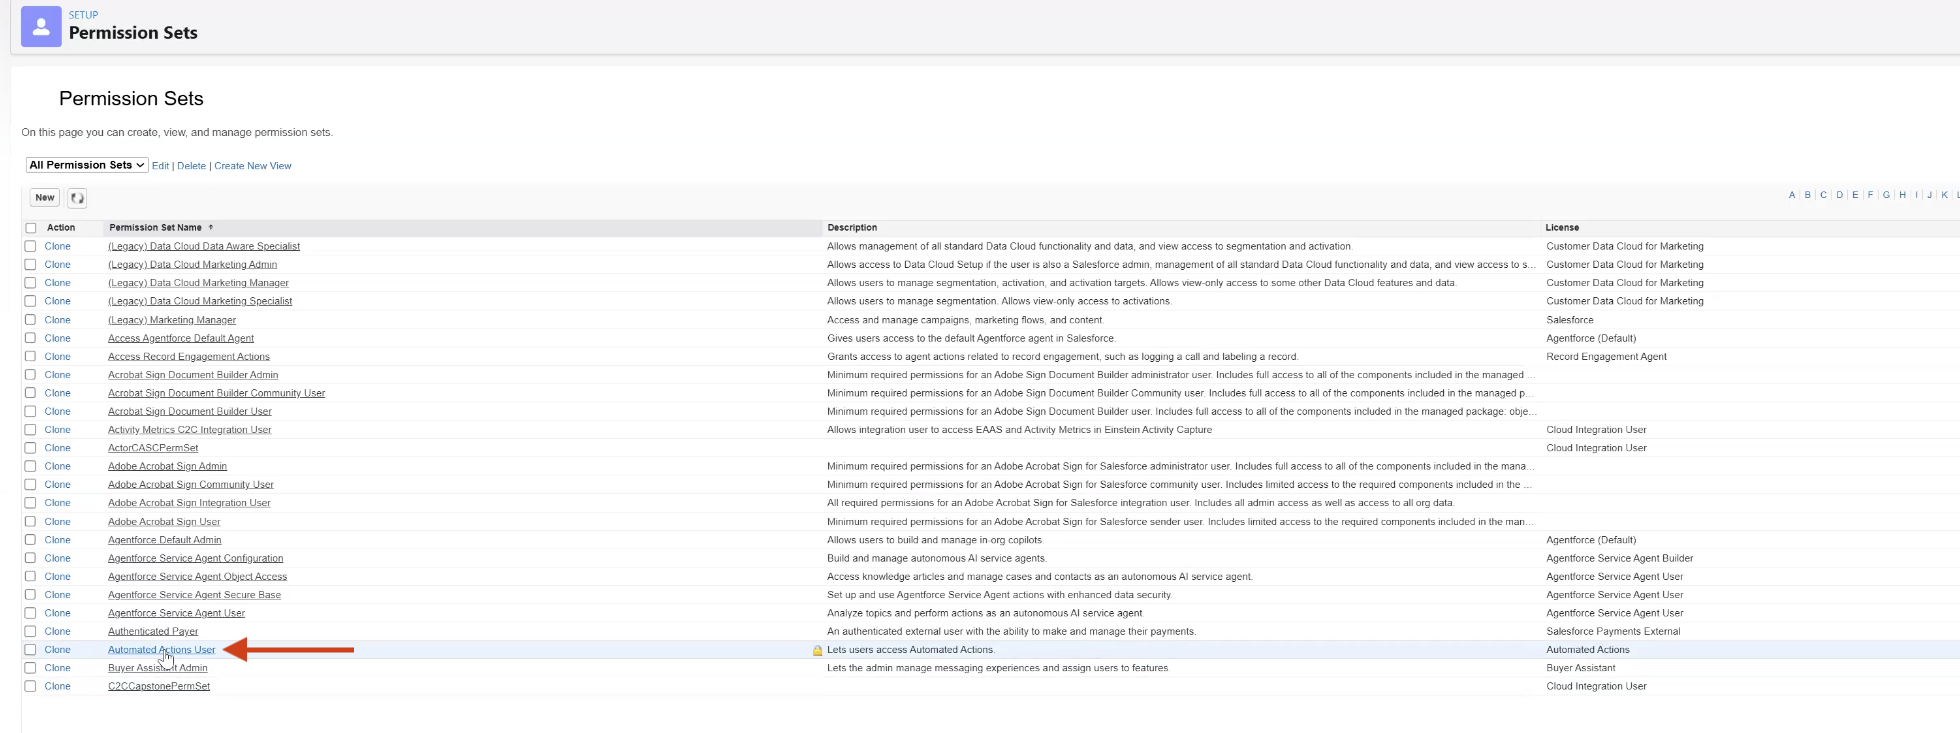
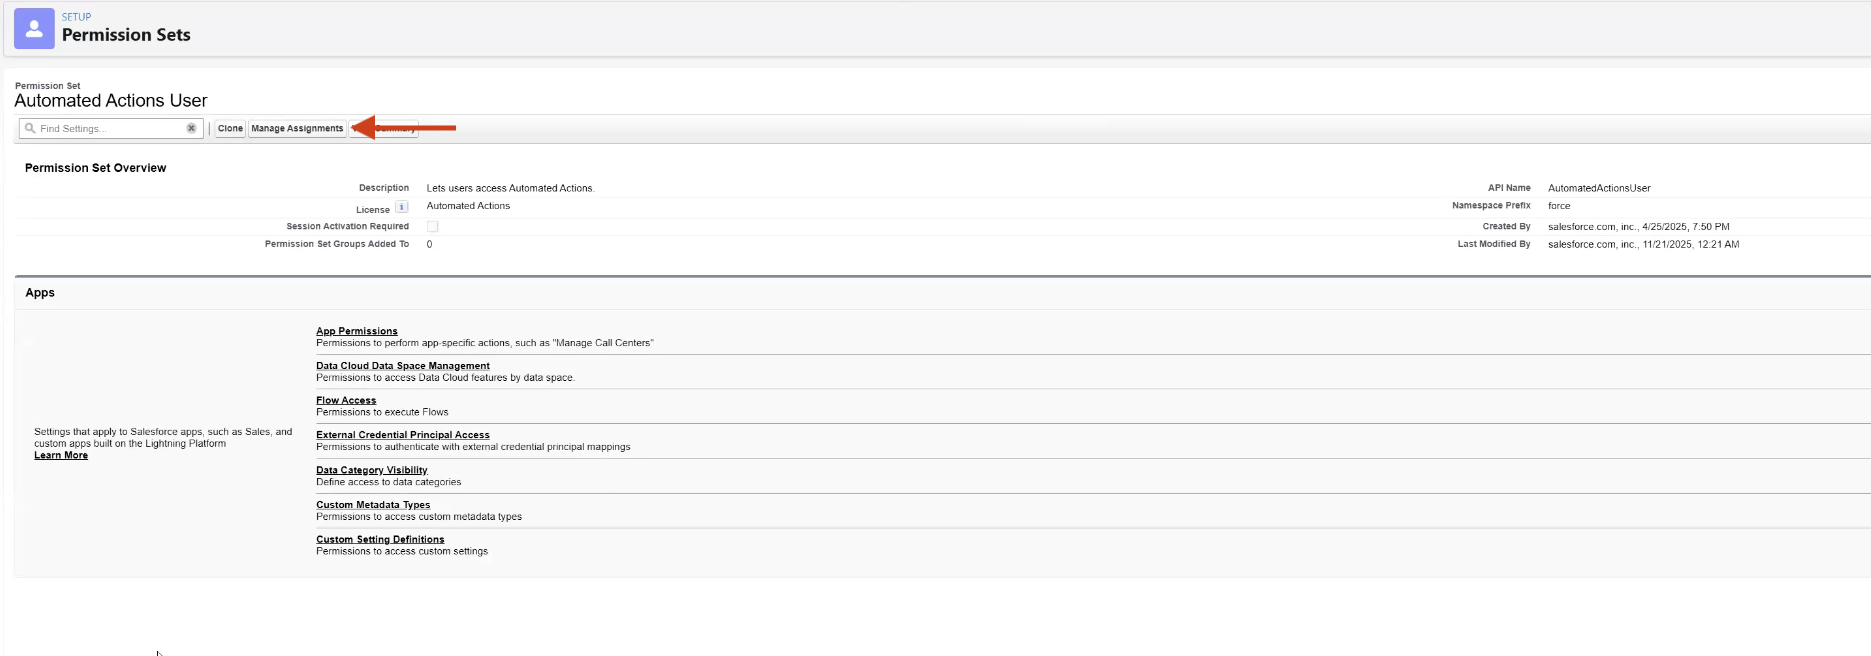
Assign the Automated Actions permission set to anyone who needs permission to configure them
If this permission set has been newly assigned, log out of Salesforce and back in to make sure the permission is granted before attempting to set up automated actions.
5.Create an Automated Action to automatically enroll Gem-E records
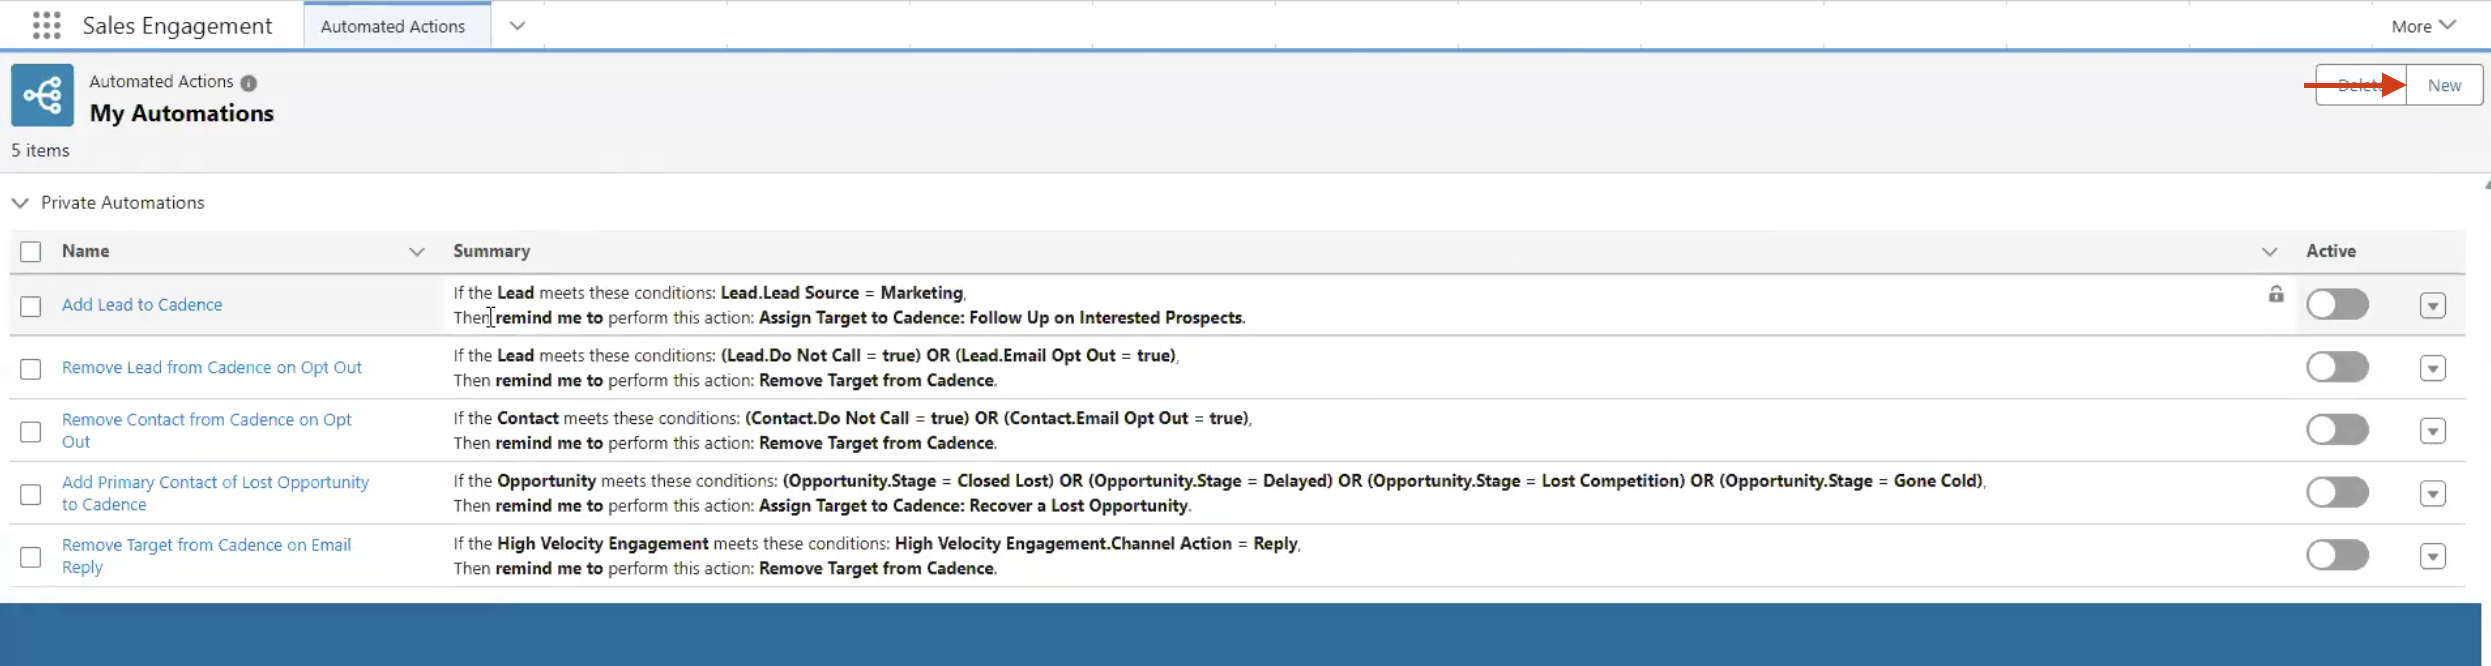
Within the Sales Engagement App in Salesforce, navigate to Automated Actions.
Within Automated Actions, click the New button in the top right.
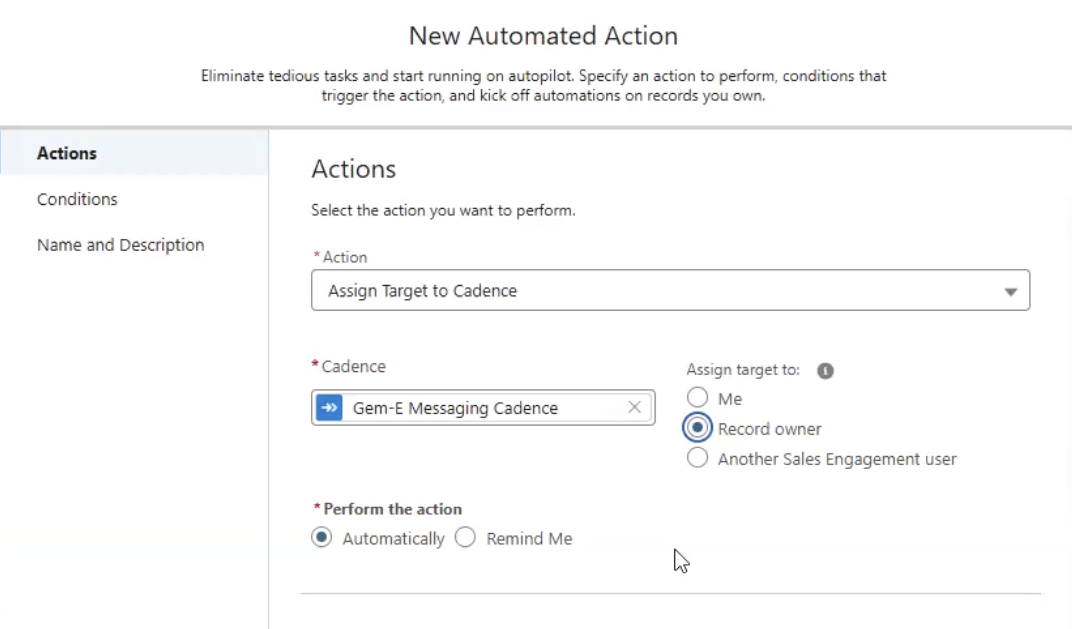
Configure your Automated Action:
Action: Assign Target to Cadence
Cadence: Select the Cadence you created in Step 3
Perform the action: Automatically
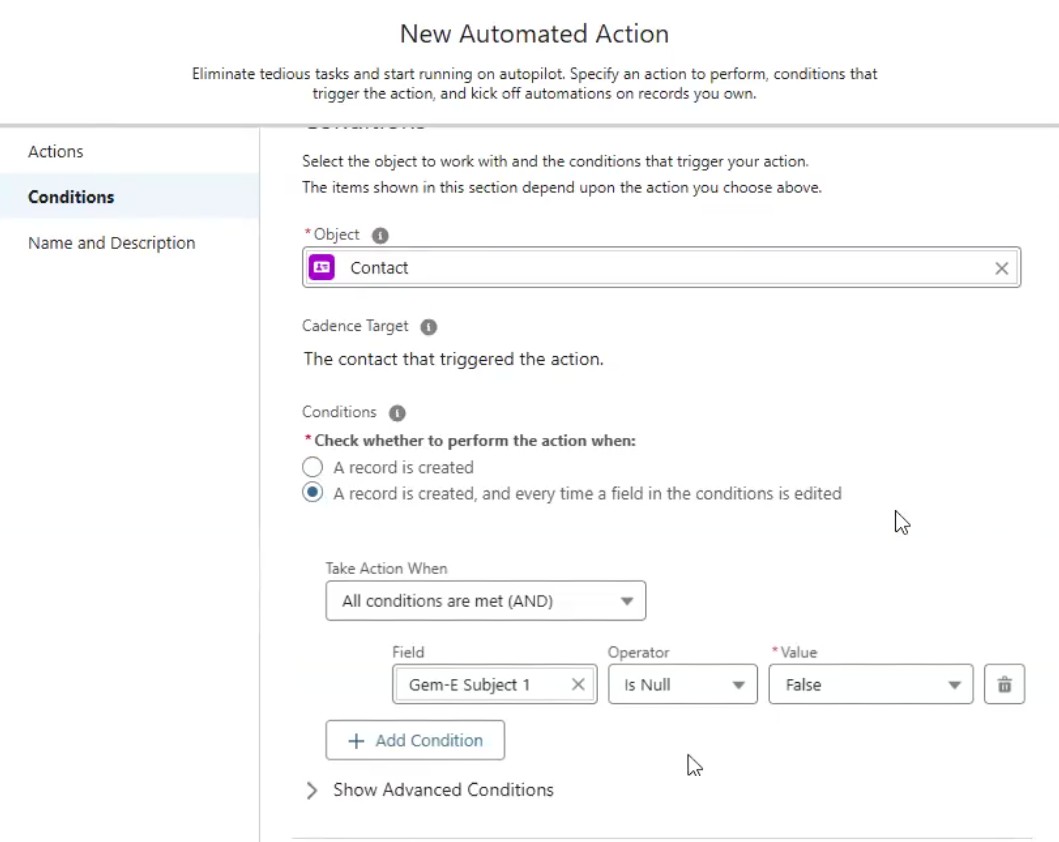
Select the Object your automated action should apply to (e.g. Contacts or Leads)
Check whether to perform the action when: A record is created, and every time a field in the condition is edited
Select the custom variable you created in Step 1 that corresponds toGem-E Subject 1, Operator: Is Null, Value: False (this is Salesforce speak for "when the Gem-E Subject 1 field is not blank)
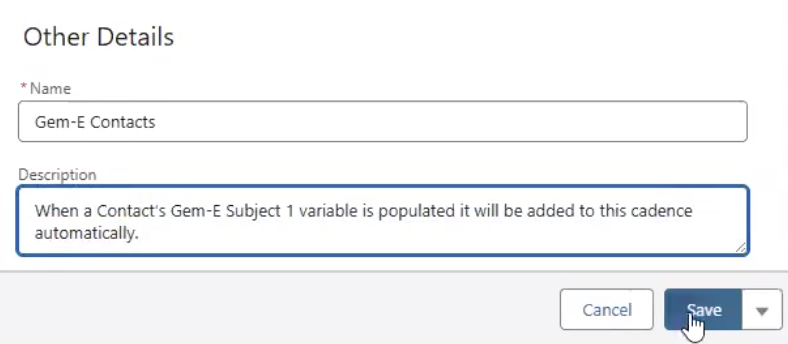
Give the automation a name, e.g. Gem-E Contacts
Optionally, include a detailed description of what the automation does
Save
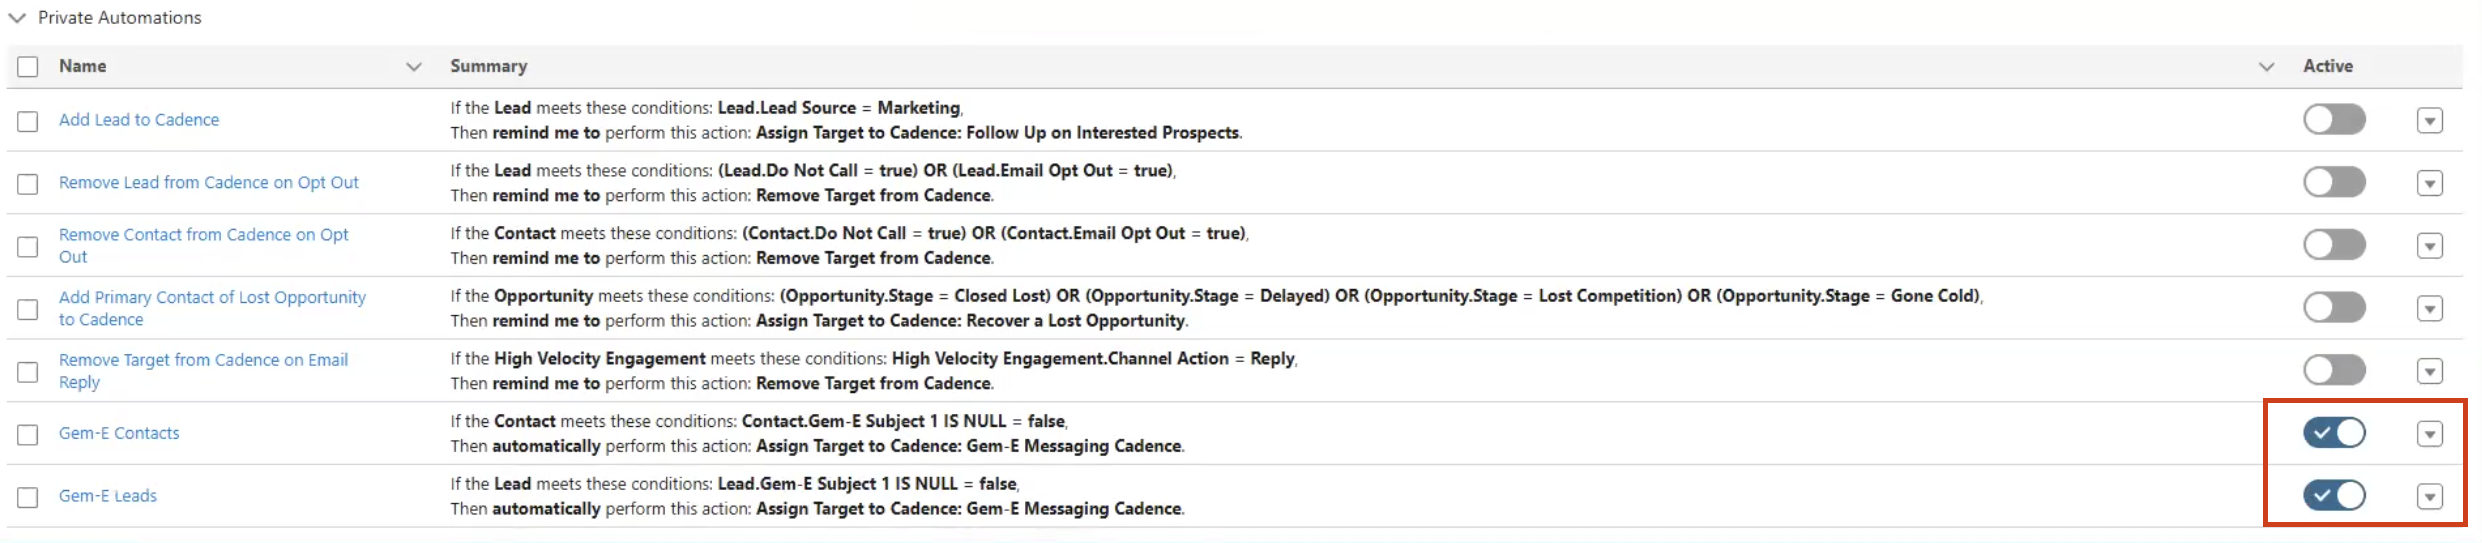
If you use both Leads and Contacts in Salesforce, start with Contacts and clone the action for Leads once you're finished. In the Lead automated action, choose the Lead Object and corresponding Lead Gem-E Subject 1 field, and give it a different name.
Cloning an automated action for Contacts to create a Leads version
Finally, activate your Automated Action(s). As Leads/Contacts have their Gem-E variables populated by UserGems workflows, they'll start enrolling prospects automatically.