

What is The Writing Agent?
The Writing Agent is built to be your sellers’ ultimate co-pilot.
It continuously analyzes both people and account signals to identify and prioritize the highest-potential prospects. Then, it generates personalized messaging based on those signals.
In short, it automates time-consuming, non-selling tasks so your team can focus on what matters most: real, human-to-human connections.
This guide walks you through how to set up and chat with the Gem-E Writing Agent to shape your outbound messaging.
Where to find the Writing Agent
There are two places to work with the Writing Agent.
1. Global level
Head to the Navigation Bar → Writing Agent tab.
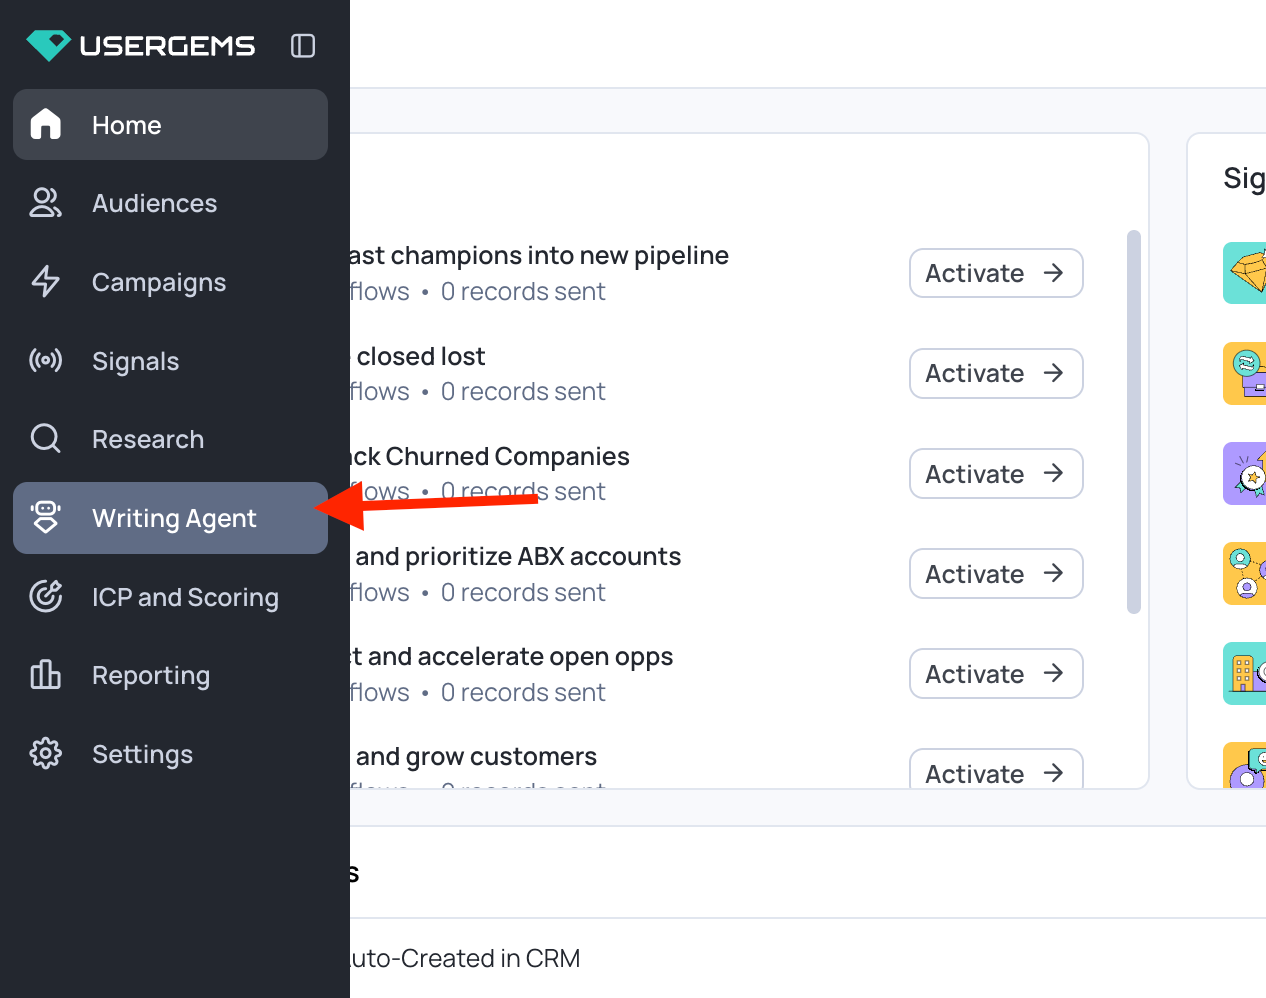
This is where you shape your outbound messaging at the global level — meaning across all of your sequences at once.
2. Campaign level
Go to the Campaigns tab → open (or create) a campaign → activate the outbound branch → click the “Add action” button → add “Writing Agent”.
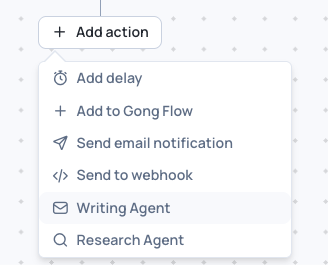
The campaign-level editor has the exact same UX.
The only difference is scope: any change you make while working inside a campaign affects only that campaign. Nothing you do here touches your global messaging or your other campaigns.
The UX: two panels
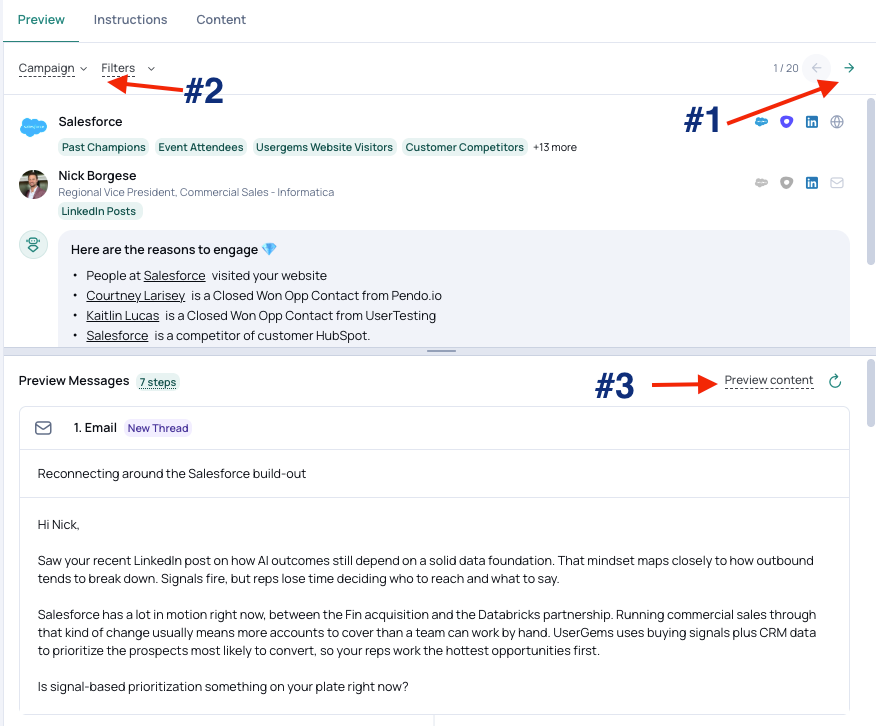
The screen splits in two. On the left is the chat, where you talk to Gem-E. On the right (by default) is your preview area, where you see a preview of messaging for real prospects in your audience.
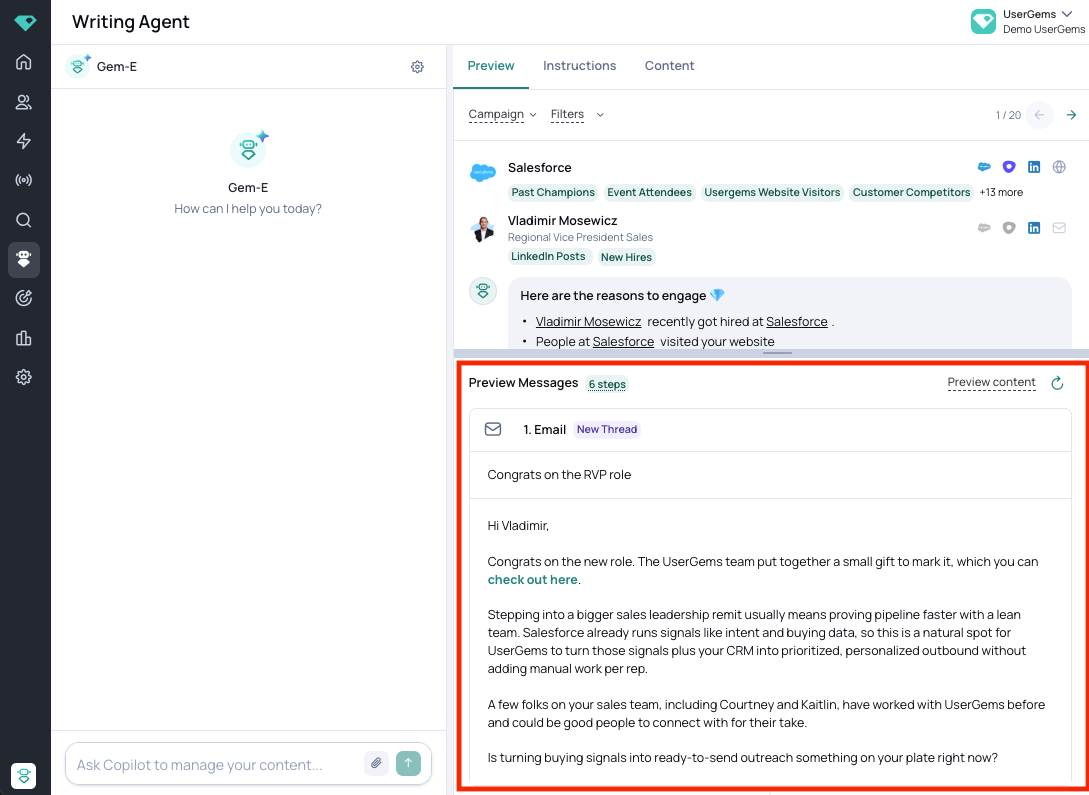
Three tabs to get familiar with: Preview, Instructions, and Content.
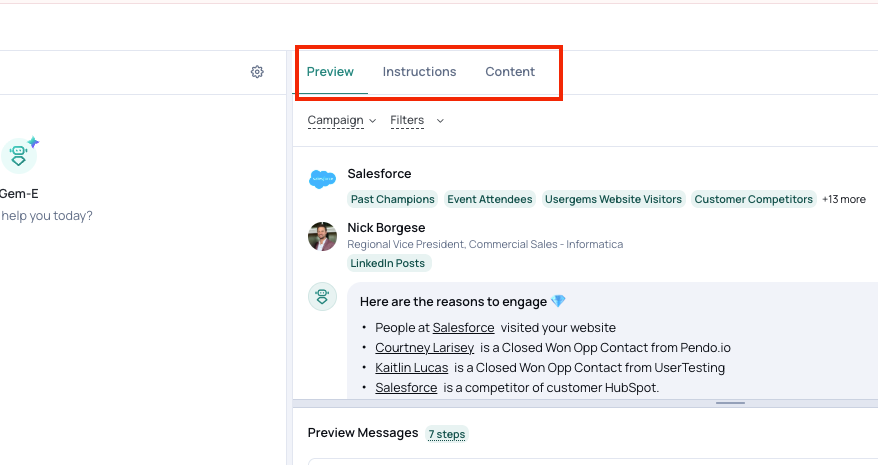
We’ll get into what each one does later — for now, just know the chat drives your changes, and these tabs are where you see and manage them.
The Chat
90% of the actions you take will go through the chat:
- Shape your messaging — tone, structure, sequence length, subject lines, CTAs.
- Add content — case studies, links, value props, and more (covered in its own section).
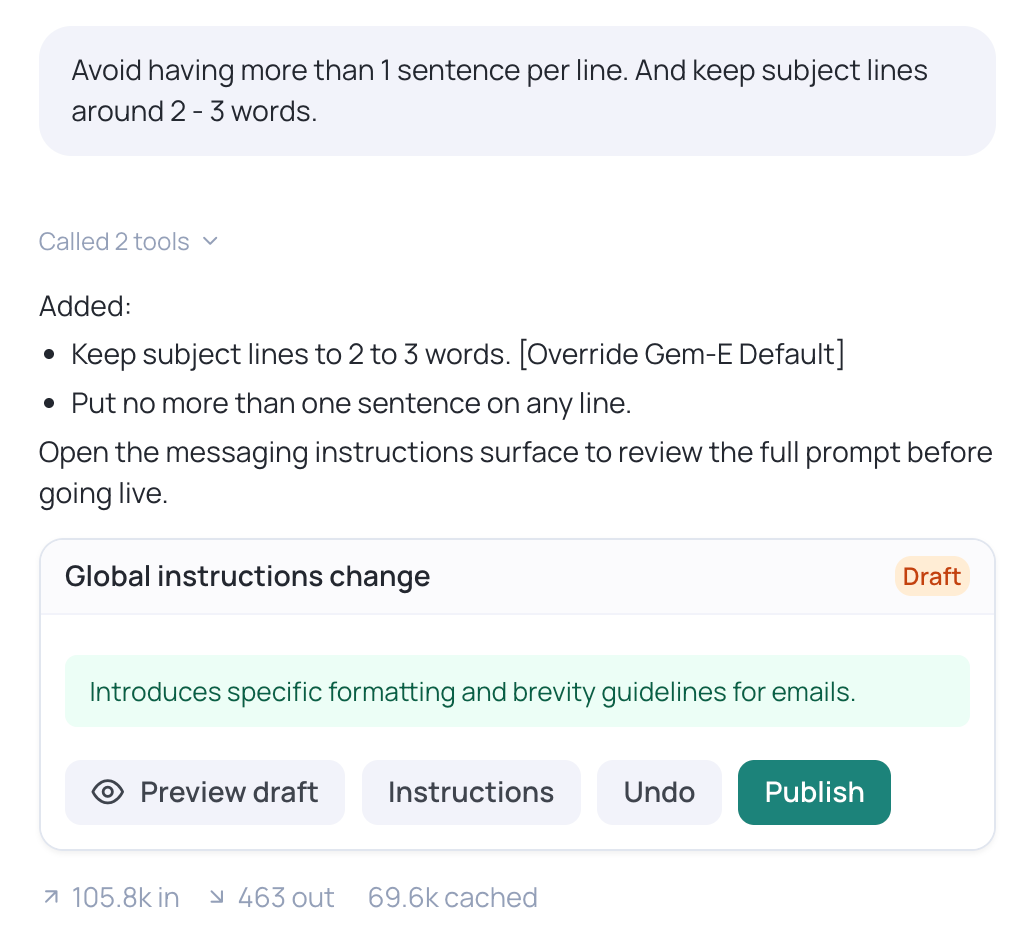
The Preview Panel
As you chat, the right-hand panel previews exactly what your changes look like. From there you can:
- Flip between prospects and watch the messaging change dynamically based on each one’s signals — at the contact or account level.
- Use filters to switch up the audience on the fly (or preview a specific campaign), without having to pre-create an audience just to see examples.
- Preview specific pieces of content, like a case study or link, pulled from your content library.
Do’s & Don’ts
The golden rule: keep your instructions broad enough to apply to every prospect, since Gem-E writes dynamically for each one.
A few more rules of thumb:
- Give examples when you can — show Gem-E what “good” looks like.
- Make one change per chat — far easier to undo a single instruction than to feed four or five instructions into one chat and have to undo everything at once.
- Don’t ask Gem-E to do things outside messaging (change your audience, edit a workflow) or pull data it doesn’t have.

Shaping Messaging
You shape your messaging by giving Gem-E instructions. There are two places to do that.
90% of the time we recommend using the chat function. Why? Two reasons:
- It structures your instructions for you — it phrases them well and files them in the right place, so you never have to know where anything goes.
- It has guardrails. Before it creates any instructions, it asks clarifying questions to make sure it understands exactly what you want.
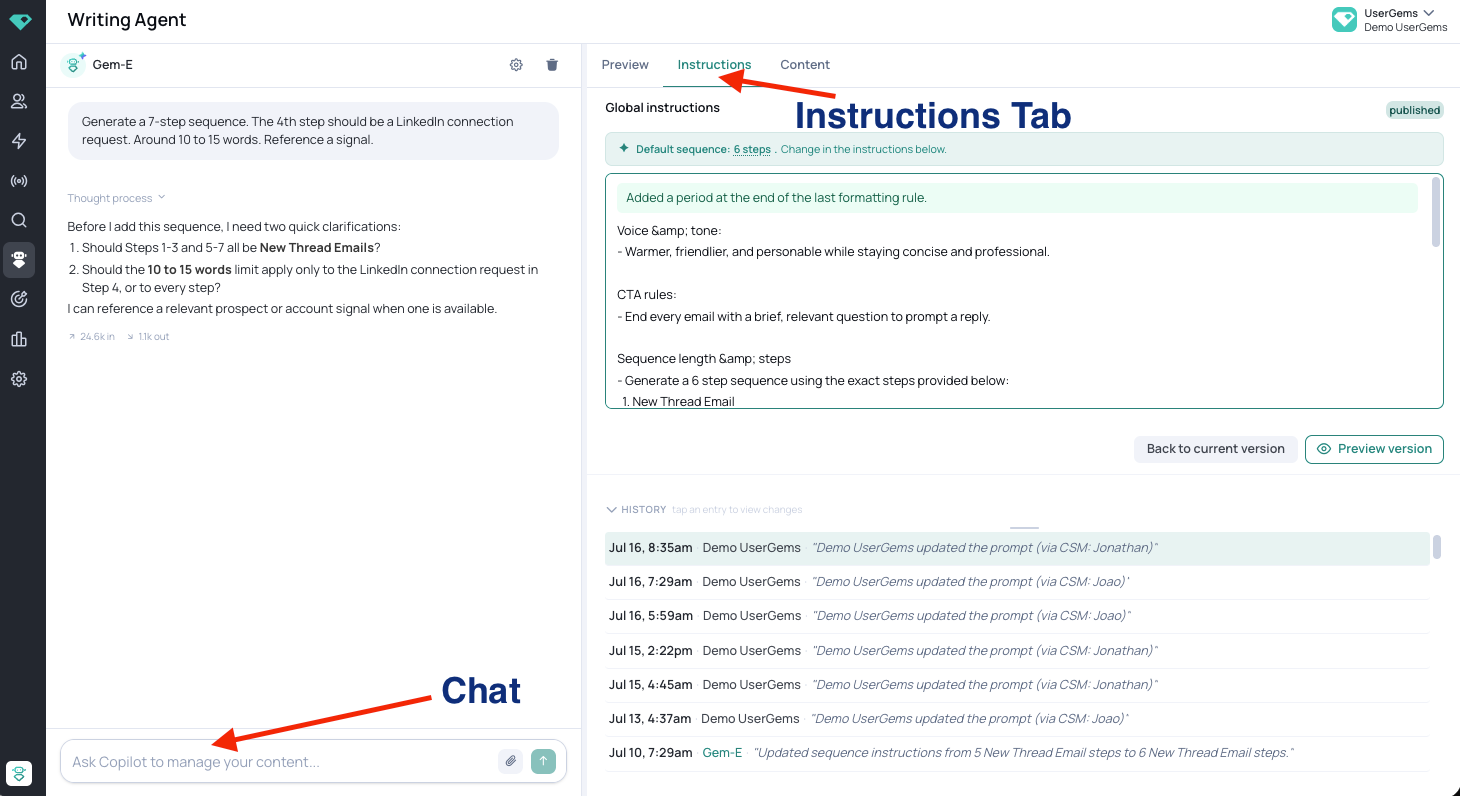
Making a change using the chat
Type your request in plain English:
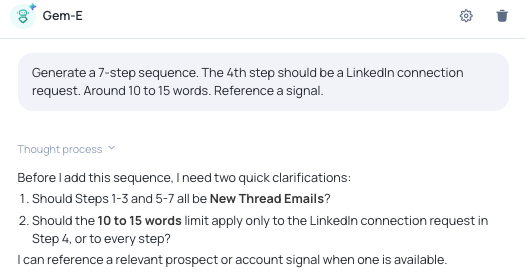
Answer Gem-E’s clarifying questions, and it returns two things: (1) a plain-English summary of what it changed, and (2) a card summarizing proposed changes.
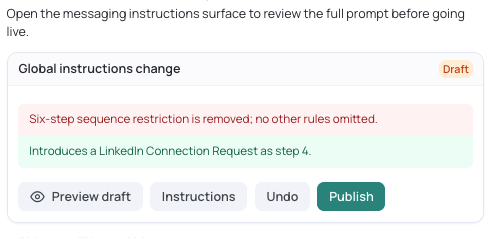
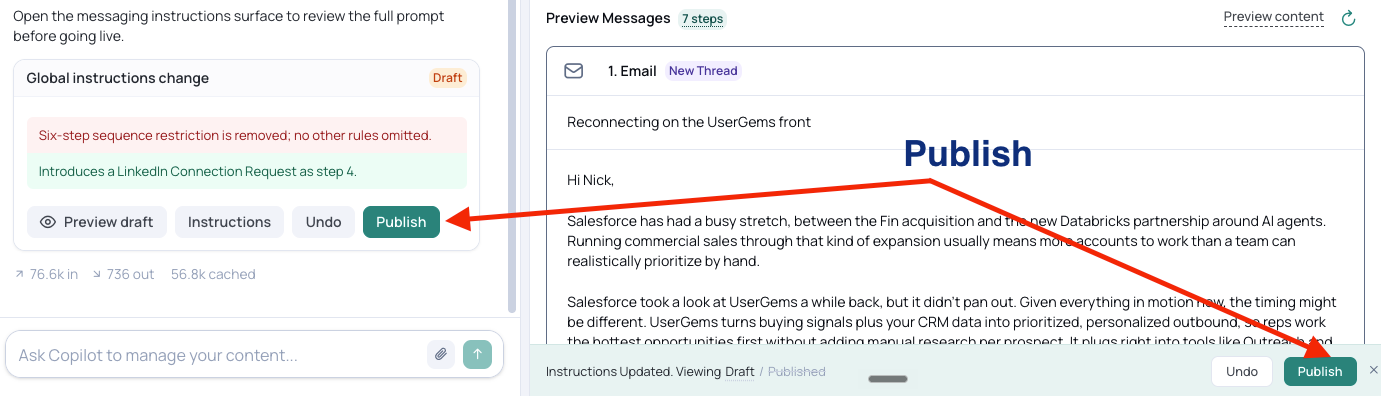
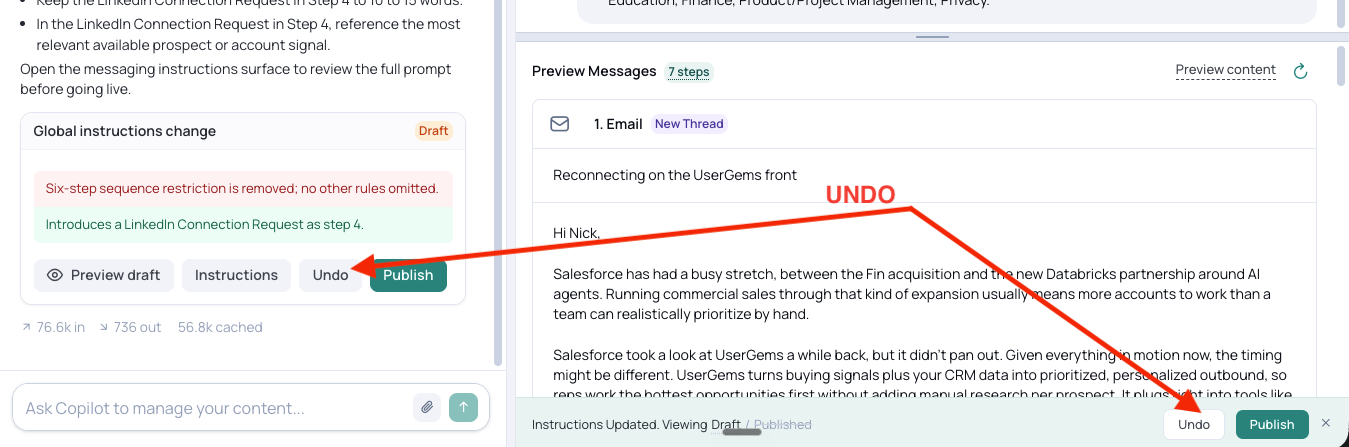
Every change card gives you the same four options: Preview draft, Instructions, Undo, and Publish.
Using forward slash commands
Use the forward slash command to clearly tell the Writing Agent what you’re trying to add or update.
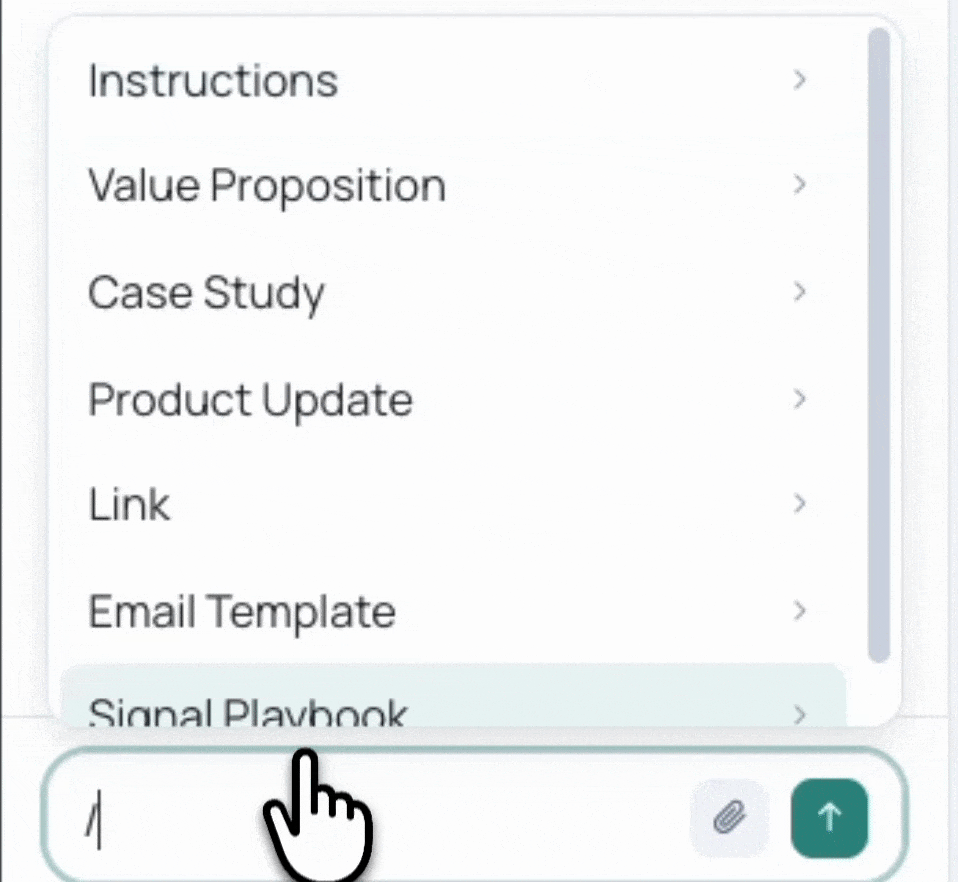
Pick a content type and you’ll get an Add or Update option:
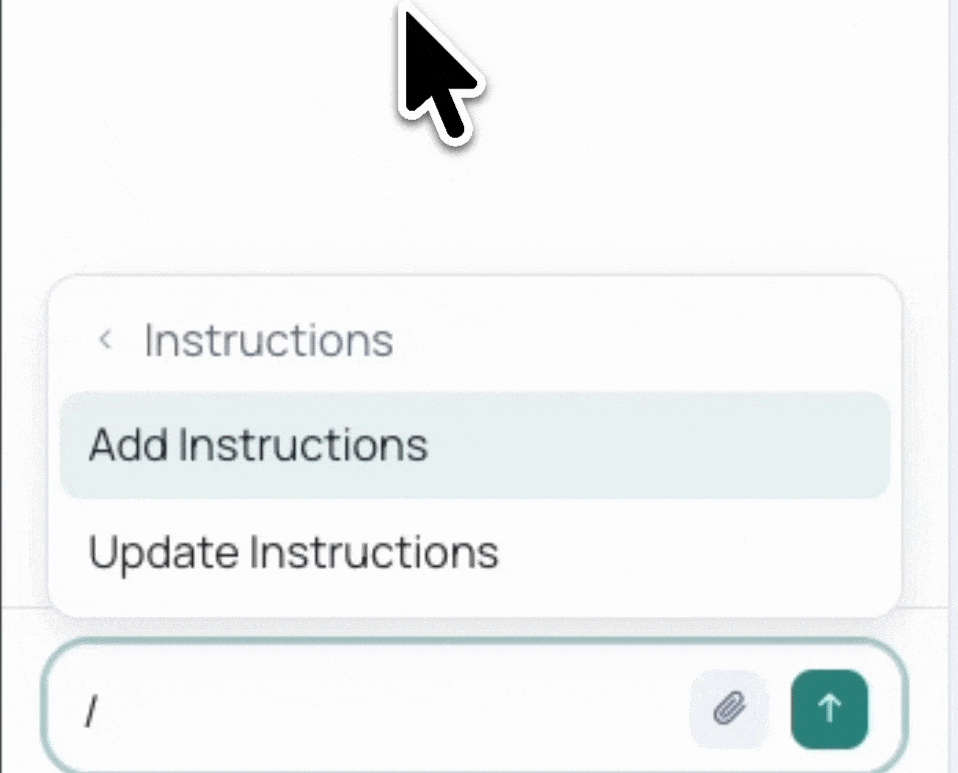
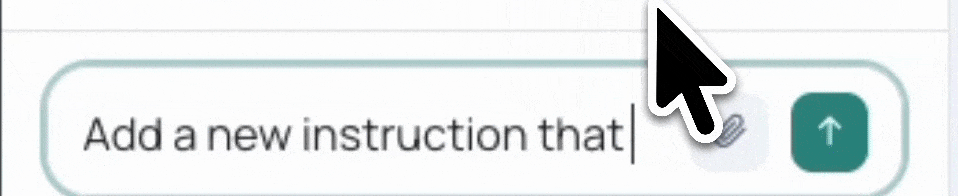
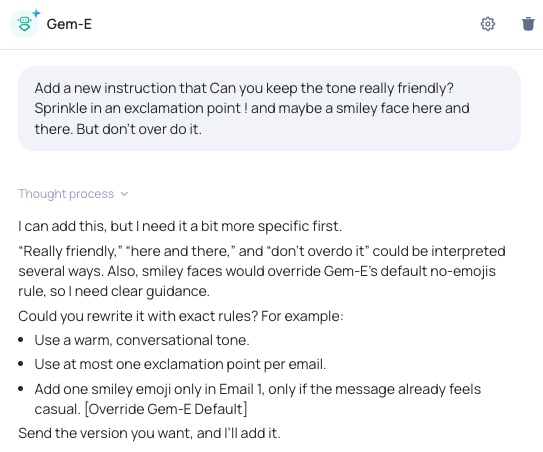
In the example below we asked it to change the tone of the messaging.
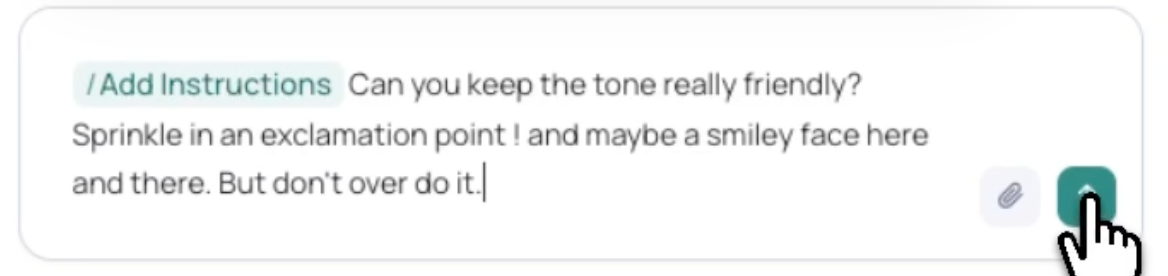
The chat itself wasn’t clear enough, so the Writing Agent will ask clarifying questions to understand you before it applies any instructions.
Previewing & managing your changes
Once you make a change with the Writing Agent, here’s how to preview it, publish it, undo it, and track your history.
Preview before you publish
On the right, the preview updates to show your change on real prospects.
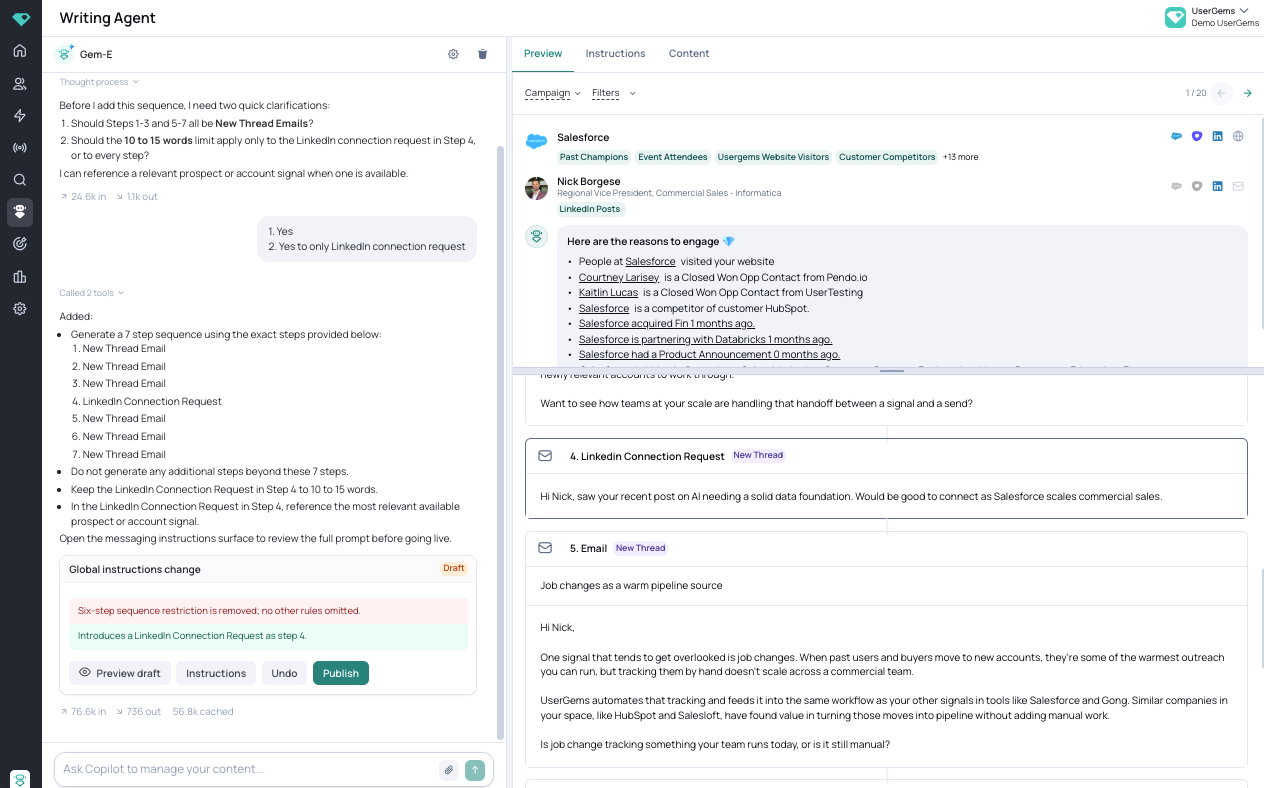
While previewing, you can:
- Flip between prospects to confirm the change holds up across different signals.
- Toggle between Draft and Published to compare before and after (see the bottom bar, “Viewing Draft / Published”).
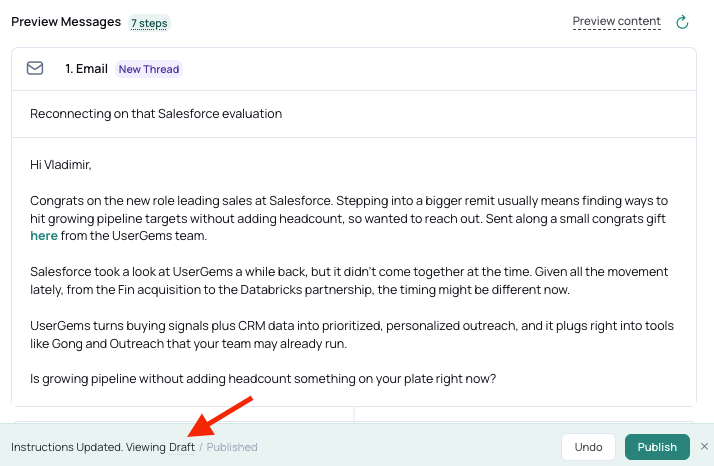
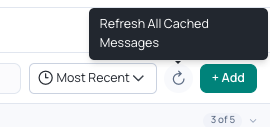
If the preview doesn’t update after you send, hit the reload icon to refresh.
Publishing
Once you’ve previewed and you’re happy with it, hit Publish. Your change goes live and applies to messaging going forward.
Undo
Changed your mind? Undo rolls back your last change — both the instruction and the messaging update that came with it.
Track changes in History
Go to the Instructions tab and click the History dropdown at the very bottom to see every change: when it happened, who made it, and a short description. This helps teams keep track of the messaging as it changes over time.
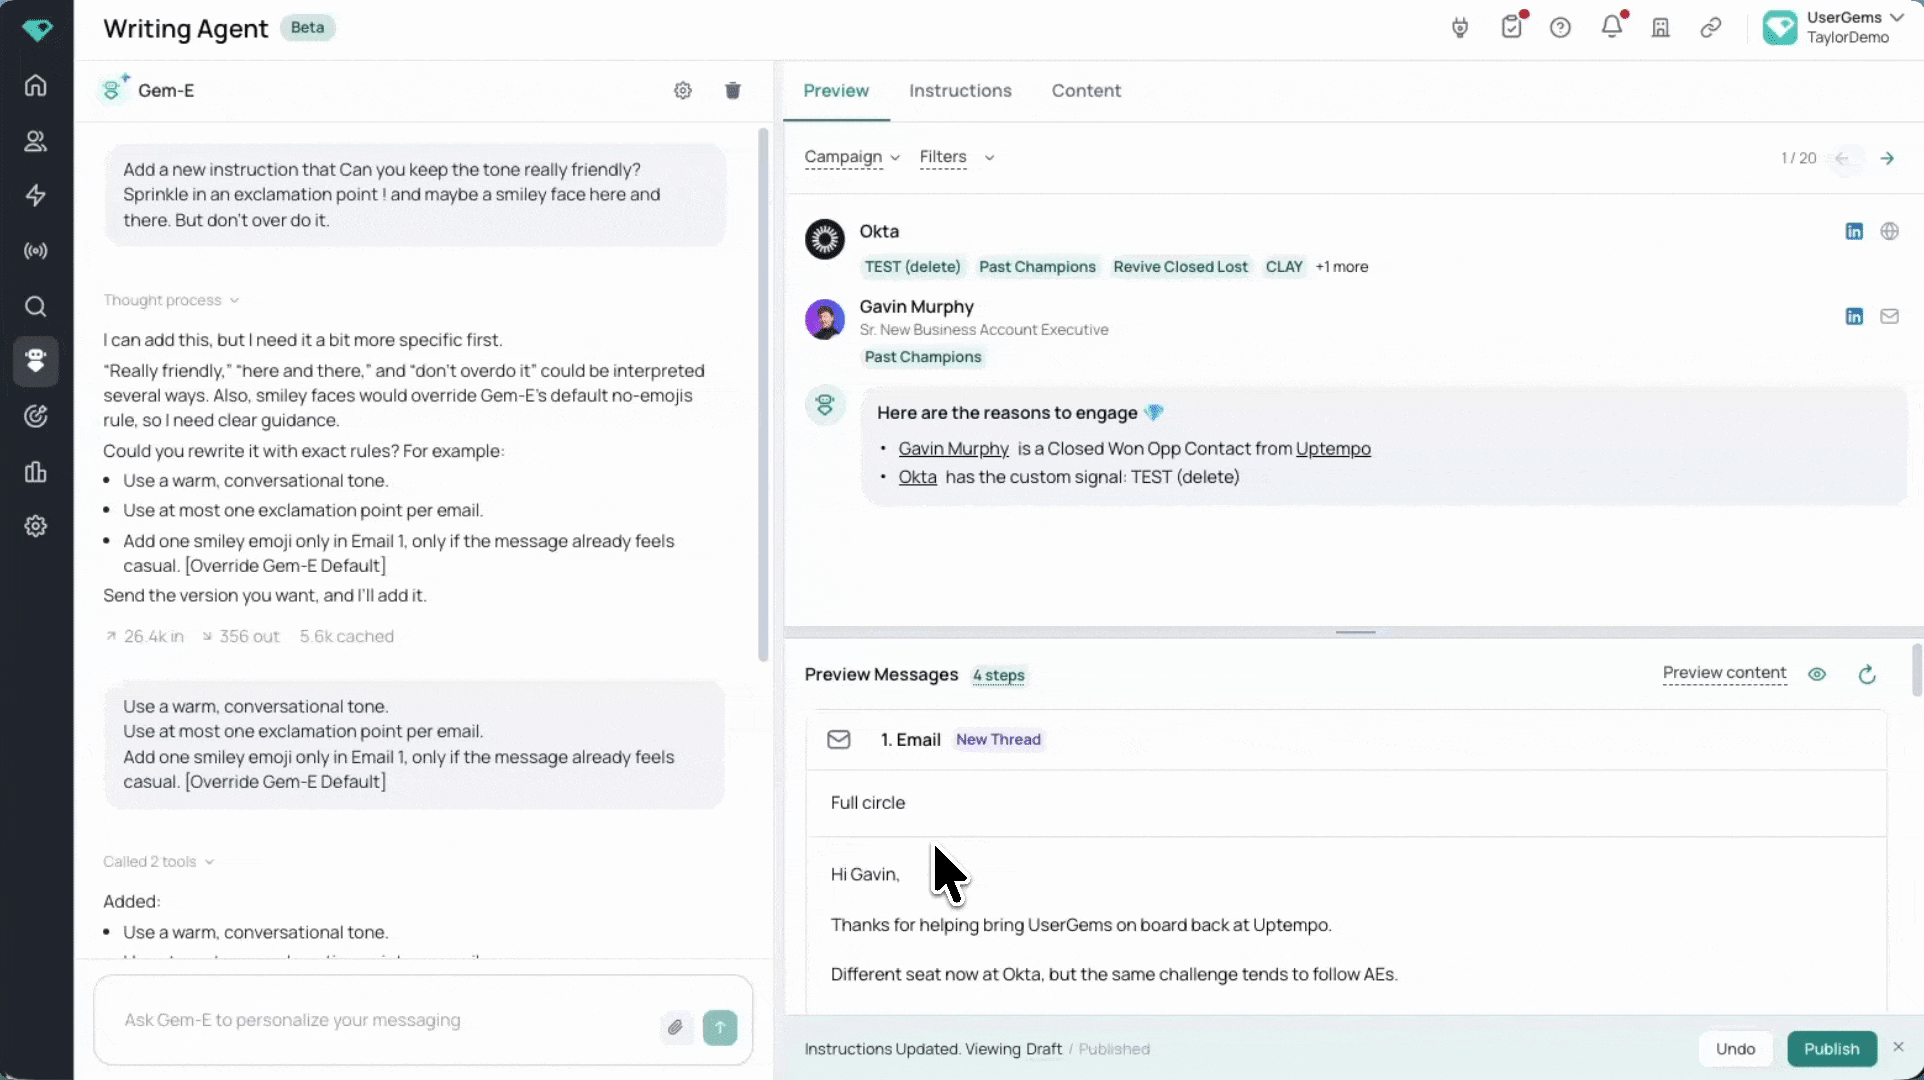
Your unpublished change shows here as a Draft entry, with Publish and Undo right there.
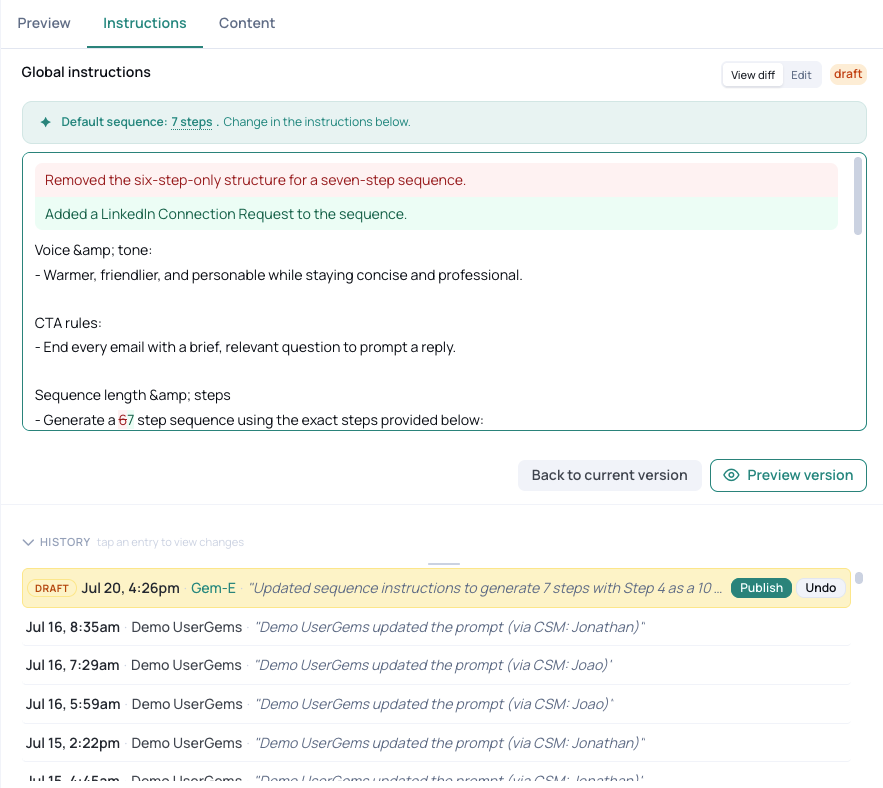
Your drafts will autosave, so if you exit out, all of your changes will be waiting there untouched.
Your chats are private. Colleagues won’t see your chat history with Gem-E, but they will still have access to the changes you made, so they can undo or publish your draft.
How it works out of the box
Before you start adding your own instructions, it helps to know that the Writing Agent isn’t a blank slate.
Out of the box, it already follows a set of default instructions and playbooks. It knows things like:
- The default sequence length
- How to congratulate a job change or a new hire
- How to handle a link or a case study
- How to reference closed-lost information
For example, with a link, Gem-E knows by default to hyperlink it rather than paste the full URL — and to weave it naturally into the email. You don’t have to teach it the basics; it already knows best practices.
The default system prompt never appears inside the Instructions tab — it isn’t shown or editable. If the Instructions tab is empty, it means you haven’t added any of your own custom instructions yet.
What this means for your content
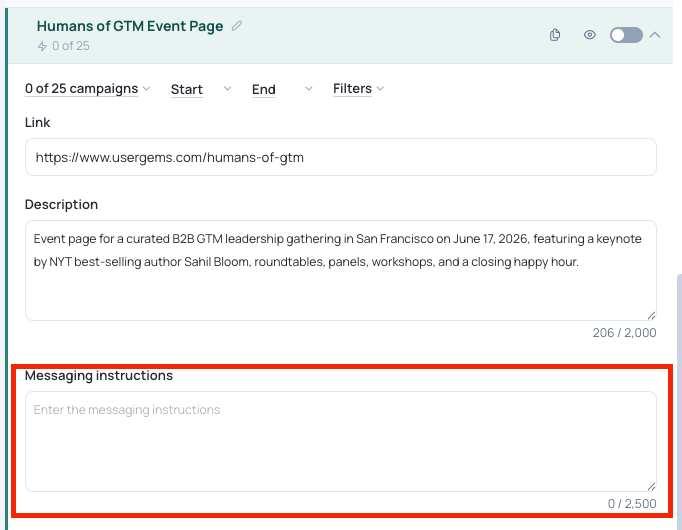
Because the defaults are strong, your content works out of the box too. When you add a piece of content, the Messaging Instructions field is optional — you only fill it in when you want Gem-E to do something specific on top of how it already handles that content.
Your instructions build on top
Anything you tell Gem-E layers on top of those defaults — most of the time, it simply adds to them. And if your instructions happen to conflict, it follows this hierarchy:
The Campaign Prompt will always win over the Global Prompt, and the Global Prompt will always win over the Default. The only exception to this rule is Conditional Instructions — the system is designed to always follow Conditional Instructions above everything else.
Example of the hierarchy in action with Conditional Instructions:
- Default Prompt: writes emails in English by default
- Campaign Prompt: write emails in Spanish (for this campaign)
- Conditional Instruction: write emails in French if the prospect is based in Paris — this takes precedence over Global and Campaign instructions
Best practice: keep conflicts to a minimum. Even though the Writing Agent is good at following this order, a lot of contradictory instructions can still push it off track. The cleaner the instructions, the more reliably it follows the hierarchy — so avoid stacking conflicting rules where you can. If you do include contradictions in the prompt, add a note next to them to ignore the other instruction. For example — Company Instructions: “Generate a 10 step sequence”; Campaign Instructions: “Generate a 5 step sequence [Ignore all other sequence length instructions]”.
What happens when you override the default
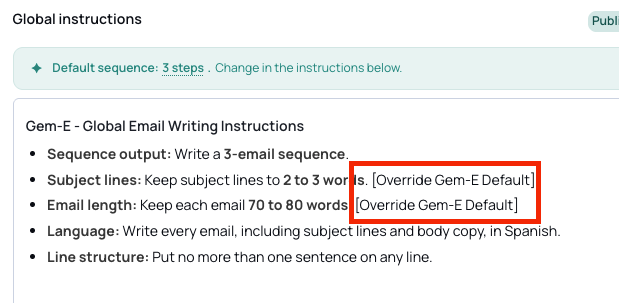
When something you ask directly conflicts with the default system prompt, Gem-E flags it with an [Override Gem-E Default] tag — you can see this directly within your instructions.
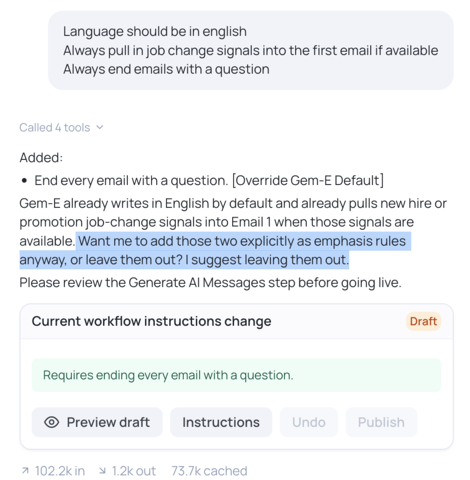
What happens if you ask it something already in the default? The Writing Agent will let you know that the instructions already exist:
Intro to Content
Content is what Gem-E pulls from when it writes — the value prop, case studies, links, and more. It all lives in the Content tab.
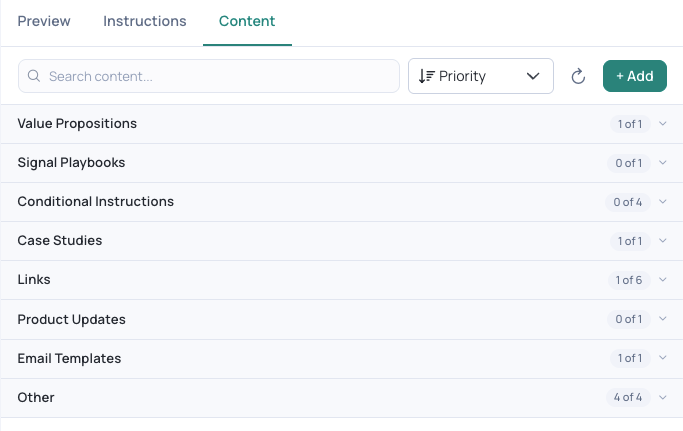
This section is a high-level tour of the two most important content types: the value proposition and signals. In the next section, you’ll learn how to actually add and configure content.
Start with the value proposition
The value proposition is required — it’s the foundation for how Gem-E talks about the product: what it does, who it’s for, and the pain points it solves by persona. It shows up across all messaging, so it’s the most important piece to get right.
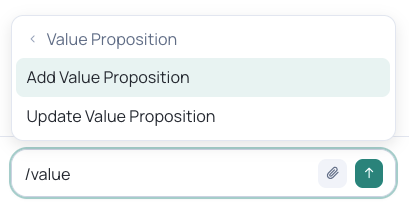
Create it directly in the chat — “help me create a general value prop” — and paste a website link for Gem-E to work from. Or try typing /value prop to get started.
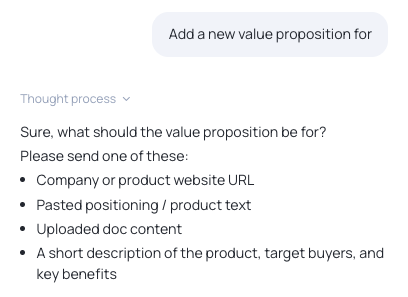
The Writing Agent will ask what it should use as a foundation (a website URL, pasted text, an uploaded doc, or a short description) and turns it into a draft.
Use cases for multiple value props:
- A vertical-specific play — a value prop written just for, say, cyber security prospects.
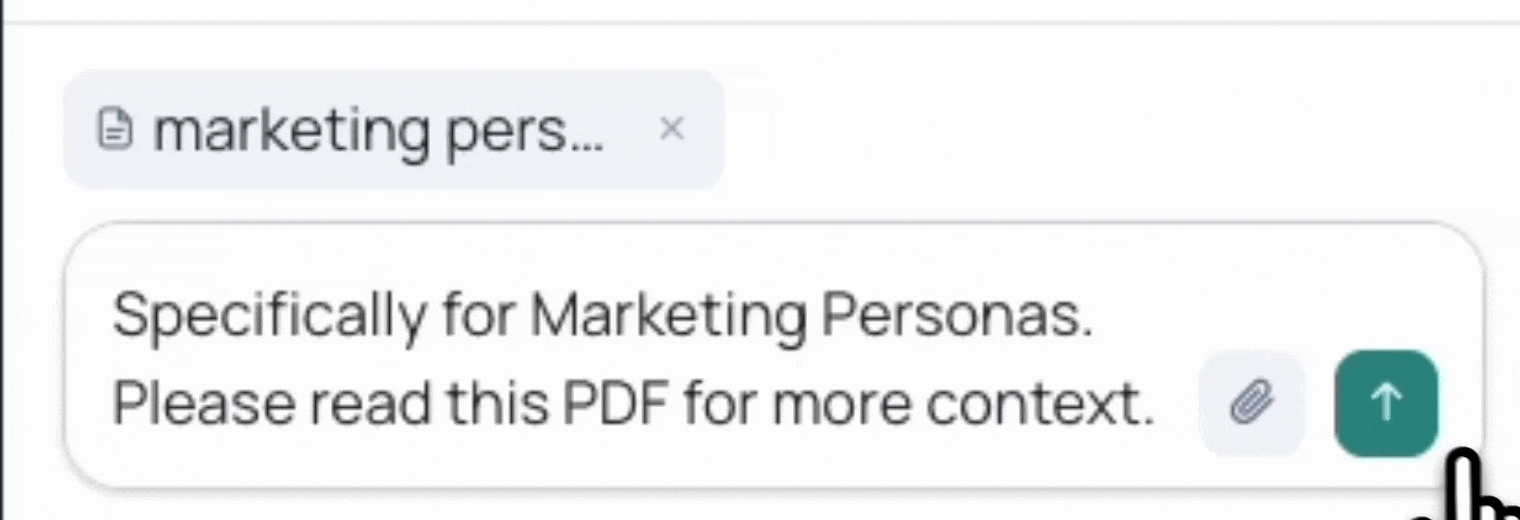
- A value prop dedicated to each persona being sold to.
In the example below we’ve attached a PDF for the Writing Agent to analyze.
Order matters for value props. Gem-E reads them top to bottom: if a prospect doesn’t match the first value prop’s filters, it moves down to the next. Put the most specific ones first. (One with no filters applies to everyone, so it usually belongs at the bottom.)
Signal Playbooks
Signals are the newest content type. They are simply the set of rules that controls how Gem-E personalizes the messaging around a given signal. There are two kinds.
1. Built-in signals
Native signals — job changes, new hires, past champions, and more — come out of the box with great messaging by default. Nothing to set up.
When you want to tailor how one of these sounds, you can add custom rules on top, and toggle any signal on or off at any time, either globally or for a single campaign.
Here’s a very common example: teams differ — some find success name-dropping and mentioning past relationships, while others want that off entirely. Rather than burying those rules in the global instructions, the Signal Playbooks content type keeps them isolated and easy to toggle in one place (i.e. stop referencing past champions by name in one campaign).
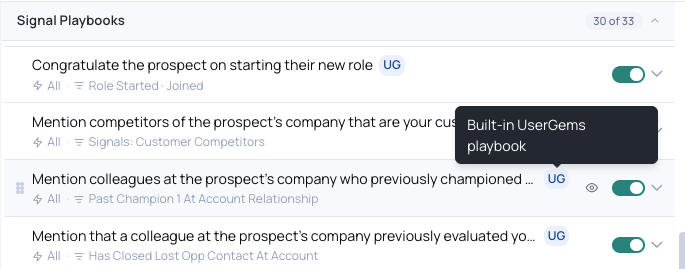
To add instructions to a playbook: ask the Writing Agent to update it in the chat (recommended), or type them into the Messaging Instructions field manually (not recommended).
2. New & custom signals
These work a little differently. When a new signal is created, Gem-E automatically spins up a Signal Playbook for it, with the signal already attached as a filter — but it starts empty and switched off until instructions are added.
Why? Because custom signals and sub-signals usually need more context before Gem-E knows how to use them. For example: if you create a new sub-signal for hiring, the Signal Playbook will automatically be created with the sub-signal applied in the filter.
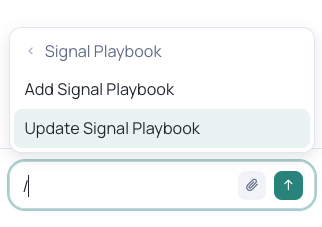
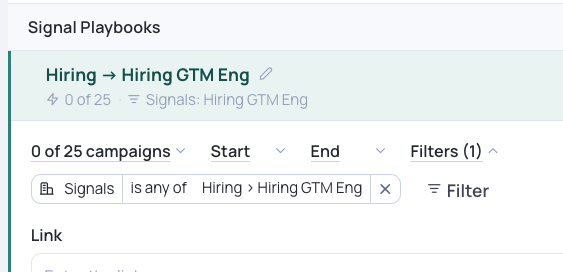
The instructions will be empty by default — go to the chat and provide instructions to update the Signal Playbook before you activate it.
⚠️ Important! It’s always recommended to update content directly from the chat, not from the content instructions directly. Because updating from the chat (i.e. /Update Playbooks) means the Writing Agent will structure your instructions for you, which will lead to better results. Only update the content instructions when you need minor tweaks or edits.
Optional content types
The value proposition and signals do the heavy lifting. Everything else is optional — extra content to add when it’ll make the messaging stronger. Here’s what’s available:
Email Templates was formerly called “Sample Emails.” It’s no longer used to shape the overall tone or style of your messaging; it’s literally email templates now. Use them only when you want templated language with light personalization layered on top — like pre-event outreach or messaging tied to a specific situation.
Setting up Content
Now that the key content types are covered, here’s how to actually add and configure content.
Two ways to add content
- Option 1: through the chat (recommended)
- Option 2: manually with the + Add button (avoid this if possible)
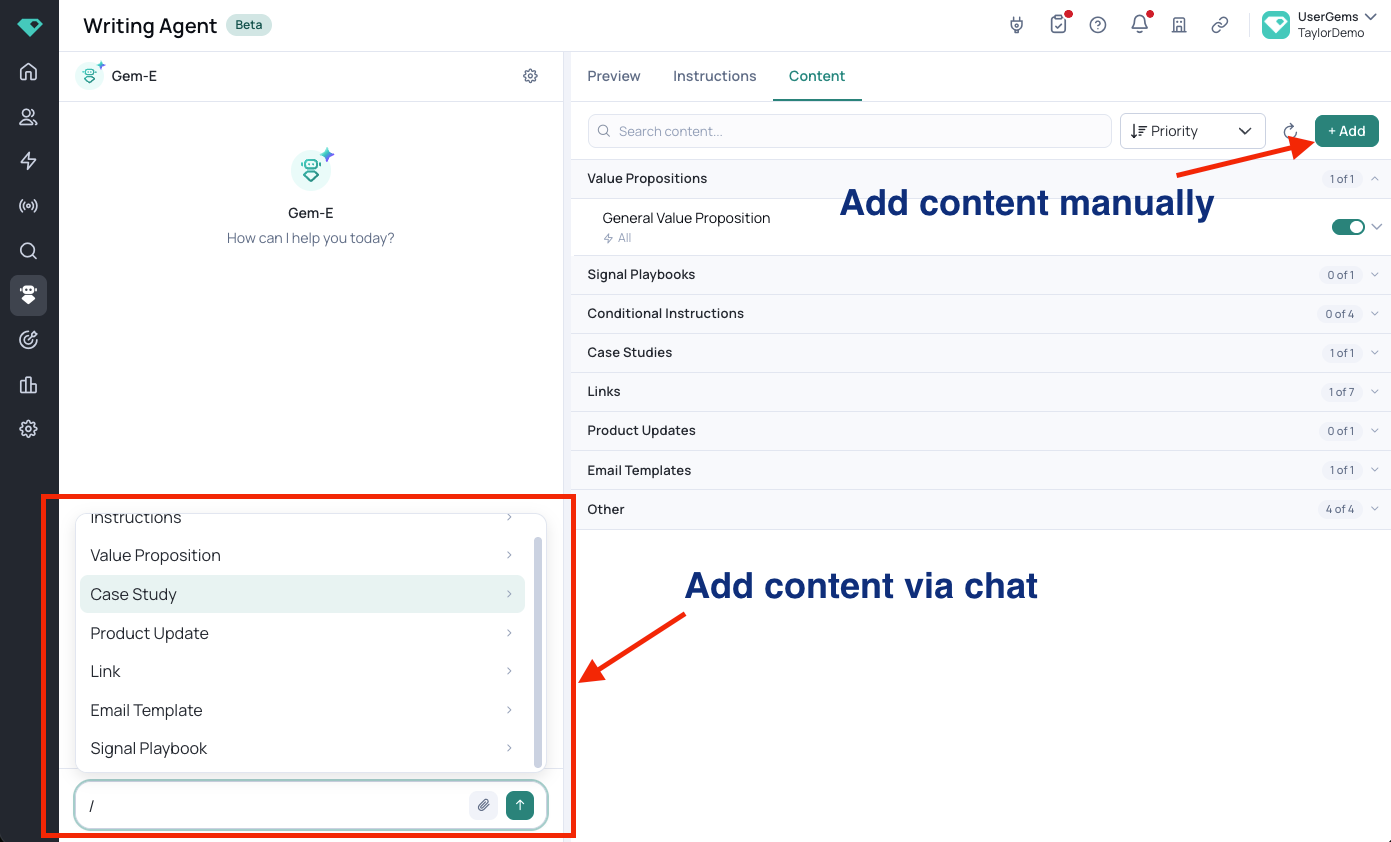
Adding content in the chat
Tell Gem-E what the content is and who it’s for, and drop in the link or attachment (PDF or .txt files are supported).
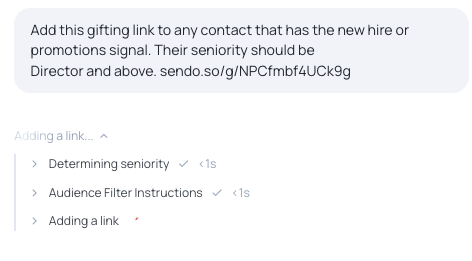
If it can’t access or understand your attachment, it will ask follow-up questions before creating your content. In the example below it couldn’t read the Sendoso URL and requested more information on what the title and description should be:
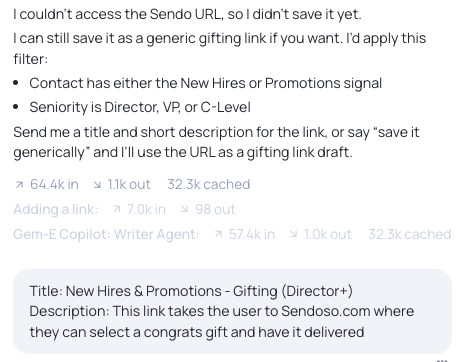
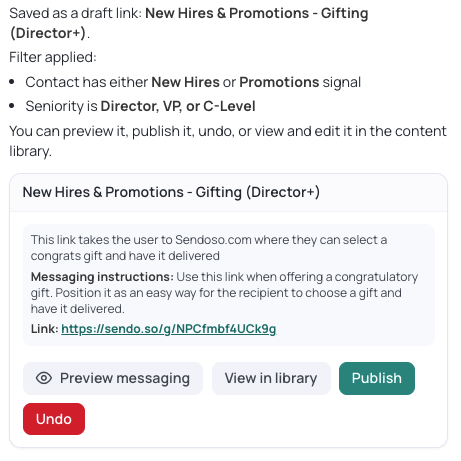
The card gives you Preview messaging, View in library, Publish, and Undo.
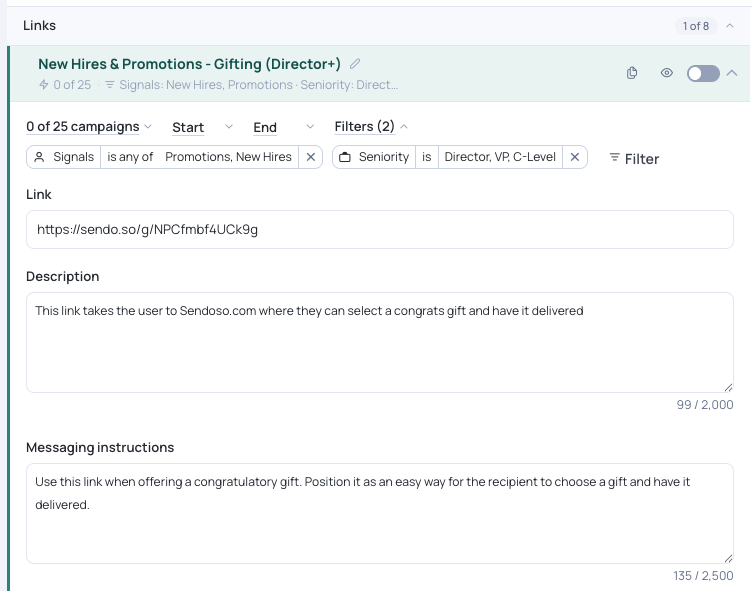
Click View in library to preview the full content details within the Content tab.
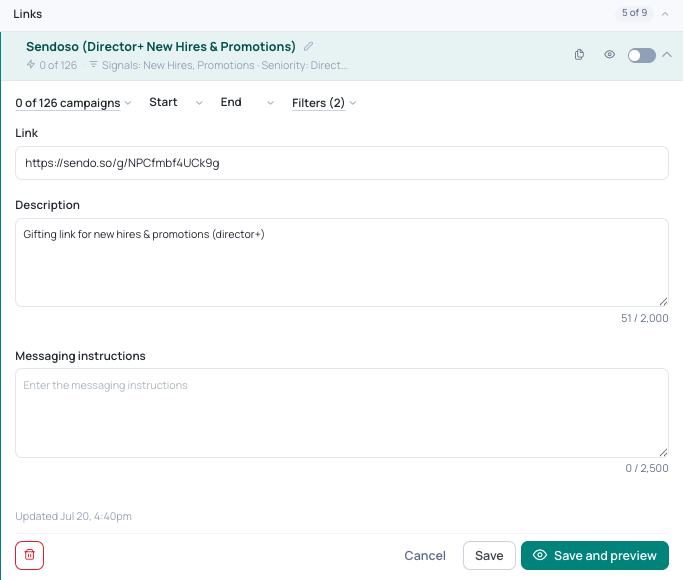
Tip: you don’t always need Messaging Instructions
In the example below we asked the Writing Agent to add a new link. It automatically generated the content with a Link and Description — leaving the Messaging Instructions empty.
Yet in the preview, Gem-E weaves the link in naturally and hyperlinks it, because it already knows how to handle links.

Only add Messaging Instructions to do something specific on top of the default.
Best practice: create the content in the chat → preview the messaging → then head back to the chat to request any updates. You can always type instructions into the box manually, but it’s better to let the Writing Agent adjust them for you.
Try hitting forward slash / → select your content type and press “update”.
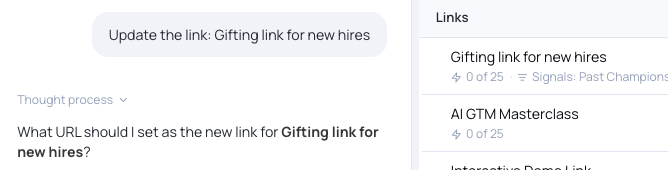
Not sure whether something’s already handled by default? Just try it — if the instruction is already covered, the chat will tell you it’s redundant and suggest leaving it out.
Configure your content
Aside from adding additional instructions or a description, you also have the option to add start and end dates, additional filters for which ICPs should see your content, narrow it to specific personas, or campaigns.
In the example below, an end date was added to this content, meaning it will auto turn OFF once the end date arrives.

The campaigns dropdown lets you pick and choose whether the content applies globally (across all campaigns) or scoped to a select few.
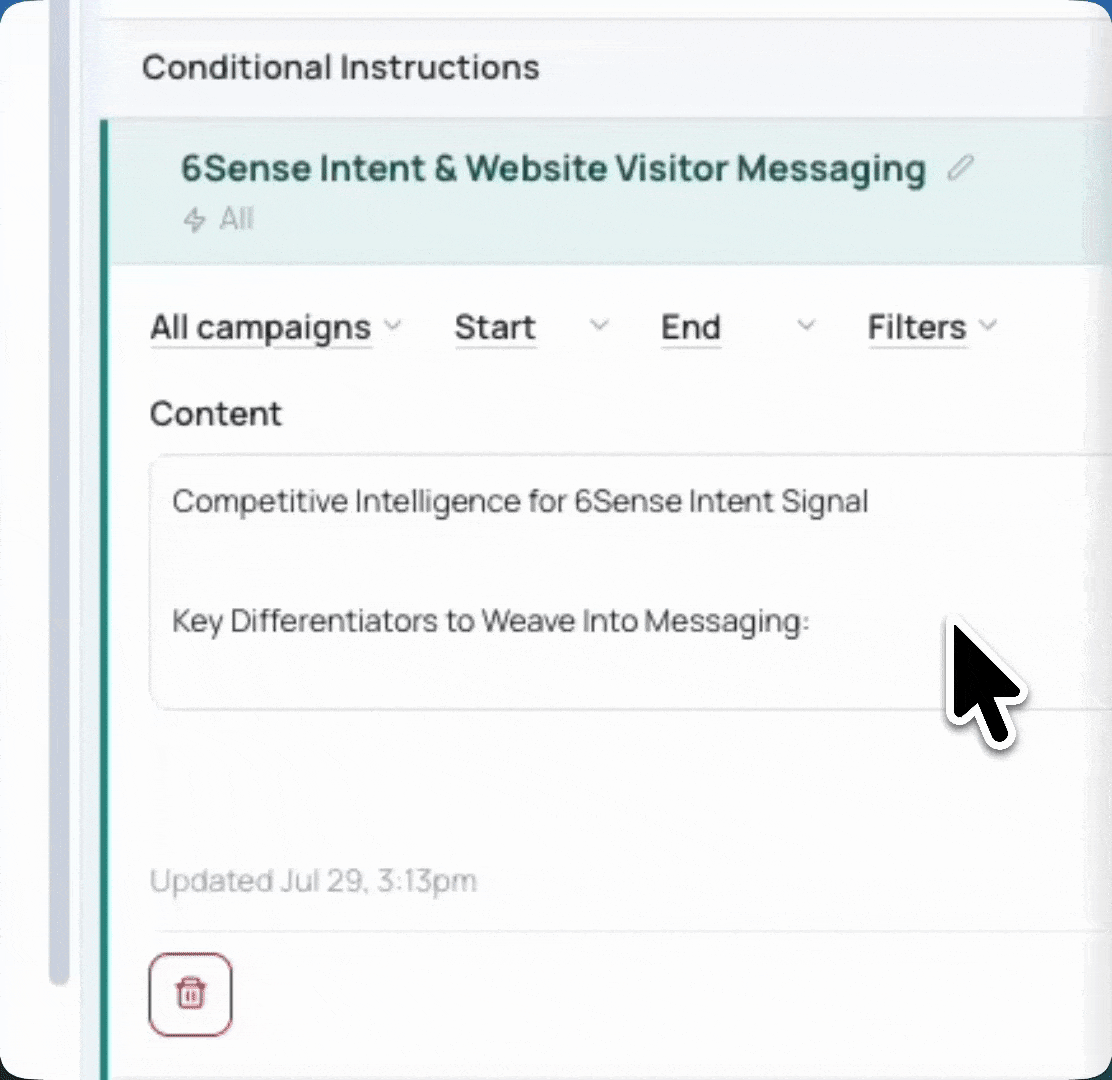
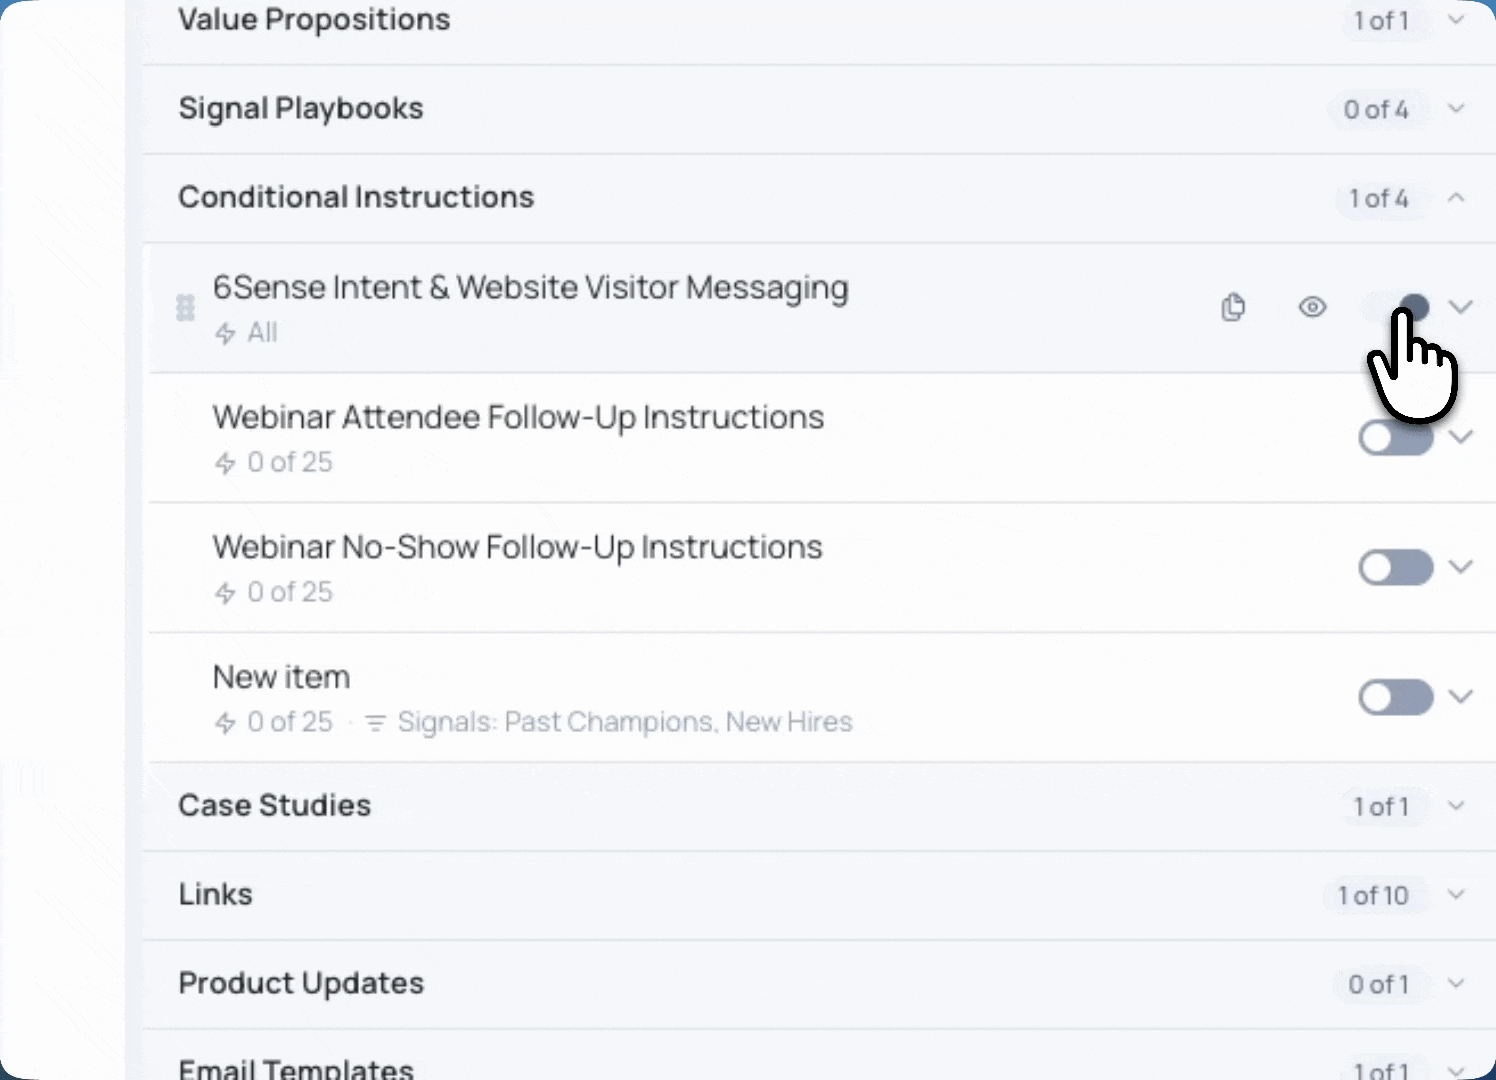
Within the campaign level you can see all content and easily toggle on/off global instructions. Notice in the example below: when we toggled this content OFF, the status on the left changes from “ALL” to “24 of 25” campaigns.
Save & preview
You can either Save (which keeps the content but does not activate it) or Save and preview to check out a live preview of how your content looks.
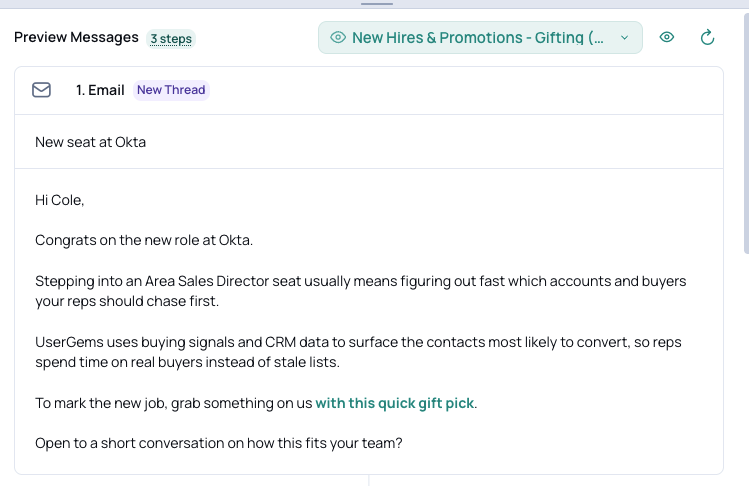
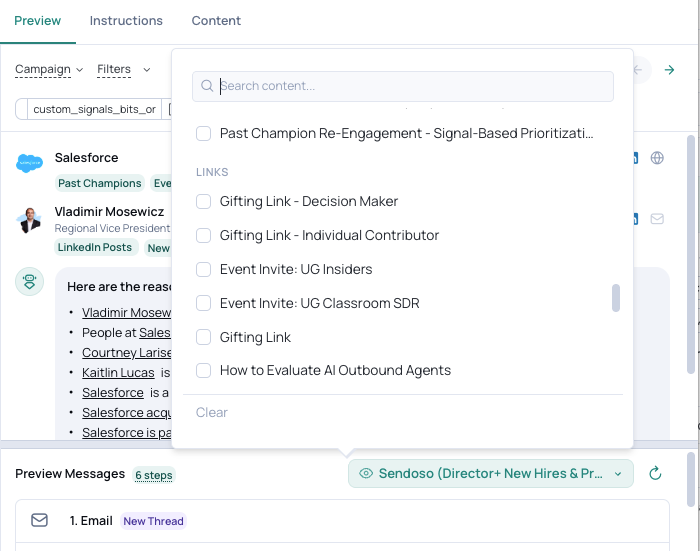
Your content will auto-select once you hit Save & Preview — here you can review your messaging and choose from a pick list if you’d like to see how this content looks with others in your library.
Need some inspiration?
Here are a few ideas on how to chat with Gem-E:
- “Make the tone friendlier”
- “Use 2–3 word subject lines”
- “Only use open ended questions”
- “Never ask for a meeting directly, only use interest based CTAs”
- “Change the language to Spanish”
- “Subject lines should never mention the organization’s name”