

New to the UserGems MCP? Start with the Getting Started guide for an overview of what it does and how it works. This article walks you through connecting it in Claude.
Before you start
Check your Claude plan
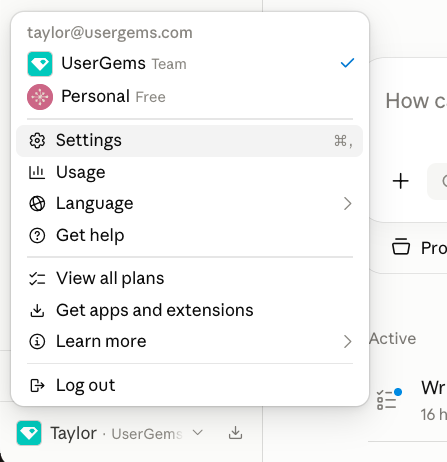
Not sure which plan you’re on? Click your name (bottom-left) → Settings. Your plan is listed at the top.
Set up your MCP
One-time setup. Takes about 60 seconds.
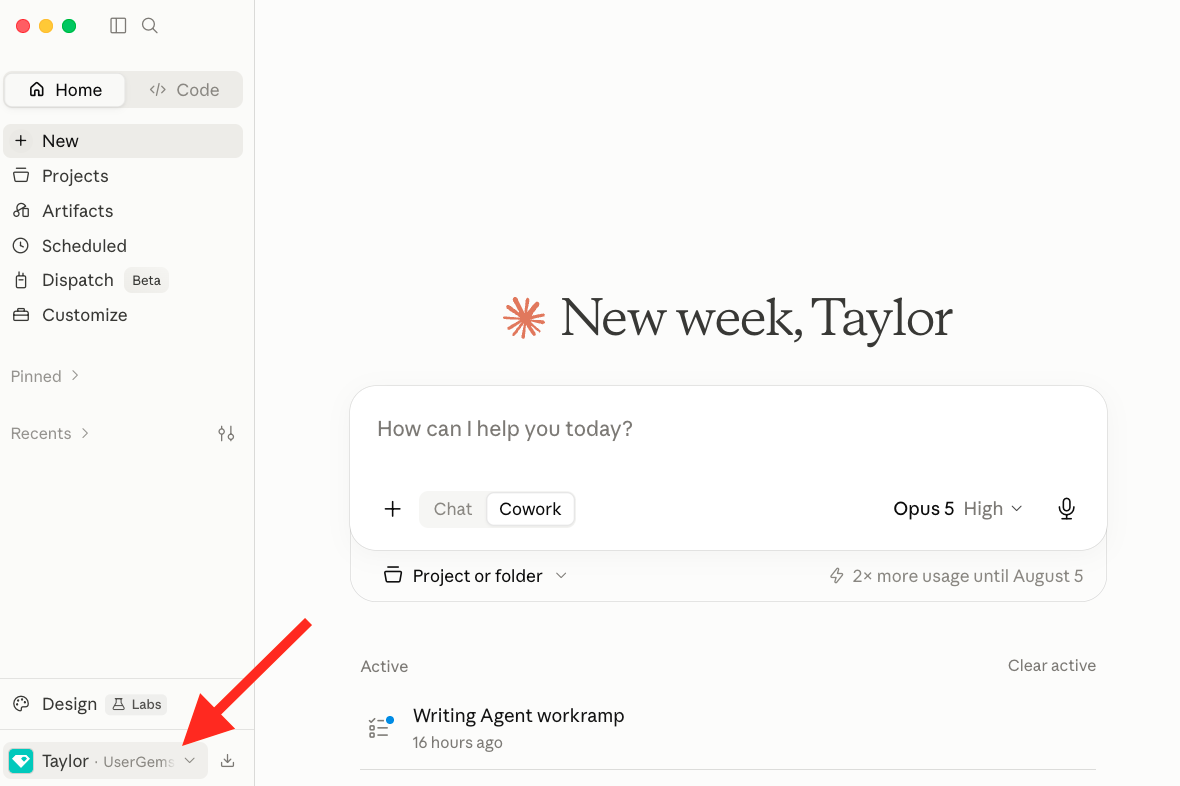
Step 1 — Open Claude Desktop and confirm you’re logged in
You should land on the home screen with the chat composer in the middle. Your name appears in the bottom-left corner of the sidebar when you’re logged in.
Step 2 — Open Settings
Click your name in the bottom-left to open the profile menu, then click Settings.
Step 3 — Go to Connectors
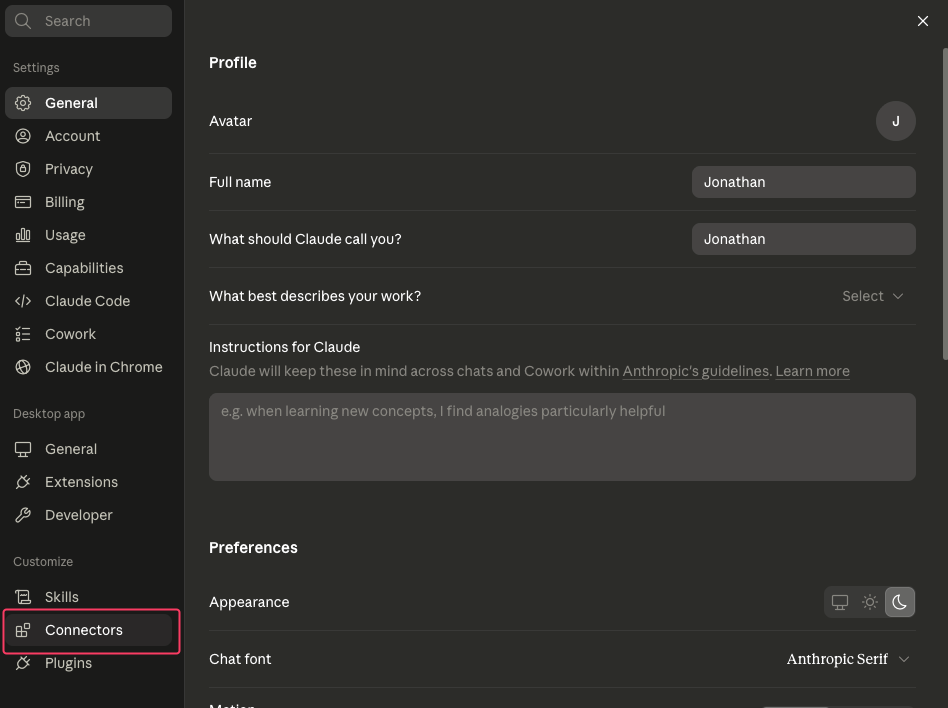
The Settings panel opens on General. In the left sidebar, scroll to the Customize section and click Connectors.
Step 4 — Add UserGems as a custom connector
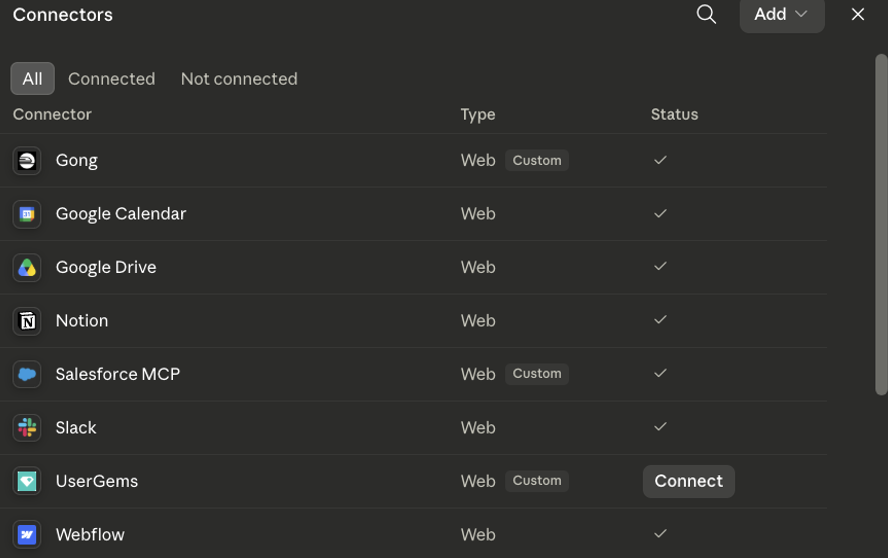
Click the Add button in the top-right of the Connectors panel, choose Add custom connector, and paste this URL:
https://mcp.usergems.comMake sure you’re logged in to UserGems in your browser first. The connector authorizes against your active UserGems session.
If you do not see an option to add a custom connector, this means a Claude Admin is required to set this up (send them this article for assistance).
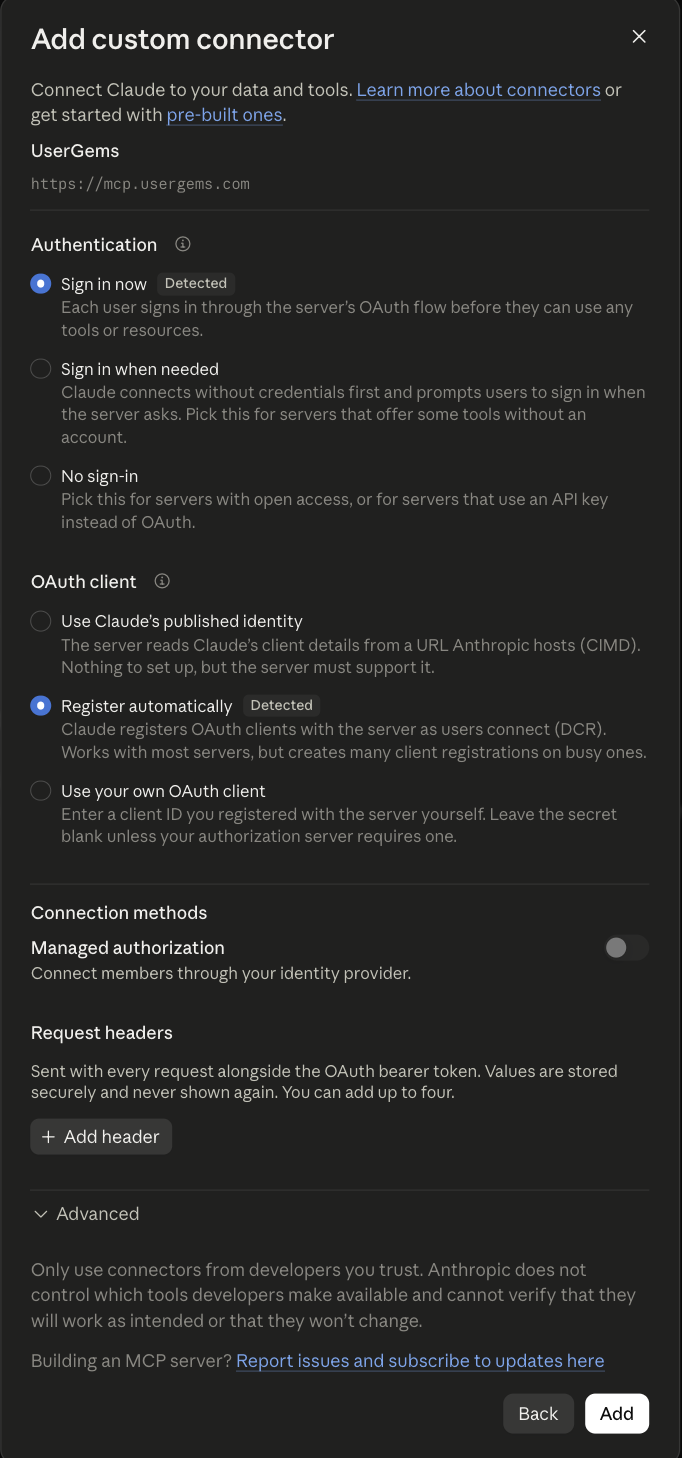
Step 5 — Review the connection settings
After you paste the server URL, Claude shows a screen of auto-detected connection settings. Confirm these before continuing:
Step 6 — Authorize
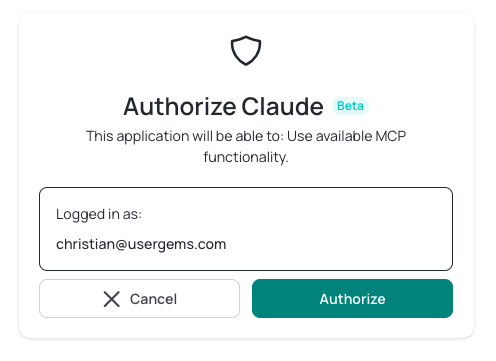
Click Connect. You’ll be redirected to UserGems’ authorization page, which shows “Authorize Claude” with your email under Logged in as.
Confirm the email is correct and click Authorize.
You’ll be redirected back, and the UserGems connector will flip to Connected.
Step 7 — Verify it works
Open a new chat and type:
What UserGems tools do you have available?
You should get back a list of UserGems tools. Once you see them, try any play from the tables below.
Start a fresh conversation after connecting. Existing chats won’t pick up the new connector.
Step 8 — Set your tool permissions to always allow
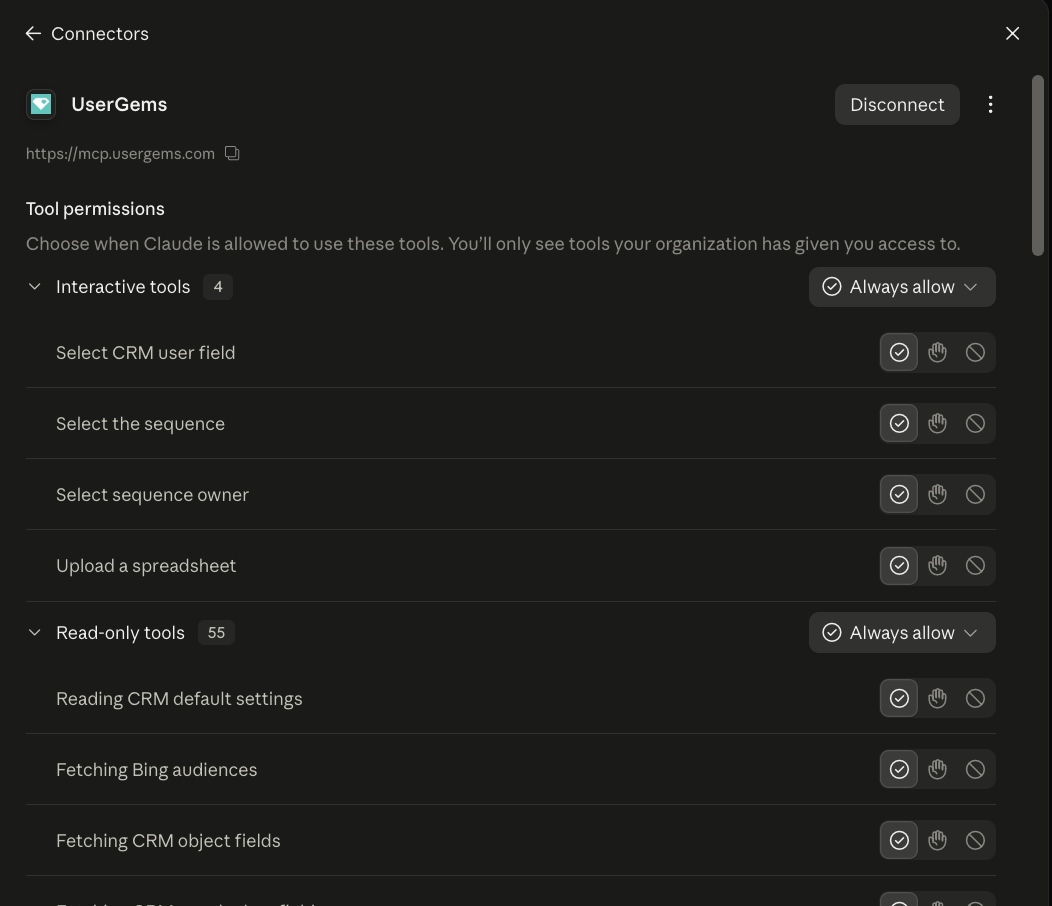
Claude asks for approval the first time it calls a UserGems tool. To stop being asked for every read-only action, go to Settings → Connectors → UserGems and set the first two tool categories to Always allow. We’d still leave write actions (campaign creation, CRM writes, sequence enrollment) on Always ask.
If you need your Claude admin to add it
Some Claude workspaces reserve connector setup for admins.
First — make sure they have UserGems access. If they don't already have an account, invite them: click your profile in the upper-right corner → Users → Invite User.
Then — send them the block below. Forward it to whoever administers your company's Claude account, usually IT or an ops lead. It takes them under a minute.
Hi — I’m setting up the UserGems MCP integration and need a custom connector added to our Claude workspace.
1. Go to Organization settings → Connectors
2. Click Add
3. Hover Custom, then select Web
4. Paste this URL:https://app.usergems.com/mcp/usergems
5. Click Add
Each person still signs in with their own UserGems login and their own permissions after this.
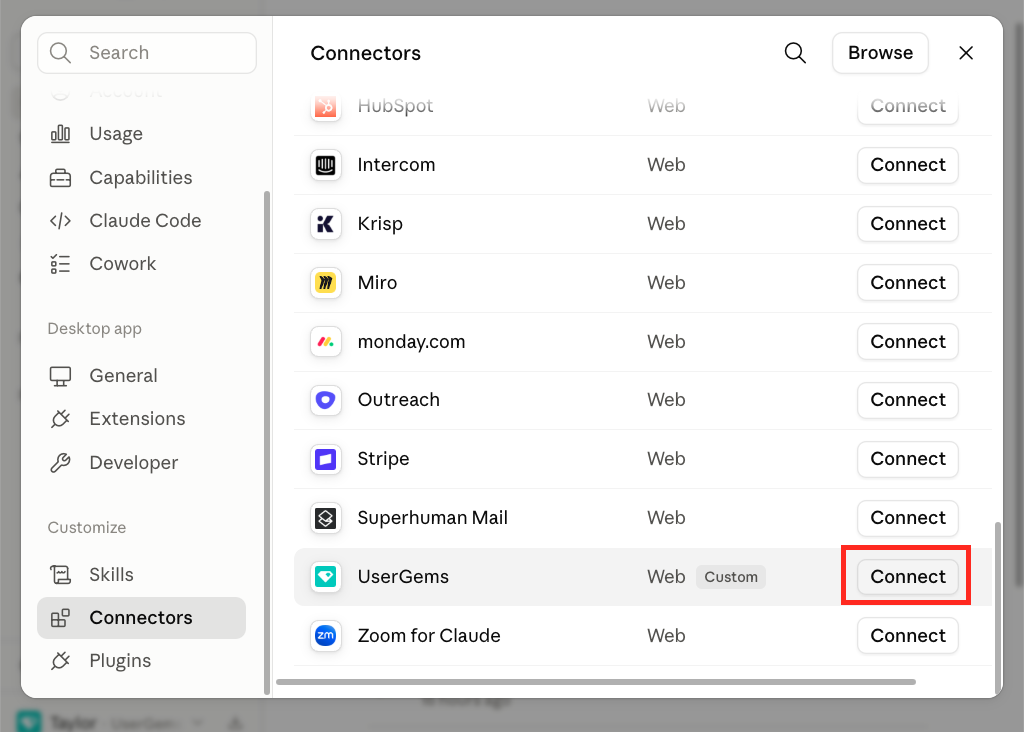
Once your admin has added it, open Settings → Connectors, find UserGems in the list, and click Connect. Then follow Step 6 above to authorize.
Permissions and approvals. The first time Claude calls a UserGems tool it asks you to approve it. Once you're connected, follow Step 8 above to set read-only tools to always allow. Matters most for write actions: campaign creation, CRM writes, sequence enrollment — we'd leave those on always ask.
How to install as a non-Claude admin
Once your Claude admin has added UserGems as a connector for your organization, you don't need to add it again — you just need to connect it for yourself.
Step 1 — Open Settings → Connectors
Click your name in the bottom-left → Settings → Connectors.
Step 2 — Find UserGems and connect
UserGems should already be listed. Click Connect next to it.
If you don't see it listed, your admin hasn't added it yet — send them the block above to get it added first.
Step 3 — Authorize, verify, and set permissions
Follow Step 6, Step 7, and Step 8 above to finish connecting, confirm it's working, and set your tool permissions.
Step 3 — Check out best practices
Review our prompt library here for copy/paste prompts to get you started with the UserGems MCP.
What you can do today
Everything in this section is live and available to you right now, running against your own UserGems workspace and your own CRM data.
For reps
For admins
Three prompts worth trying in your first session:
- “Give me the full picture on [account] — buying stage, signals, and who I should reach.”
- “Show me all campaigns using contact-level intent and how many records each is hitting.”
- “Build me an audience of accounts in [segment] with [signal] and tell me how many match.”
For a full list, check out this page here.
How to give us feedback
Rate a session within Claude
At the end of any session where the MCP did something — created a campaign, sized an audience, drafted an email, ran research — type one of these:
Rate this session with UserGemsGive UserGems feedback on this session
From there you can provide your feedback to us directly in Claude.
Coming soon
For a full list of what’s coming next, check out this page here.