
This article is for existing UserGems customers using the legacy managed package. New customers who started with UserGems as of ~February 2025 should refer to this Salesforce implementation guide instead.
Introduction & Background
Thank you for your interest in UserGems! This guide will take you through the configuration of UserGems Contact Tracking, our flagship Job Change product, and how it can integrate with your Salesforce instance.
You will be partnered with a dedicated Customer Success Manager and a Salesforce-certified RevOps resource for the duration of your contract. For this implementation, you can expect a smooth and fully supported onboarding experience where we will cover everything in the guide below and more, including:
- Installing the UserGems Managed Package & Connecting your Salesforce
- Job Change Input Reports: creating and connecting dynamic Salesforce reports of segmented high-value Leads/Contacts you'd like to track for job changes
- Job Change Output Configuration: what should happen in your Salesforce when UserGems identifies a job change (e.g. Lead/Contact/Account creation, field mapping, campaigns)
- Routing & Sales/Marketing Handoff: how we can make sure that the high-value job changes that UserGems delivers make it to your reps, into sequences, or into a marketing campaign.
- Testing & QA
- Full team training run by UserGems (or we can train-the-trainer)
- Go-live & ongoing program management
Step 1 - Install the UserGems <> Salesforce Managed Package
The latest version of the UserGems/Salesforce integration is an unlisted managed package that is installed via the Salesforce AppExchange using one of the links below.
Please note that while you can install UserGems in your Salesforce sandbox, UserGems does not offer a trial, and no data will be sent into your sandbox until you become a customer. Most UserGems customers choose to skip the sandbox stage and implement directly to production given the lower risk profile of our product (UserGems never overwrites your data).
When prompted, it's highly recommended that you "Install for All Users"!
If you do not grant access to All Users, then you must select allprofiles that might include end users who need to view and modify the Leads & Contacts that UserGems creates.
- SFDC Production Managed Package: www.usergems.com/sfdcapp
- SFDC Sandbox Managed Package: www.usergems.com/sfdcsandbox
Also See: A full list of components included in the UserGems Managed Package.
Step 2 - Select or Create an Integration User for UserGems
You can either select an existing Salesforce User or create a new dedicated Salesforce Integration User for UserGems.
Also See:How Many API Calls Does UserGems Use?
Step 3 - Connect your Salesforce Integration User
Your CSM will provide the sign-up links for you to access the UserGems application for both yourself and the Salesforce integration user. All UserGems plans include unlimited Users.
To connect your Salesforce Integration User: first, login into Salesforce as your integration user (we suggest using an Incognito window so that there is only one active Salesforce session in your browser). Please note that:
- You cannot use the "Login As" feature to impersonate a user; you need to actually login as the integration user.
- You can connect an integration user that has SSO, 2FA, or is API Only. If the User is API only, you will see an error related to that when you login, but you will still be able to successfully authorize UserGems once your session is active.
Then, in the same browser session, follow the signup link provided by your CSM, and simply click “Sign in with Salesforce”
Once your integration user is connected to UserGems, your CSM will approve the connection and you will be notified.
Step 4 - Setup & Connect your Input Lists of People to Track
In UserGems Settings, you can map Salesforce reports of people to track for job changes (which you might have already started in a data test with us before purchasing):
Step 5 - Configure the Record Creation Behavior
We will now configure the record creation behavior within UserGems Settings for the UserGems <> Salesforce integration (we will cover these options with you on our setup call):

More details and considerations regarding these options can be found here.
Step 6 - Configure Salesforce Field Mappings
We will then configure the Salesforce field mappings in UserGems Settings based on the logic that you selected in the previous step (we will send you a simple questionnaire once you purchase and UserGems Ops will complete the initial mappings for you).
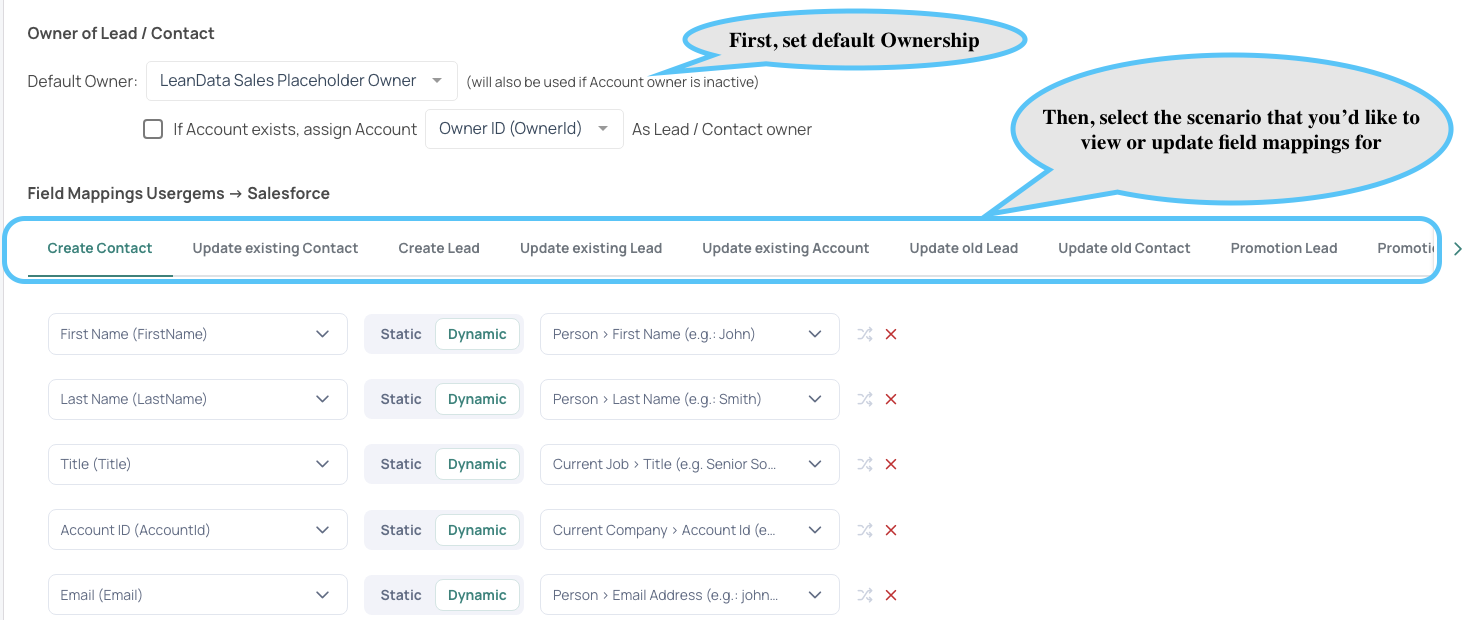
- Create Contact & Lead: when UserGems creates a net-new record for the job change
- Update Existing Contact & Lead: when UserGems identified a job change but also determined you already had a Lead or Contact representing their new job. We don't charge a job change credit, but offer free enrichment.
- UpdateOld Contact & Lead: when UserGems detects that someone has changed jobs, we can update the old record (the one that was in your input report of people to track) as no longer at the company, including setting any of your own custom fields.
Step 7 - Lead Mapping Screen, Page Layouts, & Testing
Lead Mapping Screen: if you configured UserGems to create Leads, please map the fields starting with "UG" on the Salesforce Lead > Contact Mapping Screen.
Page Layouts: rather than creating a new section on the Lead/contact Page Layout, most UserGems customers choose to configure the UserGems Dynamic Lightning Components which show up front and center contextually only if the record has job change data.
Testing: once UserGems is connected and configured, your CSM will be able to send over a specified number of test records (typically 5 or 10) into your Salesforce so that you can review the data and field mappings before we send a larger batch.
- To review test records that have been sent, go to the App Launcher in the top-left of Salesforce and type in "UserGems." Then switch the view from "Recently" to "All".